メインコンテンツにスキップ

How to Clean and Adjust Direct-Pull Cantilever V Brakes

必要な工具と部品

  1. How to Clean and Adjust Direct-Pull Cantilever V Brakes, How to Clean and Adjust Direct-Pull Cantilever V Brakes: 手順 1、 3の画像 1 How to Clean and Adjust Direct-Pull Cantilever V Brakes, How to Clean and Adjust Direct-Pull Cantilever V Brakes: 手順 1、 3の画像 2 How to Clean and Adjust Direct-Pull Cantilever V Brakes, How to Clean and Adjust Direct-Pull Cantilever V Brakes: 手順 1、 3の画像 3
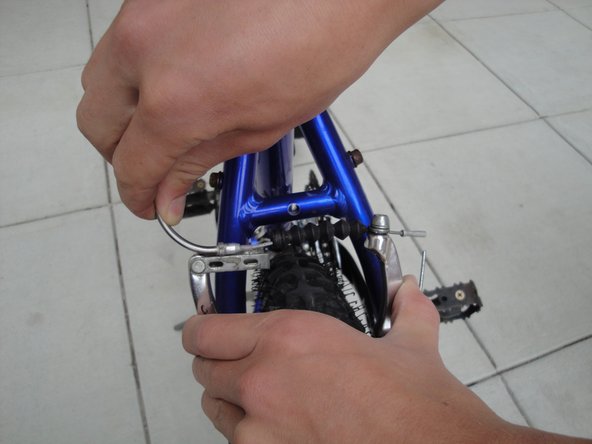
    • Squeeze the calipers together, and remove the brake cable.

  2. How to Clean and Adjust Direct-Pull Cantilever V Brakes: 手順 2、 3の画像 1 How to Clean and Adjust Direct-Pull Cantilever V Brakes: 手順 2、 3の画像 2 How to Clean and Adjust Direct-Pull Cantilever V Brakes: 手順 2、 3の画像 3
    • Loosen the brake caliper bolt, and remove the brake caliper.

  3. How to Clean and Adjust Direct-Pull Cantilever V Brakes: 手順 3、 2の画像 1 How to Clean and Adjust Direct-Pull Cantilever V Brakes: 手順 3、 2の画像 2
    • Inspect the brake pad. If the pad has worn down past the “wear line”, then it needs to be replaced.

  4. How to Clean and Adjust Direct-Pull Cantilever V Brakes: 手順 4、 3の画像 1 How to Clean and Adjust Direct-Pull Cantilever V Brakes: 手順 4、 3の画像 2 How to Clean and Adjust Direct-Pull Cantilever V Brakes: 手順 4、 3の画像 3
    • Clean and lubricate the parts as necessary before reattaching the caliper arms.

    • Bolt the caliper arms back on while making sure the the pin on the back side of the caliper arm lines back up with the one of the holes in the frame. Each side should be in the same hole.

  5. How to Clean and Adjust Direct-Pull Cantilever V Brakes: 手順 5、 2の画像 1 How to Clean and Adjust Direct-Pull Cantilever V Brakes: 手順 5、 2の画像 2
    • Reattach the brake cable to the calipers.

  6. How to Clean and Adjust Direct-Pull Cantilever V Brakes: 手順 6、 2の画像 1 How to Clean and Adjust Direct-Pull Cantilever V Brakes: 手順 6、 2の画像 2
    • Loosen the brake pad bolt.

  7. How to Clean and Adjust Direct-Pull Cantilever V Brakes: 手順 7、 2の画像 1 How to Clean and Adjust Direct-Pull Cantilever V Brakes: 手順 7、 2の画像 2
    • Get an ordinary piece of paper, and fold it twice over.

    • Place the sheet of paper between the brake pad and the rim in the position shown.

    What's the reason of doing this? Is it to keep 1 or 2 mm gap between the pad and rim or to 'toe-in' the break bad?

    Seamuzzaman Nahid - 返信

    Helps to prevent brake chatter by feathering in the pads to the rim.

    R I - 返信

    Is this some kind of spacer? I saw other (video) using credit card.

    Edwin Icogo - 返信

  8. How to Clean and Adjust Direct-Pull Cantilever V Brakes: 手順 8、 3の画像 1 How to Clean and Adjust Direct-Pull Cantilever V Brakes: 手順 8、 3の画像 2 How to Clean and Adjust Direct-Pull Cantilever V Brakes: 手順 8、 3の画像 3
    • Align the brake pad so that it is flush with the rim, with no part touching the rubber of the tire.

    • Have somebody clamp down very tightly on the brakes.

    • Tighten the brake pad bolt in place.

    The brake lever could also be held down with a cable tie, velcro strap, or a strong elastic band

    R I - 返信

    An old toe clip strap works also

    John Pesackis - 返信

    What happened to the folded paper?

    Edwin Icogo - 返信

    Ok ok I saw it in 3rd pics. :)

    Edwin Icogo -

  9. How to Clean and Adjust Direct-Pull Cantilever V Brakes: 手順 9、 3の画像 1 How to Clean and Adjust Direct-Pull Cantilever V Brakes: 手順 9、 3の画像 2 How to Clean and Adjust Direct-Pull Cantilever V Brakes: 手順 9、 3の画像 3
    • Tighten/loosen the tension adjustment screws on each the caliper arm to adjust the resting distance of each brake pad, so that each pad is equally distant from the rim. Tightening the screw will shift the caliper outward from the bike, loosening it will shift it inward.

    • Tighten/loosen the brake adjuster on the handle bars such that when you clamp down on the brakes, the brake lever stops before hitting the handle bar. This will set the distance between the brake pads and the rim.

    • Tighten the lock nut on the brake adjuster to permanently set its position.

    Very good!,Was wondering about some small details . This clered it out. Thx

    Tim Brumen - 返信

    I'll do this and will report back.

    Edwin Icogo - 返信

    In Deutschland werden diese Bremsen nicht als Cantilever Bremsen bezeichnet, sondern als V-Brakes.

    timo_a - 返信

ゴール

49 の人々がこのガイドを完成させました。

作成者

10人の作成者と共同で作成されました。

Travis Tonder

メンバー登録日: 10/05/10

3,175 ポイント

4のガイドは作成済み

チーム

Cal Poly, Team 5-13, Maness Fall 2010 Cal Poly, Team 5-13, Maness Fall 2010人のメンバー

CPSU-MANESS-F10S5G13

4 メンバー

17のガイドは作成済み

4 件のコメント

“what does it mean if the point is red???? “

I believe that is indicating that this step corresponds to an image which highlights a specific step. I saw this two times, in step 4 and step 9. For step 4, it shows the highlight in the second image and for step 9, the highlight is in the first image. It seems that the red bullet point is just to make it easier to map the step to the image.

Hope this helps

Tony - 返信

where did you get the brake arms from?

I am looking for full metal ones like that,

Ahmed Varnham - 返信

In Deutschland werden diese Bremsen nicht als Cantilever Bremsen bezeichnet, sondern als V-Brakes.

timo_a - 返信

If your brakes still feel off, you can make further adjustments using the barrel adjuster or by fine-tuning the cable tension at the anchor bolt.

Bruno John - 返信

コメントを追加

統計データ:

過去 24時間: 11

過去 7 日: 61

過去 30 日: 245

今までの合計 113,496