この翻訳は、ソースガイドの最新の更新を反映していない可能性があります。 翻訳の更新に協力してください。 または ソースガイドを参照してください。
はじめに
外付けハードディスクドライブのシャッキングは、外付けエンクロージャを分解し、中のハードディスクドライブを採取することです。そこから、自宅のサーバーやNAS、PCでドライブを使用することができます。この手順では、筐体を残したままハードディスク・ドライブを取り外す方法を説明します。
外付けハードディスク・ドライブのシャックアウトは、より良い価格で多くのストレージを入手するための素晴らしい方法です。多くの外付ハードディスク・ドライブにはサーバ・グレードのハードディスク・ドライブが使用されていますが、外付エンクロージャを使用せずに単体で購入すると、価格が2倍近くになってしまいます。
このガイドでは、Western DigitalのWD Elements 12TB外付ハードドライブ、モデルWDBWLG0120HBK-NESNをシャックすることを実演しますが、手順はすべてのWD Elements 3.5インチ外付ドライブに適用することができます。
注意:'' シャックする前に、必ず外付ドライブを起動し、HD Tune Pro または Stablebit Scanner などのプログラムを使用して不良セクタのディープスキャンを実行してください。何らかのエラーが検出された場合は、ドライブを小売店またはメーカーに返品してください。
必要な工具と部品
-
-
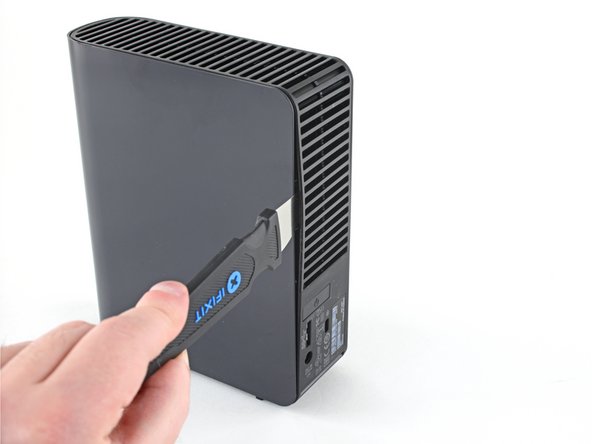
外部エンクロージャーカバーは、内側から4つのプラスチッククリップでベントフレームに取り付けられています。次のステップに進む前に、その位置をメモしておいてください。
-
-
-
この手順は未翻訳です。 翻訳を手伝う。
-
Use your hands to push on the four rubber blocks in the corners to unseat the hard drive from the frame.
Wtf. How? This doesn’t work.
Ok, got it, but these directions are terrible. You don’t want to push the blocks out, like the illustration and directions say, because they literally can’t be pushed out. They need to be lifted up while the plastic shell is manipulated until the drive is loosened.
Thanks, Feddy!
-


筐体および付属の部品やネジ類は、保証期間が終了するまで必ず保管してください。その後、R2またはe-Stewards認定リサイクル業者に持ち込んでください。また、r/DataHoarderの人たちに再利用のために提供することもできます。
ドライブとエンクロージャを再組み立てするには、以下の手順に従います(逆順)。
筐体および付属の部品やネジ類は、保証期間が終了するまで必ず保管してください。その後、R2またはe-Stewards認定リサイクル業者に持ち込んでください。また、r/DataHoarderの人たちに再利用のために提供することもできます。
ドライブとエンクロージャを再組み立てするには、以下の手順に従います(逆順)。
52 の人々がこのガイドを完成させました。
以下の翻訳者の皆さんにお礼を申し上げます:
18%

これらの翻訳者の方々は世界を修理する私たちのサポートをしてくれています。 あなたも貢献してみませんか?
翻訳を始める ›

15 件のコメント
I have a question. Is it possible to take a similar drive but smaller capacity like this about and turn it into a portable drive from it having to have a power supply?
It is not possible. The problem is that a 3.5” disk drive (as used in the Elements drive) needs 12 V as well as 5 V, and they need more power than a USB socket can typically deliver. 2.5” disk drives operate from just a 5 V supply, and, having smaller disks inside, they use less power to start up, so they can be run completely through USB.
Hi Craig! My PC sees it as Local Disc (E:) and wants to format it. Can’t do that! Is there a workaround? This was due to a power surge and I think it was just the adaptor power supply that got damaged. Running W10Home21H1 on Lenovo DESKTOP-699CIMO. Intel(R) Core(TM) i7-4790 CPU @ 3.60GHz 3.60 GHz 16,0GB 64bits Any ideas would be greatly appreciated! Cheers, Marco
On Step 14, you see there are no screws to take the HDD cover off. How do you take the cover off the HDD to get inside?
lol + other characters to allow comment
I have a WD element 4T and it will not power up. New cable and power adapter. It was stabilized in one spot for over a year, powered up just to store my movies. Plug it up after two weeks of none use and would not power up, no light inside. What can be done? My other storage drives work fine. By the way, you have the best directions on the web.
Tim Newton - 返信
I just wrote you about WD Element, it is a 5.0TB Sata/64MB Cache, WD50EZRZ
WDBlue PC Hard Drive. It will not power up. I wonder if I can get a new USB controller board for it? I am only interested in getting information off of the hard drive. Can an "WEme USB 3.0 to SATA Converter Adapter for 2.5 3.5 Inch Hard Drive Disk SSD HDD" work to power it up to retrieve the Data?
Tim Newton - 返信
Hey Tim, yeah so if you already tried a new power adapter, then it could be a bad controller board. If the drive is already shucked (or you don't mind shucking it), then you can get a SATA to USB adapter to see if the drive will boot up. That will at least rule out the USB controller board.
Very informative explenation wih clear pictures that show EXACLY in which direction to move the tool to safely detach the casing from the clips without breaking them, much better than most YouTube video's.
Only, I've used two old bank cards. That is i.m.o. much safer than using a metal knife or "Jimmy". With two plastic credit- or bank cards or two guitar picks it's almost impossible to damage the case.
Thank you for the guide!
I found that I had a 3 TB Toshiba hdd lying around which I put in one of WD Elements enclosures I was about to recycle. Now I have a fully stacked NAS as well as an external hdd :)
And I'm keeping a controller board + wall wart to be used as simple usb-to-sata device.
Hi.
Is possible on this box, change the HDD. For example. I have WD Elements to 4Tb and have another ( Seagate ) 12Tb and I thinking to change the HDD 4Tb for 12Tb using the same case.
Is possible?
Thanks a lot
Did it successfully with fairly limited experience of taking electronics apart (other than joycons a few times), didn't even break any clips. Worked fine for me installing it in a PC without taping over anything.
Can I remove the drive and install in a new enclosure? My WD 8tb no longer mounts on my mac. I think it's probably the usb port or whatever communicates with the port.
Jim Fields - 返信