メインコンテンツにスキップ

How to Replace a Guitar Nut

必要な工具と部品

  1. How to Replace a Guitar Nut, Guitar Nut: 手順 1、 3の画像 1 How to Replace a Guitar Nut, Guitar Nut: 手順 1、 3の画像 2 How to Replace a Guitar Nut, Guitar Nut: 手順 1、 3の画像 3
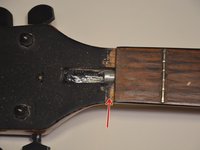
    • Use a micrometer to measure the length, width, and depth of the guitar nut.

    • Use a ruler to measure the string height compared to the first fret.

  2. How to Replace a Guitar Nut: 手順 2、 1の画像 1
    • Remove the guitar strings.

    • If your intention is to replace the guitar strings; removing the strings by cutting them will be the most efficient.

    • If you want to keep the current strings; loosening then adjusting the strings will be the most efficient.

  3. How to Replace a Guitar Nut: 手順 3、 1の画像 1
    • Use a sharp knife to cut the glue from the edges of the guitar nut.

  4. How to Replace a Guitar Nut: 手順 4、 2の画像 1 How to Replace a Guitar Nut: 手順 4、 2の画像 2
    • Remove the original nut by striking it with a hammer or mallet.

    • Before knocking the nut out of its slot, make sure it was scored properly.

    • Inspect the location where the nut was removed. Use sandpaper to flatten the location if necessary.

  5. How to Replace a Guitar Nut: 手順 5、 2の画像 1 How to Replace a Guitar Nut: 手順 5、 2の画像 2
    • Sand the replacement nut, make the measurements identical to the original.

    • Only sand the nut a bit at a time. It's easier to work with a larger nut than a smaller one.

  6. How to Replace a Guitar Nut: 手順 6、 3の画像 1 How to Replace a Guitar Nut: 手順 6、 3の画像 2 How to Replace a Guitar Nut: 手順 6、 3の画像 3
    • Use a pencil to put graphite in the slots of the nut.

  7. How to Replace a Guitar Nut: 手順 7、 1の画像 1
    • Place the replacement nut onto the guitar.

    • Restring your guitar or move the strings back into place.

    • Do not glue the nut into place.

    • This step is to verify the measurements of the replacement nut.

  8. How to Replace a Guitar Nut: 手順 8、 1の画像 1
    • Verify the string height

    • String height is where precision is key. Make sure it is the EXACT height required.

    • Remove the strings before proceeding to the next step.

  9. How to Replace a Guitar Nut: 手順 9、 2の画像 1 How to Replace a Guitar Nut: 手順 9、 2の画像 2
    • Using watered-down wood glue, glue the nut onto the guitar.

    • Use a small amount of wood glue.

    • Placing glue on the guitar nut itself is easier than placing glue directly on the guitar.

  10. How to Replace a Guitar Nut: 手順 10、 1の画像 1
    • Restring your guitar or move the strings back into place. Tighten the string immediately afterwards to secure the nut.

終わりに

Make sure the strings are tuned and the nut is in its proper place before claiming to be finished. It is important that the guitar nut becomes glued to the guitar properly. Be certain that the guitar nut is in place before, during, and after tuning the guitar.

作成者

1人の作成者と共同作成されました。

Danylo Gula

メンバー登録日: 01/10/22

181 ポイント

1ガイドが承認済み

チーム

York University, Team 2-9, O'Regan Winter 2022 York University, Team 2-9, O'Regan Winter 2022人のメンバー

YORK-O'REGAN-W22S2G9

1 メンバー

1のガイドは作成済み

0 件のコメント

コメントを追加

統計データ:

過去 24時間: 3

過去 7 日: 36

過去 30 日: 110

今までの合計 3,553