メインコンテンツにスキップ

How to Replace a Button with a Sewing Machine

必要な工具と部品

  1. How to Replace a Button with a Sewing Machine, Clothing Button: 手順 1、 1の画像 1
    • Attach an open toed presser foot to your machine.

  2. How to Replace a Button with a Sewing Machine: 手順 2、 1の画像 1
    • Thread your sewing machine with the proper colored thread.

  3. How to Replace a Button with a Sewing Machine: 手順 3、 1の画像 1
    • Set your machine to a zig-zag stitch setting.

    • Adjust the stitch length to zero.

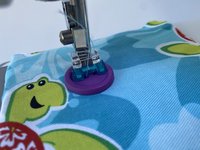
  4. How to Replace a Button with a Sewing Machine: 手順 4、 2の画像 1 How to Replace a Button with a Sewing Machine: 手順 4、 2の画像 2
    • Place the button under the presser foot and manually lower the needle to make sure that it is lined up with the first hole on the right.

    • Continue manually turning the needle to make sure that it clears the second hole on the left.

    • If the second hole is not lined up, adjust the stitch width accordingly.

  5. How to Replace a Button with a Sewing Machine: 手順 5、 1の画像 1
    • Begin pushing on the foot pedal.

    • If the button has two holes, make about 10 stitches, or until the button is securely fastened.

    • If the button has four holes, sew diagonally about 5 stitches, pivot, and repeat on the opposite diagonal, forming an X.

  6. How to Replace a Button with a Sewing Machine: 手順 6、 1の画像 1
    • Remove the finished garment from under the presser foot by clipping and leaving about 4 inches of excess thread.

  7. How to Replace a Button with a Sewing Machine: 手順 7、 1の画像 1
    • Pull the top threads to the back of the garment.

    • Accomplish this by tugging on the bottom of the bobbin thread, forming a loop.

    • Using either your seam ripper or scissors, place the tip in the middle of the loop and pull it through. All four threads should be on the back of the garment.

  8. How to Replace a Button with a Sewing Machine: 手順 8、 1の画像 1
    • Secure the button by tying the four threads together with a knot.

    • Clip the threads close to the knot.

  9. How to Replace a Button with a Sewing Machine: 手順 9、 1の画像 1
    • The button is now finished and ready to be used.

終わりに

After following these steps, your garment will now be fixed.

作成者

2人の作成者と共同で作成されました。

Jackson Williams

メンバー登録日: 09/19/22

169 ポイント

1ガイドが承認済み

チーム

University of Memphis, Team 2-50, Cameron Fall 2022 University of Memphis, Team 2-50, Cameron Fall 2022人のメンバー

UM-CAMERON-F22S2G50

2 メンバー

2のガイドは作成済み

0 件のコメント

コメントを追加

統計データ:

過去 24時間: 1

過去 7 日: 5

過去 30 日: 22

今までの合計 568