メインコンテンツにスキップ

How to Repair a Broken Kitchen Faucet Pull-out Spray Head

必要な工具と部品

  1. How to Repair a Broken Kitchen Faucet Pull-out Spray Head, Kitchen Faucet Pull-out Spray Head: 手順 1、 2の画像 1 How to Repair a Broken Kitchen Faucet Pull-out Spray Head, Kitchen Faucet Pull-out Spray Head: 手順 1、 2の画像 2
    • Located underneath the sink is the water-control valve.

    • Shut off the water supply by turning the water-control valve.

    • Not all water control values are the same so some nozzles may vary.

  2. How to Repair a Broken Kitchen Faucet Pull-out Spray Head: 手順 2、 3の画像 1 How to Repair a Broken Kitchen Faucet Pull-out Spray Head: 手順 2、 3の画像 2 How to Repair a Broken Kitchen Faucet Pull-out Spray Head: 手順 2、 3の画像 3
    • Pull on the kitchen spray head nozzle to reveal the connected hose.

    • Unscrew the kitchen faucet spray head nozzle counterclockwise off of the hose assembly.

  3. How to Repair a Broken Kitchen Faucet Pull-out Spray Head: 手順 3、 2の画像 1 How to Repair a Broken Kitchen Faucet Pull-out Spray Head: 手順 3、 2の画像 2
    • Remove the rubber gasket from the hose to reveal the c-clip.

    • Remove the c-clip that is located on the pull-out sprayer connection point with a small flat head screwdriver.

    • Do not discard the gasket. It can be reused unless damaged.

  4. How to Repair a Broken Kitchen Faucet Pull-out Spray Head: 手順 4、 2の画像 1 How to Repair a Broken Kitchen Faucet Pull-out Spray Head: 手順 4、 2の画像 2
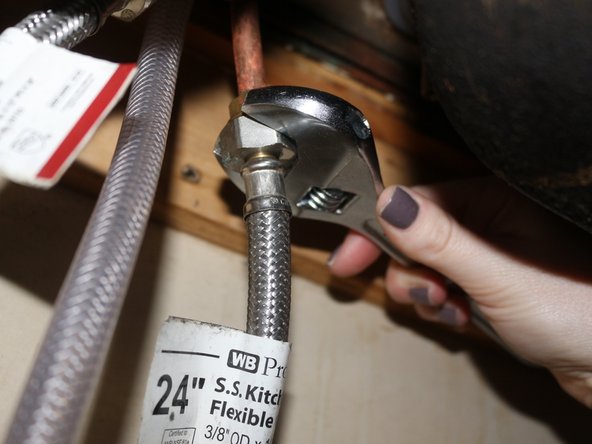
    • Pull on the sink faucet spray head from above the sink to find the main hose connection point to the water line located underneath the sink.

    • Unscrew the hose from the main faucet’s water line connection point.

    • A wrench may be necessary in order to loosen the nut.

    • Remove the hose from the sink sprayer location.

    • Connect the new hose by pressing it into the connection point. Then screw hose back on clockwise.

    • A wrench may be necessary in order to secure the end of the hose to the nut.

  5. How to Repair a Broken Kitchen Faucet Pull-out Spray Head: 手順 5、 1の画像 1
    • Apply plumber's tape to the male threads on the new sink sprayer head to avoid leakage.

終わりに

To reassemble your device, follow these instructions in reverse order.

2 の人々がこのガイドを完成させました。

作成者

3人の作成者と共同で作成されました。

Jodi Wright

メンバー登録日: 02/23/16

158 ポイント

1ガイドが承認済み

チーム

Texas Tech, Team 26-2, Rauch Spring 2016 Texas Tech, Team 26-2, Rauch Spring 2016人のメンバー

TTU-RAUCH-S16S26G2

2 メンバー

1のガイドは作成済み

0 件のコメント

コメントを追加

統計データ:

過去 24時間: 2

過去 7 日: 19

過去 30 日: 91

今までの合計 13,544