メインコンテンツにスキップ

How to Reassemble the Palm IIIc

必要な工具と部品

  1. How to Reassemble the Palm IIIc, How to Reassemble the Palm IIIc: 手順 1、 1の画像 1
    • Reinsert the screen into the case that contains the buttons.

  2. How to Reassemble the Palm IIIc: 手順 2、 1の画像 1
    • Put the Motherboard back into casing from right to left.

    • Make sure the black clips are securing the motherboard into the casing.

  3. How to Reassemble the Palm IIIc: 手順 3、 3の画像 1 How to Reassemble the Palm IIIc: 手順 3、 3の画像 2 How to Reassemble the Palm IIIc: 手順 3、 3の画像 3
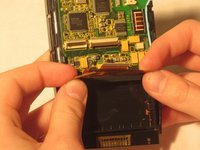
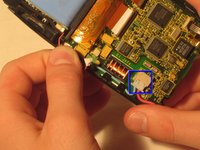
    • Secure the bottom two ZIF connectors into their slots by opening the flap and inserting the ZIF connectors.

    • Gently press down on the flap to secure the ZIF connector. This secures the screen and buttons to the motherboard.

  4. How to Reassemble the Palm IIIc: 手順 4、 2の画像 1 How to Reassemble the Palm IIIc: 手順 4、 2の画像 2
    • Connect the blue and red screen cables to the beige box they were removed from.

  5. How to Reassemble the Palm IIIc: 手順 5、 2の画像 1 How to Reassemble the Palm IIIc: 手順 5、 2の画像 2
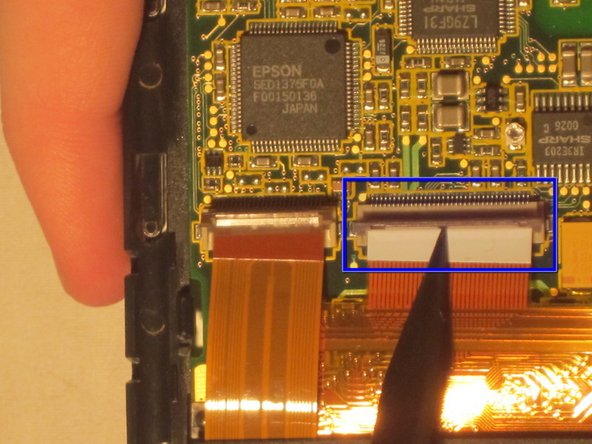
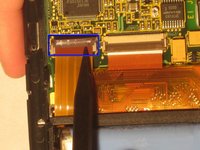
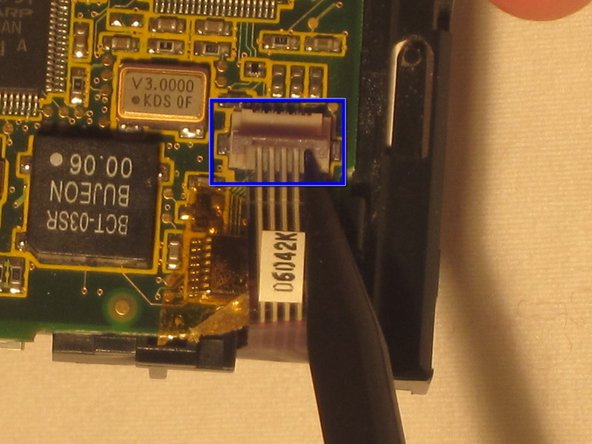
    • Open the ZIF connector box at the top of the motherboard by gently pulling up on the flap.

    • Insert the ZIF tab into the connector box.

    • Gently press down on the flap to secure the ZIF tab in place.

  6. How to Reassemble the Palm IIIc: 手順 6、 1の画像 1
    • Attach the white box on the end of the red cable connected to the battery into the connector box on the motherboard.

  7. How to Reassemble the Palm IIIc: 手順 7、 1の画像 1
    • Place the front and back covers around the casing containing the motherboard and screen.

    • Before securing the covers, place the sensor in between the front and back cover at the top of the device.

    • After the sensor is in place between the two covers, firmly secure the front and back covers.

  8. How to Reassemble the Palm IIIc: 手順 8、 1の画像 1
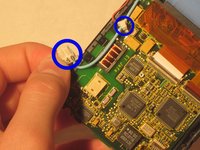
    • Replace the long screws at the top of the back case with the Philips head screwdriver.

    • Replace the short screws to the bottom of the back case using the Philips head screwdriver.

    • After the screws are in place, insert the stylus.

  9. How to Reassemble the Palm IIIc: 手順 9、 1の画像 1
    • Gently snap the flip cover back into place where it connects at the top of the Palm IIIc

ゴール

ある他の人がこのガイドを完成しました。

作成者

3人の作成者と共同で作成されました。

Angela Arthur

メンバー登録日: 02/16/12

101 ポイント

1ガイドが承認済み

チーム

Ohio State, Team 1-5, Buehl Winter 2012 Ohio State, Team 1-5, Buehl Winter 2012人のメンバー

OSU-BUEHL-W12S1G5

5 メンバー

1のガイドは作成済み

0 件のコメント

コメントを追加

統計データ:

過去 24時間: 0

過去 7 日: 1

過去 30 日: 1

今までの合計 241