必要な工具と部品
-
-
Before programming a machine, make sure you have all necessary information about the site! ''italic text''
-
To begin programming click on “kiosk2 – Shortcut”.
-
-
-
When the M3t Kiosk Setup screen opens, you will need to test the connection before you can do anything. Sometimes you might need to delete “sqlexpress” from the DB Server IP but otherwise it should be fine. DO NOT CLICK DONE OR EXIT OUT UNTIL EVERYTHING IS FINISHED!!! ''italic text''
-
It should open to the Unit tab. Fill out this page with the information you have been given. The Unit Type should be Route Kiosk and you will always need to add a check mark to the Bill Break and Ticket Redemption options and possibly the ATM option.
-
Click the save button when you're done but make absolute sure that everything is correct before you do so.
-
-
-
Going down the line, there is a Tickets tab that you can click on to bring up the Tickets menu. Here you will need to enter the location name and address. Under Ticket System, select SCIGAMES from the system drop down menu and COM1 from the COM port drop down menu and SAS address 6.
-
Make sure you click save when everything is to your liking but not before.
-
-
-
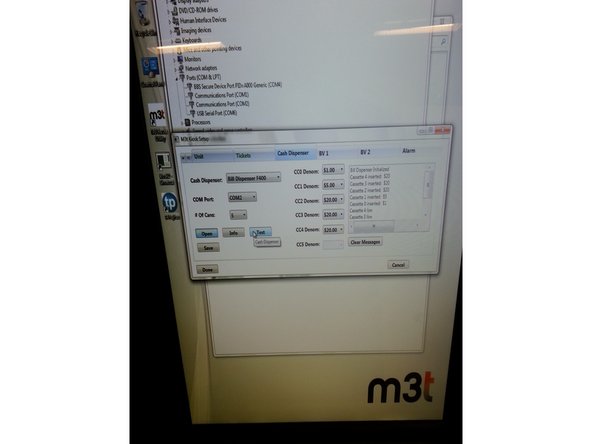
Next to that will be the Cash Dispenser tab. Under the Cash Dispenser drop down menu, click on “Bill Dispenser F400”.
-
In the COM Port drop down menu click on COM2 and select 5 from the # of Cans drop down menu.
-
The denominations should be as follows (4 will probably need to be changed after set up.)
-
CC0 Denom: $1.00
-
CC1 Denom: $5.00
-
CC2 Denom: $20.00
-
CC3 Denom: $20.00
-
CC4 Denom: $20.00
-
-
-
-
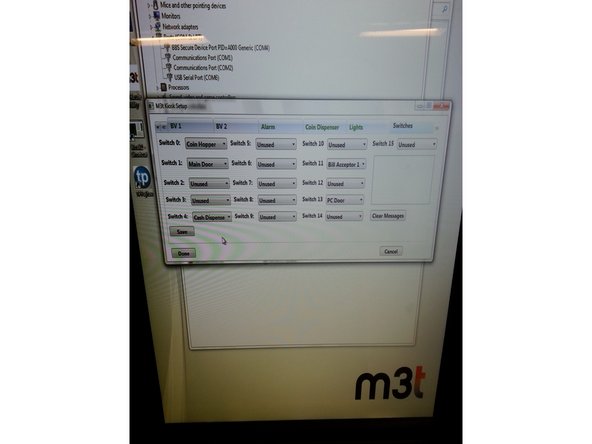
Next, click on the Alarm tab. From the Alarm Board Type dropdown menu, select Paylink IO. Then test and save.
-
-
-
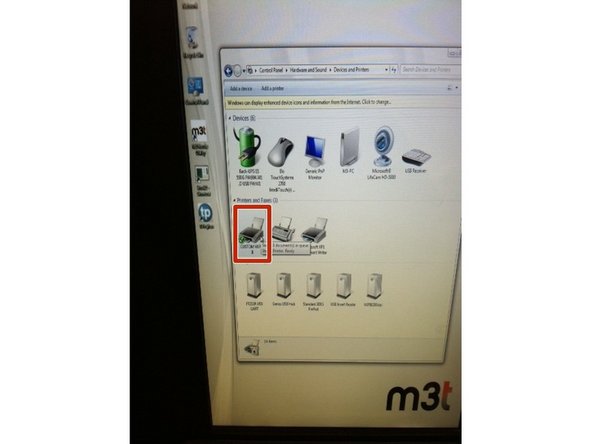
Now select the Printer tab. From the Printer drop down menu select CUSTOM VKP80 II. Then attempt to Open and Test. .
-
Sometimes this won’t work. To remedy this double click on Control Panel
-
From there, Click on Control Panel at the top of the Explorer.
-
-
-
Select Hardware and Sound.
-
Select Devices and Printers.
-
Double Click on Custom VKP80 II.
-
-
-
This will bring up the Custom VKP80 II menu. Right Click in the white space and Select Properties.
-
Under the General tab will be a button to print a test page. Once you do that, provided it works, you should be able to test and save on the printer tab.
-
-
-
Select the Coin Dispenser tab.
-
From the Type drop down menu, select Money Controls.
-
In the # of Hoppers drop down menu, select 3, and the denominations should be as follows:
-
CH1: 1
-
CH2: 5
-
CH3: 25
-
Once that is done test it and save it.
-
-
-
Under the Card Reader tab there will be a Card Reader drop down menu.
-
From there, select Magteck USB HID Reader.
-
Open, Test, and Save.
-
-
-
When you thing you’re done click Done in the bottom left of the window. Keep in mind it won’t work unless certain things are saved. This will initialize the window.
-
This will initialize the window. If something should happen and there is an error while you are programming and the window shuts down, you will not be able to continue where you left off by clicking on Kiosk2 – shortcut. Call the help desk and they will tell you what to do from there. (309)863-2200
-
Once the kiosk does initialize go through and make sure all of your devices are coming up correctly and correct any errors you may have.
-


To reassemble your device, follow these instructions in reverse order.
To reassemble your device, follow these instructions in reverse order.
ある他の人がこのガイドを完成しました。
チーム
