メインコンテンツにスキップ

このバージョンは誤った内容を含んでいる可能性があります。最新の承認済みスナップショットに切り替えてください。

必要な工具と部品

  1. この手順は未翻訳です。 翻訳を手伝う。

    : 手順 1、 1の画像 1
    • Locate and remove two 6.4mm screws on the bottom of the camera with a Phillips #00 screwdriver.

  2. この手順は未翻訳です。 翻訳を手伝う。

    : 手順 2、 1の画像 1
    • Locate the battery door.

  3. この手順は未翻訳です。 翻訳を手伝う。

    : 手順 3、 1の画像 1
    • Locate the latch on the battery door marked by the word "BATT." Use your finger to pry it open.

  4. この手順は未翻訳です。 翻訳を手伝う。

    : 手順 4、 1の画像 1
    • Remove the battery from the camera by pulling the battery door outwards.

  5. この手順は未翻訳です。 翻訳を手伝う。

    : 手順 5、 1の画像 1
    • Locate and remove three black 3.80mm screws on the back of the camera with the Phillips #00 screwdriver.

  6. この手順は未翻訳です。 翻訳を手伝う。

    : 手順 6、 2の画像 1 : 手順 6、 2の画像 2
    • Locate and remove the 6.4mm screws located on either side of the camera with a Phillips #00 screwdriver.

  7. この手順は未翻訳です。 翻訳を手伝う。

    : 手順 7、 1の画像 1
    • Locate the film door latch located on the side of the camera.

    • Insert the spudger under the latch.

    • Caution: Be careful during the following step in order to not break any parts within the camera. Prying the latch in any other direction than perpendicular may result in broken parts.

    • Pry the latch upward, applying force perpendicular to the camera.

  8. この手順は未翻訳です。 翻訳を手伝う。

    : 手順 8、 1の画像 1
    • Insert the flat edge of the spudger between the gold front casing and the black back casing.

    • Pry the spudger upward until the black back casing snaps out and is dislodged on that edge of the camera.

  9. この手順は未翻訳です。 翻訳を手伝う。

    : 手順 9、 1の画像 1
    • Squeeze the camera by placing a thumb on the tab marked CE.

    • Pull the back half of the camera firmly away from the camera body.

  10. この手順は未翻訳です。 翻訳を手伝う。

    : 手順 10、 1の画像 1
    • Locate and remove the 3.80mm screw inside the film compartment with the Phillips #00 screwdriver.

  11. この手順は未翻訳です。 翻訳を手伝う。

    : 手順 11、 2の画像 1 : 手順 11、 2の画像 2
    • Pull the front cover off of the camera by lifting the tripod tab over the tripod hole.

  12. この手順は未翻訳です。 翻訳を手伝う。

    : 手順 12、 1の画像 1
    • Locate the CHP Mode Switch.

  13. この手順は未翻訳です。 翻訳を手伝う。

    : 手順 13、 1の画像 1
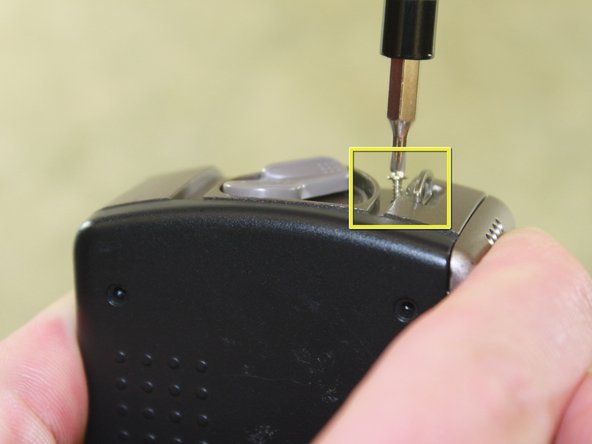
    • Remove any visible debris that may be blocking the CHP Mode Switch.

    • Using the Q-tip gently wipe away any dust, dirt or residue, in and around the switch.

    • Once you are sure the switch is clean, test it gently by sliding it back and forth between the 'C', the 'H', and the 'P'. If the switch is clean there should be very little resistance and the switch should glide smoothly from one mode to the next.

ゴール

ある他の人がこのガイドを完成しました。

作成者

7人の作成者と共同で作成されました。

Eric Nicolai

メンバー登録日: 01/10/11

679 ポイント

6のガイドは作成済み

チーム

Cal Poly, Team 13-5, Forte Winter 2011 Cal Poly, Team 13-5, Forte Winter 2011人のメンバー

CPSU-FORTE-W11S13G5

5 メンバー

11のガイドは作成済み

0 件のコメント

コメントを追加

統計データ:

過去 24時間: 2

過去 7 日: 7

過去 30 日: 15

今までの合計 2,275