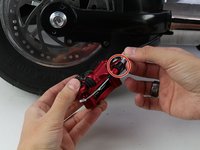
メインコンテンツにスキップ

Hover-1 XLS Brake Replacement

必要な工具と部品

  1. Hover-1 XLS Brake Replacement, Front Brake: 手順 1、 3の画像 1 Hover-1 XLS Brake Replacement, Front Brake: 手順 1、 3の画像 2 Hover-1 XLS Brake Replacement, Front Brake: 手順 1、 3の画像 3
    • Remove the two, 23 mm Hex #5 screws holding the brake to the bike.

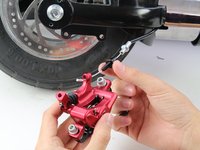
    • Slide the brake mechanism off and turn it upside down to reveal the screw holding the brake wire.

  2. Hover-1 XLS Brake Replacement: 手順 2、 1の画像 1
    • Remove the one, 14 mm Hex #4 screw pushing down the brake wire to the brake mechanism on the bottom.

  3. Hover-1 XLS Brake Replacement: 手順 3、 2の画像 1 Hover-1 XLS Brake Replacement: 手順 3、 2の画像 2
    • Remove the side screw holding the brake wire and mechanism together with your hands.

    • Slide the brake mechanism off from the brake wire.

終わりに

To reassemble your device, follow these instructions in reverse order.

ある他の人がこのガイドを完成しました。

作成者

2人の作成者と共同で作成されました。

Jonathan Hidalgo

メンバー登録日: 01/24/19

575 ポイント

5のガイドは作成済み

チーム

Cal Poly, Team S1-G2, White Winter 2019 Cal Poly, Team S1-G2, White Winter 2019人のメンバー

CPSU-WHITE-W19S1G2

3 メンバー

6のガイドは作成済み

0 件のコメント

コメントを追加

統計データ:

過去 24時間: 1

過去 7 日: 7

過去 30 日: 24

今までの合計 778