メインコンテンツにスキップ

Hover-1 Nomad LED Headlights Replacement

必要な工具と部品

  1. Hover-1 Nomad LED Headlights Replacement, Outer Shell: 手順 1、 3の画像 1 Hover-1 Nomad LED Headlights Replacement, Outer Shell: 手順 1、 3の画像 2 Hover-1 Nomad LED Headlights Replacement, Outer Shell: 手順 1、 3の画像 3
    • Break the two warranty stickers by poking a screwdriver through them or peeling them off.

    • Remove the following twenty screws by rotating the screwdriver counterclockwise:

    • Eight 16.2mm Phillips #2 screws

    • Eight 15mm Phillips #2 screws

    • Four 19.1mm Phillips #2 screws

    • The holes containing most of the screws are deep and narrow. A screwdriver with interchangable bits will not be able to reach them.

    • Do not over-tighten the screws during reassembly. Over-tightened screws can crack the plastic channels holding the shell to the frame of the hoverboard.

  2. Hover-1 Nomad LED Headlights Replacement: 手順 2、 3の画像 1 Hover-1 Nomad LED Headlights Replacement: 手順 2、 3の画像 2 Hover-1 Nomad LED Headlights Replacement: 手順 2、 3の画像 3
    • Use a nylon spudger to pry the metal handle away from the outer shell.

    • Rotate the metal handle toward the center of the hoverboard to unlock the plate from the retaining clips.

    • Lift the hoverboard off the metal handle.

    • Repeat for the handle on the other side of the hoverboard.

  3. Hover-1 Nomad LED Headlights Replacement: 手順 3、 1の画像 1
    • Lift the plastic cover on each side up and away from the device.

    • Multiple wires connect the circuit boards to the outer shell. Remove the shell gently to avoid damaging the wires or components.

  4. Hover-1 Nomad LED Headlights Replacement: 手順 4、 2の画像 1 Hover-1 Nomad LED Headlights Replacement: 手順 4、 2の画像 2
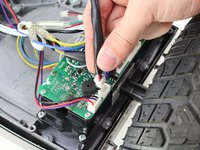
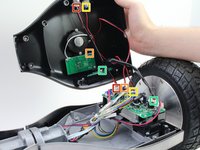
    • Disconnect the following wires by pinching the connector tabs and pulling the plugs out of the connectors:

    • Charging port wires

    • Speaker assembly wires

    • Power button wires

    • Headlight wires

    • Only the headlight wires need to be disconnected from the other circuit board.

    • Ensure the wires are connected to the correct ports on the circuit board during reassembly.

  5. Hover-1 Nomad LED Headlights Replacement, LED Headlights: 手順 5、 1の画像 1
    • Remove the two 13mm Phillips #1 screws by rotating the screwdriver counterclockwise.

    • Repeat on the other side of the hoverboard to remove the other headlight.

  6. Hover-1 Nomad LED Headlights Replacement: 手順 6、 1の画像 1
    • Pull the headlight up and off the outer shell.

    • Repeat on the other side of the hoverboard to remove the other headlight.

終わりに

To reassemble your device, follow these instructions in reverse order.

ある他の人がこのガイドを完成しました。

作成者

3人の作成者と共同で作成されました。

Samuel Frazee

メンバー登録日: 10/08/18

1,015 ポイント

7のガイドは作成済み

チーム

Cal Poly, Team S15-G1, White Fall 2018 Cal Poly, Team S15-G1, White Fall 2018人のメンバー

CPSU-WHITE-F18S15G1

4 メンバー

7のガイドは作成済み

0 件のコメント

コメントを追加

統計データ:

過去 24時間: 0

過去 7 日: 0

過去 30 日: 0

今までの合計 231