メインコンテンツにスキップ

この修理ガイドは変更されています。最新の未承認バージョンに切り替えます。

Harley-Davidson Sportster Evolution Front Brake Pad Removal Replacement

必要条件のみ
この修理ガイドは、他のガイドの前提条件として使用されます。それ自体は不完全で、単独で使用されることはありません。

必要な工具と部品

  1. Harley-Davidson Sportster Evolution Front Brake Pad Removal Replacement, Preparing the Motorcycle: 手順 1、 2の画像 1 Harley-Davidson Sportster Evolution Front Brake Pad Removal Replacement, Preparing the Motorcycle: 手順 1、 2の画像 2
    • For the best access to the brake pads, we recommend securing the motorcycle in an upright position.

    • If you do not have a motorcycle lift, you will still be able change the brake pads, but it is still a good idea to secure the front wheel in place.

    • Be sure to allow time for the brake pads to cool completely before working on them. It may take ten to twenty minutes, especially if the motorcycle has just been ridden.

  2. Harley-Davidson Sportster Evolution Front Brake Pad Removal Replacement: 手順 2、 1の画像 1
    • Allowing the brake assembly to dangle from the brake lines can cause damage to the line.

    • Hang the caliper on a metal hanger attached to the handlebars or headlights.

  3. Harley-Davidson Sportster Evolution Front Brake Pad Removal Replacement, Removing the old brake pads: 手順 3、 3の画像 1 Harley-Davidson Sportster Evolution Front Brake Pad Removal Replacement, Removing the old brake pads: 手順 3、 3の画像 2 Harley-Davidson Sportster Evolution Front Brake Pad Removal Replacement, Removing the old brake pads: 手順 3、 3の画像 3
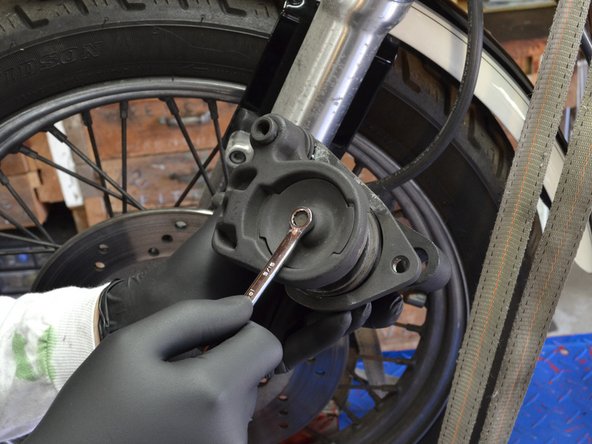
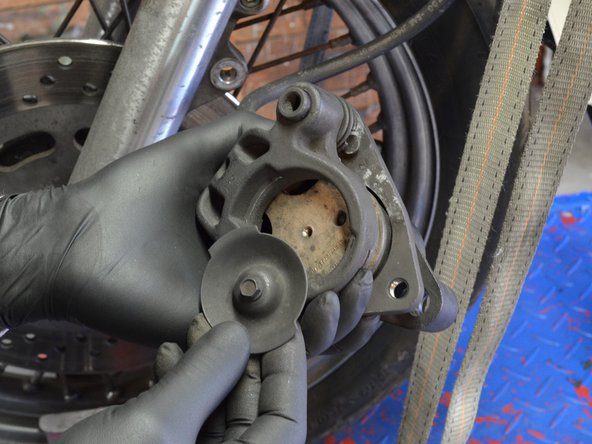
    • Using a 1/4" hex head or allen wrench, unscrew the two bolts holding the front brake assembly to the fork.

    • Unscrew and remove the bottom bolt, but do not completely remove the top bolt yet.

  4. Harley-Davidson Sportster Evolution Front Brake Pad Removal Replacement: 手順 4、 3の画像 1 Harley-Davidson Sportster Evolution Front Brake Pad Removal Replacement: 手順 4、 3の画像 2 Harley-Davidson Sportster Evolution Front Brake Pad Removal Replacement: 手順 4、 3の画像 3
    • Supporting the brake assembly with one hand, remove the top bolt.

    • Carefully slide the brake off of the brake rotor and hang it from the metal hanger.

  5. Harley-Davidson Sportster Evolution Front Brake Pad Removal Replacement: 手順 5、 3の画像 1 Harley-Davidson Sportster Evolution Front Brake Pad Removal Replacement: 手順 5、 3の画像 2 Harley-Davidson Sportster Evolution Front Brake Pad Removal Replacement: 手順 5、 3の画像 3
    • Using a 5/16 wrench, remove the bolt holding the stationary brake pad cover in place.

    • Remove the stationary brake pad cover from the brake assembly.

  6. Harley-Davidson Sportster Evolution Front Brake Pad Removal Replacement: 手順 6、 1の画像 1
    • Being careful to not let any loose parts fall out of the brake assembly, remove the stationary brake pad from the front brake assembly.

  7. Harley-Davidson Sportster Evolution Front Brake Pad Removal Replacement: 手順 7、 1の画像 1
    • Remove the floating caliper and remaining brake pad from the caliper assembly.

    • The brake pad and floating caliper are not attached to each other. Be careful to not drop either the brake pad or caliper.

  8. Harley-Davidson Sportster Evolution Front Brake Pad Removal Replacement: 手順 8、 1の画像 1
    • Using a can of brake cleaner, spray out the piston and inside of the brake caliper.

    • Make sure to do this over a bucket or tray; there tends to be a lot of grime inside the brake caliper and spraying it out can make quite a mess.

  9. Harley-Davidson Sportster Evolution Front Brake Pad Removal Replacement, Depressing the brake piston: 手順 9、 3の画像 1 Harley-Davidson Sportster Evolution Front Brake Pad Removal Replacement, Depressing the brake piston: 手順 9、 3の画像 2 Harley-Davidson Sportster Evolution Front Brake Pad Removal Replacement, Depressing the brake piston: 手順 9、 3の画像 3
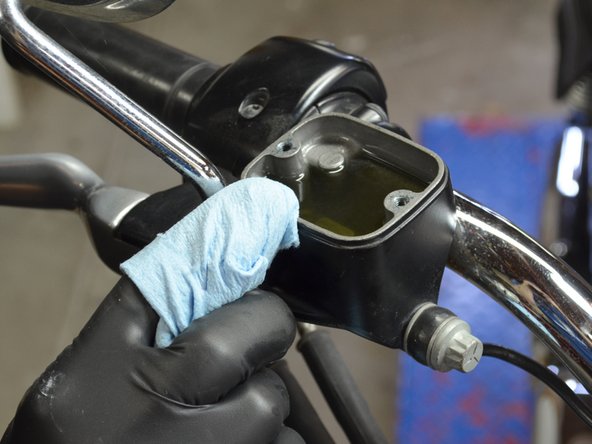
    • Using a Phillips #2 screwdriver, remove the two screws securing the cover on the master brake-fluid reservoir.

    • Carefully remove the cover of the master reservoir, making sure that you do not spill any of the brake fluid.

    • Brake fluid can cause ugly stains and scarring on cosmetic components of the motorcycle. Make sure you don't spill any.

  10. Harley-Davidson Sportster Evolution Front Brake Pad Removal Replacement: 手順 10、 2の画像 1 Harley-Davidson Sportster Evolution Front Brake Pad Removal Replacement: 手順 10、 2の画像 2
    • Position the screw of a large C clamp so that the head of the screw is pressing against the inside of the brake piston.

    • It is possible to use your hands rather than a C clamp, but it is much more difficult.

    • Slowly tighten the C clamp, forcing the brake piston back into the brake cylinder until it is completely depressed.

    • Make sure that you work slowly, or else the piston will force brake fluid out of the master reservoir and all over the motorcycle.

  11. Harley-Davidson Sportster Evolution Front Brake Pad Removal Replacement: 手順 11、 3の画像 1 Harley-Davidson Sportster Evolution Front Brake Pad Removal Replacement: 手順 11、 3の画像 2 Harley-Davidson Sportster Evolution Front Brake Pad Removal Replacement: 手順 11、 3の画像 3
    • To prevent spilling any brake fluid, first clean the area around the master cylinder with a clean rag, then replace the cover.

終わりに

To reassemble your device, follow these instructions in reverse order.

作成者

1人の作成者と共同作成されました。

Brett Hartt

メンバー登録日: 04/12/10

127,876 ポイント

143のガイドは作成済み

チーム

iFixit iFixit人のメンバー

Staff

135 メンバー

16,732のガイドは作成済み

0 件のコメント

コメントを追加

統計データ:

過去 24時間: 0

過去 7 日: 0

過去 30 日: 0

今までの合計 134