メインコンテンツにスキップ

Hamilton G5 Ventilation Unit Motherboard Replacement

医療機器
この修理ガイドは医療機器メーカーからの是認を得ておらず、iFixitと医療機器メーカーは提携していません。

必要な工具と部品

  1. Hamilton G5 Ventilation Unit Motherboard Replacement, Rail: 手順 1、 1の画像 1
    • Remove 4 Hex Allen screws (A) from the Rail surrounding the Ventilation Unit.

  2. Hamilton G5 Ventilation Unit Motherboard Replacement: 手順 2、 1の画像 1
    • Remove the Rail (B).

  3. Hamilton G5 Ventilation Unit Motherboard Replacement: 手順 3、 1の画像 1
    • The Standoff Brackets (C) remain with the Main Cover.

    • Place aside in a safe location.

  4. Hamilton G5 Ventilation Unit Motherboard Replacement, Main Cover: 手順 5、 1の画像 1
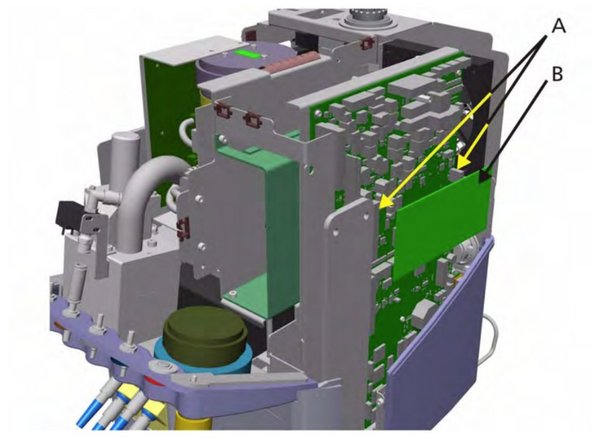
    • Lift the Main Cover (A) from the Ventilation Unit using the Standoff Brackets (B) attached to the Main Cover.

    • Place aside in a safe location.

  5. Hamilton G5 Ventilation Unit Motherboard Replacement, Ventilation Unit Motherboard: 手順 7、 1の画像 1
    • First, we need to remove the ESM module. It is connected to 2 connector sockets. Disconnect and remove.

    • Take out the Ventilation Real-time Controller (VRC) SW chip

  6. Hamilton G5 Ventilation Unit Motherboard Replacement: 手順 9、 1の画像 1
    • Install the ESM Module, by connecting the connectors (A), and the VRC SW chip on the new board.

  7. Hamilton G5 Ventilation Unit Motherboard Replacement: 手順 10、 1の画像 1
    • Disconnect all cables and connections from the board to the unit.

  8. Hamilton G5 Ventilation Unit Motherboard Replacement: 手順 11、 1の画像 1
    • Remove the three Hex screws (B).

  9. Hamilton G5 Ventilation Unit Motherboard Replacement: 手順 12、 1の画像 1
    • Move the motherboard out then up away from the ventilation unit (C).

終わりに

To reassemble your device, follow these instructions in reverse order.

作成者

1人の作成者と共同作成されました。

Dane Dormedy

メンバー登録日: 04/08/20

349 ポイント

3のガイドは作成済み

チーム

Cal Poly, Team S7-G25, Paton Spring 2020 Cal Poly, Team S7-G25, Paton Spring 2020人のメンバー

CPSU-PATON-S20S7G25

6 メンバー

11のガイドは作成済み

0 件のコメント

コメントを追加

統計データ:

過去 24時間: 0

過去 7 日: 0

過去 30 日: 7

今までの合計 248