メインコンテンツにスキップ

Hamilton Beach 25460Z Bottom Heating Element Solders Replacement

必要な工具と部品

  1. Hamilton Beach 25460Z Bottom Heating Element Solders Replacement, Plug Wiring: 手順 1、 2の画像 1 Hamilton Beach 25460Z Bottom Heating Element Solders Replacement, Plug Wiring: 手順 1、 2の画像 2
    • Unplug your device before proceeding with disassembly.

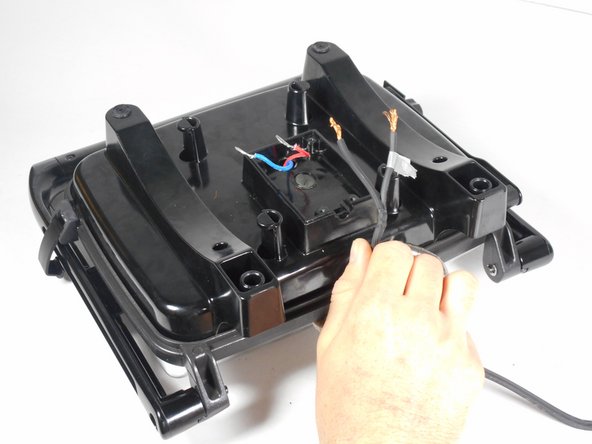
    • Remove the four 14mm screws from the bottom of the Panini Press using the T10 Screwdriver.

  2. Hamilton Beach 25460Z Bottom Heating Element Solders Replacement: 手順 2、 1の画像 1
    • Lift up the plastic cover to expose the plug wiring.

    • Mark the plug wire connected to the red wire with a piece of tape. This will be used as a reference for reassembly.

  3. Hamilton Beach 25460Z Bottom Heating Element Solders Replacement: 手順 3、 3の画像 1 Hamilton Beach 25460Z Bottom Heating Element Solders Replacement: 手順 3、 3の画像 2 Hamilton Beach 25460Z Bottom Heating Element Solders Replacement: 手順 3、 3の画像 3
    • Use the pliers to pinch the widest point of the cap. This should be done opposite of the already existing crimps.

    • Slide off the white cap.

    • Repeat these steps for the second white cap.

  4. Hamilton Beach 25460Z Bottom Heating Element Solders Replacement: 手順 4、 2の画像 1 Hamilton Beach 25460Z Bottom Heating Element Solders Replacement: 手順 4、 2の画像 2
    • Remove the two rubber screw covers from the bottom of the Panini Press.

    • Remove the four uncovered 10mm screws with the PH2 Screwdriver.

  5. Hamilton Beach 25460Z Bottom Heating Element Solders Replacement: 手順 5、 2の画像 1 Hamilton Beach 25460Z Bottom Heating Element Solders Replacement: 手順 5、 2の画像 2
    • Lift the plastic lower heating element up and place to the side for reassembly. You have now disconnected the plug wiring completely.

  6. Hamilton Beach 25460Z Bottom Heating Element Solders Replacement, Bottom Heating Element Solders: 手順 6、 2の画像 1 Hamilton Beach 25460Z Bottom Heating Element Solders Replacement, Bottom Heating Element Solders: 手順 6、 2の画像 2
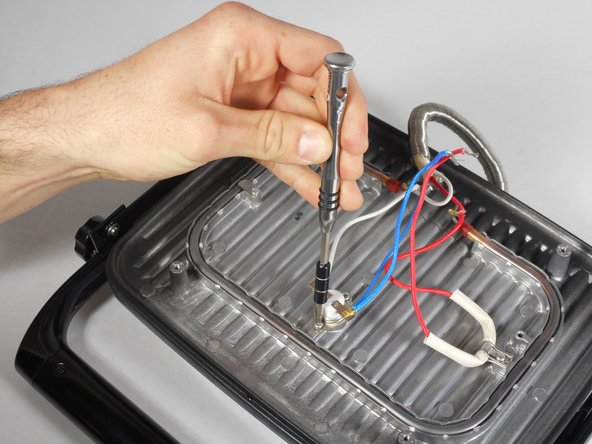
    • Using the PH2 screwdriver and a bit of force, remove the two 10mm screws holding the thermal switch to the cooking surface.

    • These screws may be difficult to remove.

  7. Hamilton Beach 25460Z Bottom Heating Element Solders Replacement: 手順 7、 1の画像 1
    • Using the PH2 screwdriver, remove the single 10mm screw connecting the red wiring cover to the cooking surface.

  8. Hamilton Beach 25460Z Bottom Heating Element Solders Replacement: 手順 8、 1の画像 1
    • Now pull both the thermal switch and the red wire to the back of the press, allowing easier access to the heating element leads.

    • Replace the missing solder.

    • The left lead, marked with a red circle, is connected to 2 white wires.

    • The right lead, marked with a yellow circle, is connected to 2 red wires.

終わりに

To reassemble your device, follow these instructions in reverse order.

3 の人々がこのガイドを完成させました。

作成者

5人の作成者と共同で作成されました。

Forrest Rodeman

メンバー登録日: 02/01/15

318 ポイント

2のガイドは作成済み

チーム

Cal Poly, Team 6-27, Amido Winter 2015 Cal Poly, Team 6-27, Amido Winter 2015人のメンバー

CPSU-AMIDO-W15S6G27

4 メンバー

6のガイドは作成済み

2 件のコメント

Muy detallado, era aproximadamente lo que buscaba.

Hay posibilidades de que sea en los pasos a seguir, sean en Español. De ser así podría resolver el problema, gracias

alcides torres lopez - 返信

Estoy tratando de resolver la avería de mo Sandwichera Hamilton Beach modelo 25460Z, desde mi hogar y desearía que la respuesta fuera en idioma Español, gracias

alcides torres lopez - 返信

コメントを追加

統計データ:

過去 24時間: 1

過去 7 日: 10

過去 30 日: 24

今までの合計 2,947