メインコンテンツにスキップ

HTC Wizard 200 Motherboard Replacement

必要な工具と部品

  1. HTC Wizard 200 Motherboard Replacement, Battery: 手順 1、 2の画像 1 HTC Wizard 200 Motherboard Replacement, Battery: 手順 1、 2の画像 2
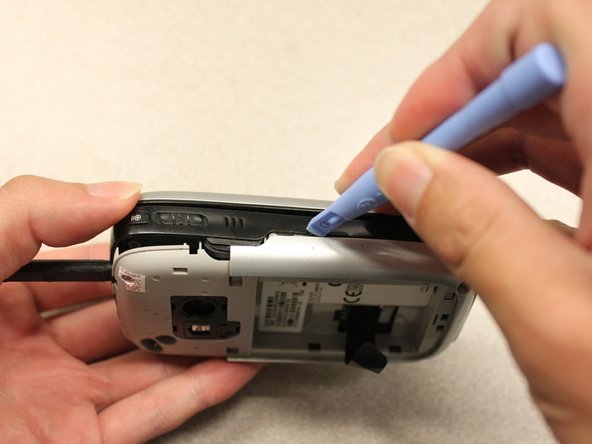
    • To expose the battery, remove the outer case with your fingernail.

    • Remove the battery by pulling the black tab.

  2. HTC Wizard 200 Motherboard Replacement, Back Panel: 手順 2、 1の画像 1
    この手順で使用する道具:
    Spudger
    $3.99
    購入する
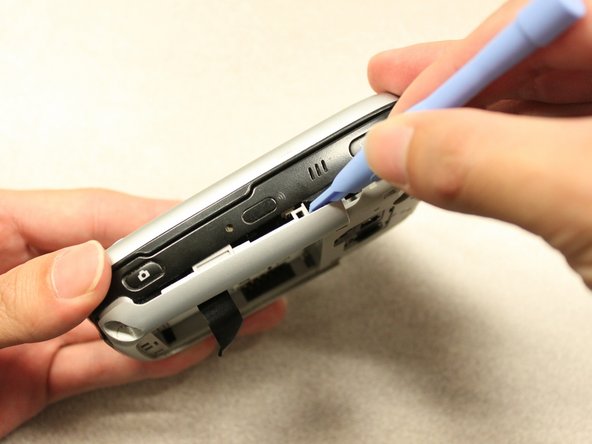
    • Insert the flat end of the spudger into the two notches on the back of the camera cover and pry them up.

  3. HTC Wizard 200 Motherboard Replacement: 手順 3、 2の画像 1 HTC Wizard 200 Motherboard Replacement: 手順 3、 2の画像 2
    この手順で使用する道具:
    Spudger
    $3.99
    購入する
    • Work the spudger around the edges of the camera cover until it comes off.

  4. HTC Wizard 200 Motherboard Replacement: 手順 4、 2の画像 1 HTC Wizard 200 Motherboard Replacement: 手順 4、 2の画像 2
    この手順で使用する道具:
    T5 Torx Screwdriver
    $5.49
    購入する
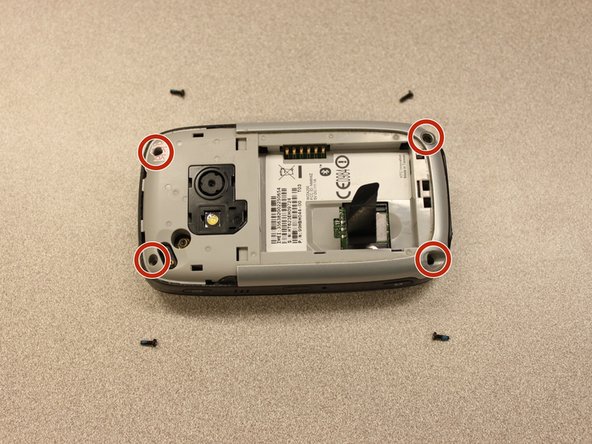
    • Remove the four 6 mm screws with the T5 Torx screwdriver.

    • One of the screws is under the "void" sticker.

  5. HTC Wizard 200 Motherboard Replacement: 手順 5、 3の画像 1 HTC Wizard 200 Motherboard Replacement: 手順 5、 3の画像 2 HTC Wizard 200 Motherboard Replacement: 手順 5、 3の画像 3
    • Insert the flat end of an iFixit opening tool between the side and inner covers to create a gap.

    • Work the tool around the edges until all the clips release.

  6. HTC Wizard 200 Motherboard Replacement: 手順 6、 2の画像 1 HTC Wizard 200 Motherboard Replacement: 手順 6、 2の画像 2
    • Once all the clips are open, remove the inner panel from the phone.

  7. HTC Wizard 200 Motherboard Replacement, Motherboard: 手順 7、 1の画像 1
    この手順で使用する道具:
    Spudger
    $3.99
    購入する
    • Use the spudger to pry the camera off.

  8. HTC Wizard 200 Motherboard Replacement: 手順 8、 2の画像 1 HTC Wizard 200 Motherboard Replacement: 手順 8、 2の画像 2
    この手順で使用する道具:
    Tweezers
    $4.99
    購入する
    • Using tweezers, flip the connector latch away from the motherboard.

    • Detach the flexible connection from under the connector latch.

  9. HTC Wizard 200 Motherboard Replacement: 手順 9、 1の画像 1
    • Slide the keyboard into the open position.

  10. HTC Wizard 200 Motherboard Replacement: 手順 10、 2の画像 1 HTC Wizard 200 Motherboard Replacement: 手順 10、 2の画像 2
    この手順で使用する道具:
    Spudger
    $3.99
    購入する
    • Lift the motherboard out of the case using the spudger.

    • Expose the underside of the motherboard using your hands.

  11. HTC Wizard 200 Motherboard Replacement: 手順 11、 2の画像 1 HTC Wizard 200 Motherboard Replacement: 手順 11、 2の画像 2
    • Remove the flexible connection from the motherboard.

    • Caution: Removing the connection too fast may cause damage to the connection and cables.

終わりに

To reassemble your device, follow these instructions in reverse order.

作成者

7人の作成者と共同で作成されました。

Kyle Champ

メンバー登録日: 10/03/11

225 ポイント

12のガイドは作成済み

チーム

Cal Poly, Team 20-27, Maness Fall 2011 Cal Poly, Team 20-27, Maness Fall 2011人のメンバー

CPSU-MANESS-F11S20G27

4 メンバー

24のガイドは作成済み

0 件のコメント

コメントを追加

統計データ:

過去 24時間: 0

過去 7 日: 0

過去 30 日: 2

今までの合計 1,099