メインコンテンツにスキップ

HTC Droid DNA Camera Board Replacement

必要条件のみ
この修理ガイドは、他のガイドの前提条件として使用されます。それ自体は不完全で、単独で使用されることはありません。

必要な工具と部品

  1. HTC Droid DNA Camera Board Replacement, Remove the SIM Card Tray: 手順 1、 1の画像 1
    • Poke a paperclip into the hole to the right of the SIM Card Tray. The SIM Card Tray will automatically pop out.

  2. HTC Droid DNA Camera Board Replacement, Removing the SIM Card Tray: 手順 2、 2の画像 1 HTC Droid DNA Camera Board Replacement, Removing the SIM Card Tray: 手順 2、 2の画像 2
    • Pull out the SIM Card Tray with your fingers.

  3. HTC Droid DNA Camera Board Replacement, Loosen the Phone Casing: 手順 3、 2の画像 1 HTC Droid DNA Camera Board Replacement, Loosen the Phone Casing: 手順 3、 2の画像 2
    • Make sure the USB cover on the bottom of the phone is removed first.

    • Starting at a corner, slowly work your way around the edge of the sides with your prying tool to loosen the front panel.

    • Take your time. A lot of force is necessary to loosen the front panel.

  4. HTC Droid DNA Camera Board Replacement, Pull the Casing Apart: 手順 4、 1の画像 1
    • Slowly pull the panel apart from the back of the phone.

    • Apply a moderate force to pry the panel from the back of the phone.

  5. HTC Droid DNA Camera Board Replacement, Remove the Black Tape: 手順 5、 1の画像 1
    • Set the device down so that the bottom of the phone is facing to the right.

    • Gently take off the piece of black tape surrounding the motherboard.

    • Be careful not to rip the tape.

  6. HTC Droid DNA Camera Board Replacement, Remove the Yellow Tape: 手順 6、 1の画像 1
    この手順で使用する道具:
    Tweezers
    $4.99
    購入する
    • Use your tweezers to take off the yellow tape on the bottom left corner of the phone.

  7. HTC Droid DNA Camera Board Replacement: 手順 7、 1の画像 1
    • Rotate your phone 90 degrees clockwise so the bottom of the phone is facing you.

    • Use the T5 Torx screwdriver to remove the two 4mm screws located at the bottom of the phone.

  8. HTC Droid DNA Camera Board Replacement, Remove the Void Screw: 手順 8、 1の画像 1
    • Use the Phillips #000 screwdriver to remove the single 2.7mm void screw on the bottom right.

  9. HTC Droid DNA Camera Board Replacement, Remove the Screw Retaining Bracket: 手順 9、 1の画像 1
    • Rotate your phone back 90 Degrees counter-clockwise.

    • Use your tweezers to take off the small metal retaining bracket on the bottom right of the phone.

  10. HTC Droid DNA Camera Board Replacement, Remove the Connector Screws: 手順 10、 1の画像 1
    • Remove the following Phillips #000 screws from the motherboard:

    • Four 1.6 mm screws

    • Two 1.5 mm screws

  11. HTC Droid DNA Camera Board Replacement, Unfasten the Connectors: 手順 11、 2の画像 1 HTC Droid DNA Camera Board Replacement, Unfasten the Connectors: 手順 11、 2の画像 2
    • Use your pry tool to unfasten the connectors on both sides of the motherboard.

    • The connectors will still be attached to the green camera board at the top so DO NOT try to pull them off or bend them severely.

  12. HTC Droid DNA Camera Board Replacement, Remove the Yellow Tape: 手順 12、 1の画像 1
    • Use your tweezers to remove the two pieces of yellow tape shown.

  13. HTC Droid DNA Camera Board Replacement, Flipping up the White Board: 手順 13、 2の画像 1 HTC Droid DNA Camera Board Replacement, Flipping up the White Board: 手順 13、 2の画像 2
    • Use your tweezers to gently snap up the white board on the bottom right of the motherboard.

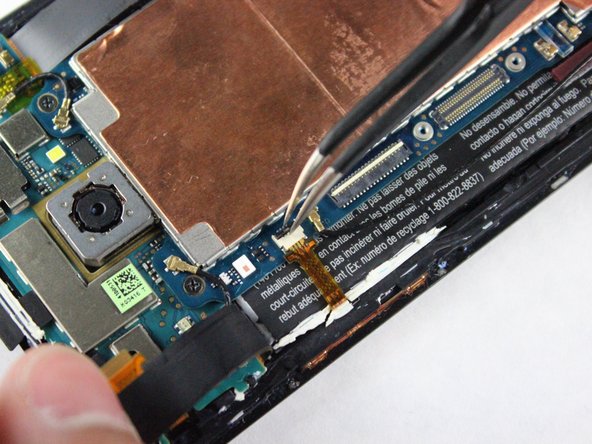
  14. HTC Droid DNA Camera Board Replacement, Disconnect the Connector: 手順 14、 1の画像 1
    • Use your tweezers to disconnect the black connector on the bottom right of the motherboard.

    • Be careful not to bend the Flex Cable of the Connector.

  15. HTC Droid DNA Camera Board Replacement, Flipping up the White Board: 手順 15、 2の画像 1 HTC Droid DNA Camera Board Replacement, Flipping up the White Board: 手順 15、 2の画像 2
    • Use your tweezers to gently snap the other white board on the bottom right of the motherboard up.

  16. HTC Droid DNA Camera Board Replacement, Disconnect the Connector: 手順 16、 1の画像 1
    • Use your tweezers to disconnect the other small connector on the bottom right of the motherboard.

    • Be careful not to bend the Flex Cables for the Connector.

  17. HTC Droid DNA Camera Board Replacement, Flipping up the White Board: 手順 17、 2の画像 1 HTC Droid DNA Camera Board Replacement, Flipping up the White Board: 手順 17、 2の画像 2
    • Rotate the phone 180 degrees.

    • Use your tweezers to gently snap up the white board on the top left of the motherboard.

  18. HTC Droid DNA Camera Board Replacement, Disconnect the Connector: 手順 18、 1の画像 1
    • Use your tweezers to disconnect the cable on the top left of the motherboard.

    • Be careful not to bend the Flex Cable of the Connector.

  19. HTC Droid DNA Camera Board Replacement, Flipping up the Black Board: 手順 19、 2の画像 1 HTC Droid DNA Camera Board Replacement, Flipping up the Black Board: 手順 19、 2の画像 2
    • Use your tweezers to gently snap up the black board on the top left of the motherboard.

  20. HTC Droid DNA Camera Board Replacement, Disconnect the Small Ribbon Connector: 手順 20、 1の画像 1
    • Use your tweezers to gently remove the yellow connector on the top left of the phone.

  21. HTC Droid DNA Camera Board Replacement, Remove the Black Wire: 手順 21、 1の画像 1
    • Remove the long black wire on the left of the motherboard.

  22. HTC Droid DNA Camera Board Replacement, Remove the Two Black Wires: 手順 22、 1の画像 1
    • Reorient the phone so that the green camera board is farthest from you.

    • Use your tweezers to remove the two wires located at the top of the board. The wires snap off very easily so not much force is needed.

  23. HTC Droid DNA Camera Board Replacement, Remove the Screws: 手順 23、 1の画像 1
    • Use a Phillips #000 screwdriver to remove the two 3.9mm screws on top of motherboard.

  24. HTC Droid DNA Camera Board Replacement, Remove the Motherboard: 手順 24、 2の画像 1 HTC Droid DNA Camera Board Replacement, Remove the Motherboard: 手順 24、 2の画像 2
    • Now, use your fingers to slowly pull up the motherboard and remove it from the phone.

  25. HTC Droid DNA Camera Board Replacement, Remove Screws: 手順 25、 1の画像 1
    • Use a Phillips #000 screwdriver to remove the two 2.1mm screws on the top of the camera board.

  26. HTC Droid DNA Camera Board Replacement, Loosen the Adhesive: 手順 26、 2の画像 1 HTC Droid DNA Camera Board Replacement, Loosen the Adhesive: 手順 26、 2の画像 2
    • Use the pry tool along the bottom and sides of the camera board to loosen the adhesive.

    • The power button and headphone jack need to be carefully removed with the camera board or they could snap off of the camera board.

  27. HTC Droid DNA Camera Board Replacement, Remove Camera Board: 手順 27、 1の画像 1
    • Slowly lift the camera board up and work on removing the remaining adhesive. You can then take the camera board off of the phone.

終わりに

To reassemble your device, follow these instructions in reverse order.

作成者

4人の作成者と共同で作成されました。

Adrian Williams

メンバー登録日: 10/14/14

585 ポイント

3のガイドは作成済み

チーム

Cal Poly, Team 4-43, Amido Fall 2014 Cal Poly, Team 4-43, Amido Fall 2014人のメンバー

CPSU-AMIDO-F14S4G43

4 メンバー

10のガイドは作成済み

0 件のコメント

コメントを追加

統計データ:

過去 24時間: 0

過去 7 日: 0

過去 30 日: 0

今までの合計 42