メインコンテンツにスキップ

HTC Desire 626s Auxiliary Port Replacement

必要な工具と部品

  1. HTC Desire 626s Auxiliary Port Replacement, Backplate: 手順 1、 3の画像 1 HTC Desire 626s Auxiliary Port Replacement, Backplate: 手順 1、 3の画像 2 HTC Desire 626s Auxiliary Port Replacement, Backplate: 手順 1、 3の画像 3
    • Insert plastic opening tool in between the back cover and grey plastic.

    • Gently work your way around the phone while sliding the tool.

    • Gently pry on plastic cover as needed to release fasteners.

  2. HTC Desire 626s Auxiliary Port Replacement: 手順 2、 2の画像 1 HTC Desire 626s Auxiliary Port Replacement: 手順 2、 2の画像 2
    • There are 7 screws you need to remove before prying the secondary cover off. You will need to use the JIS #000 screwdriver and the T5 Torx screwdriver to remove these screws.

    • There is a screw under the "void" sticker.

  3. HTC Desire 626s Auxiliary Port Replacement: 手順 3、 2の画像 1 HTC Desire 626s Auxiliary Port Replacement: 手順 3、 2の画像 2
    • Once the screws are removed, use the plastic opening tool to remove the remaining plastic cover.

    • Start from the corners of the phone, and insert the plastic opening tool between the outer colored rim and the screen.

    • This portion of the cover will be more difficult to remove than the initial back cover. Be patient and gentle around the button holes.

  4. HTC Desire 626s Auxiliary Port Replacement, Auxiliary Port (Headphone Jack): 手順 4、 2の画像 1 HTC Desire 626s Auxiliary Port Replacement, Auxiliary Port (Headphone Jack): 手順 4、 2の画像 2
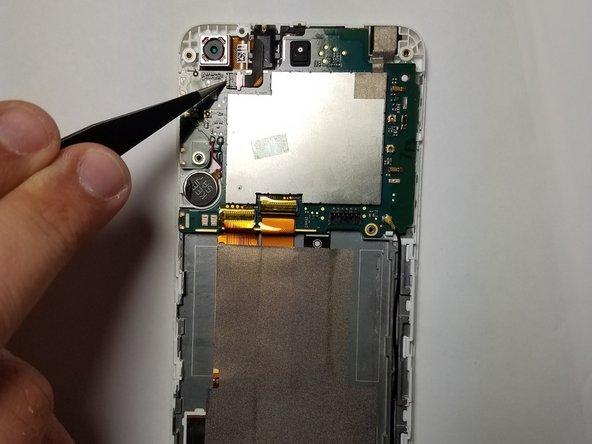
    • Look for the clear piece of tape covering the wires connecting the aux port to the phone.

    • Use the tweezers to remove this tape and stick it to the large metal plate on the phone for safe keeping.

  5. HTC Desire 626s Auxiliary Port Replacement: 手順 5、 1の画像 1
    • Find the white tab holding the wires from the previous step in place, and gently pry it up to a 90 degree angle. This will release the connection of the aux port to the phone's motherboard.

  6. HTC Desire 626s Auxiliary Port Replacement: 手順 6、 1の画像 1
    • Using the tweezers, grab the top of the aux port and gently wiggle it.

    • It should come loose easily, but if it doesn't, make sure you've completed steps 1-2, then grabbing it from a different angle and continue wiggling until it comes loose.

終わりに

To reassemble your device, follow these instructions in reverse order.

作成者

2人の作成者と共同で作成されました。

Blake Bartlett

メンバー登録日: 04/03/19

732 ポイント

6のガイドは作成済み

チーム

0 件のコメント

コメントを追加

統計データ:

過去 24時間: 2

過去 7 日: 6

過去 30 日: 9

今までの合計 225