メインコンテンツにスキップ
リペアコミュニティに参加 - アカウントの作成

HP iPAQ h4155 Back Case Replacement

必要な工具と部品

    1. HP iPAQ h4155 Back Case Replacement, Battery: 手順 1、 1の画像 1
      • While sliding the silver release tab up, simultaneously lift the cover up from the left side.

      FixBotに聞いてみる

      コメントを追加

    2. HP iPAQ h4155 Back Case Replacement: 手順 2、 1の画像 1
      • Push the tab left to right to remove the cover.

      FixBotに聞いてみる

      コメントを追加

    3. HP iPAQ h4155 Back Case Replacement: 手順 3、 1の画像 1
      • Now, lift the battery up and away from the device to remove it.

      FixBotに聞いてみる

      コメントを追加

    1. HP iPAQ h4155 Back Case Replacement, Back Case: 手順 4、 1の画像 1
      • Remove the four silver screws using the T5 Torx Screwdriver (T5 x .25 in).

      FixBotに聞いてみる

      コメントを追加

    2. HP iPAQ h4155 Back Case Replacement: 手順 5、 1の画像 1
      • Remove the single black screw that is located beneath the HP sticker with the T5 Torx Screwdriver.

      FixBotに聞いてみる

      コメントを追加

    3. HP iPAQ h4155 Back Case Replacement: 手順 6、 2の画像 1 HP iPAQ h4155 Back Case Replacement: 手順 6、 2の画像 2
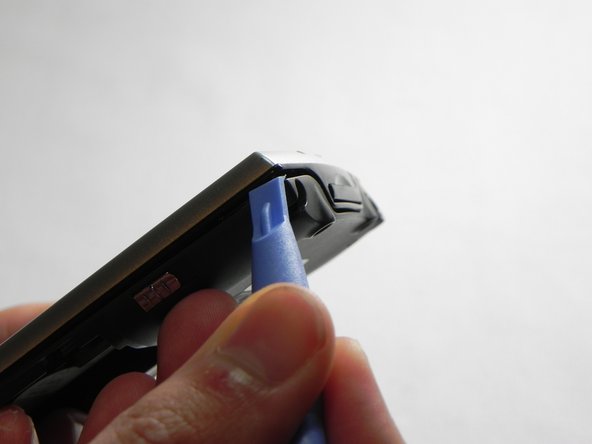
      • Next, use your plastic removal tool to separate the gray back from the black center piece.

      • For better results, start the separation at the corner piece.

      FixBotに聞いてみる

      コメントを追加

    4. HP iPAQ h4155 Back Case Replacement: 手順 7、 1の画像 1
      • Remove the back case.

      FixBotに聞いてみる

      コメントを追加

終わりに

To reassemble your device, follow these instructions in reverse order.

キャンセル: このガイドを終了できませんでした。

3 の人々がこのガイドを完成させました。

作成者

10人の作成者と共同で作成されました。

John Pagliero

メンバー登録日: 01/27/11

957 ポイント

7のガイドは作成済み

0件のガイドコメント

コメントを追加

統計データ:

過去 24時間: 1

過去 7 日: 7

過去 30 日: 48

今までの合計 1,417