メインコンテンツにスキップ

HP Z2 Mini G3 Motherboard Replacement

必要な工具と部品

  1. HP Z2 Mini G3 Motherboard Replacement, Access Panel: 手順 1、 1の画像 1
    • Turn the device so the back-side of the device is facing you.

    • Be sure that the power is off and the A/C power cord has been disconnected before starting. Removing hardware while the power is on could damage the device or harm yourself.

    • Components of the device are subject to static damage. Work on a hard, grounded surface to prevent damage to the workstation.

  2. HP Z2 Mini G3 Motherboard Replacement: 手順 2、 2の画像 1 HP Z2 Mini G3 Motherboard Replacement: 手順 2、 2の画像 2
    • Slide and hold the latch in the direction of the engraved arrow (to the right).

  3. HP Z2 Mini G3 Motherboard Replacement: 手順 3、 2の画像 1 HP Z2 Mini G3 Motherboard Replacement: 手順 3、 2の画像 2
    • While holding the latch, lift the access panel upwards and towards yourself and set it aside upside-down.

  4. HP Z2 Mini G3 Motherboard Replacement, CPU Fan: 手順 4、 1の画像 1
    • Rotate the device so the front side is facing you (the side with the power button) and locate the CPU fan.

  5. HP Z2 Mini G3 Motherboard Replacement: 手順 5、 1の画像 1
    • Swing the fan upward, to a 90-degree angle.

  6. HP Z2 Mini G3 Motherboard Replacement: 手順 6、 2の画像 1 HP Z2 Mini G3 Motherboard Replacement: 手順 6、 2の画像 2
    • Carefully disconnect the CPU fan by pulling out the wires from the motherboard.

  7. HP Z2 Mini G3 Motherboard Replacement: 手順 7、 1の画像 1
    • Swing the fan back down and carefully unhook the CPU fan notches by pulling each tab away from the heat sink holes.

  8. HP Z2 Mini G3 Motherboard Replacement: 手順 8、 1の画像 1
    • Swing the fan up again and pull it out.

  9. HP Z2 Mini G3 Motherboard Replacement, CPU Processor: 手順 9、 3の画像 1 HP Z2 Mini G3 Motherboard Replacement, CPU Processor: 手順 9、 3の画像 2 HP Z2 Mini G3 Motherboard Replacement, CPU Processor: 手順 9、 3の画像 3
    • Remove the 9mm Torx screw with a T15 Torx screwdriver to release the SSD assembly.

    • Lift the assembly upwards to remove it.

  10. HP Z2 Mini G3 Motherboard Replacement: 手順 10、 1の画像 1
    • Pull the metal arm out from under the frame and lift it up. The frame should slide back from under the screw.

  11. HP Z2 Mini G3 Motherboard Replacement: 手順 11、 2の画像 1 HP Z2 Mini G3 Motherboard Replacement: 手順 11、 2の画像 2
    • Lift the frame upward to gain access to the processor

    • Take note of a triangular mark on one of the corners of the processor and bracket it is mounted on. The triangles must be aligned together during reassembly.

  12. HP Z2 Mini G3 Motherboard Replacement: 手順 12、 1の画像 1
    • Grip the processor on each side, carefully lifting it up.

    • Do not touch the underside of the processor. Doing so may damage the processor and prevent a connection to the motherboard.

    • Be careful inserting the new processor. The connectors on the new one and the motherboard are fragile and damage easily.

  13. HP Z2 Mini G3 Motherboard Replacement, Motherboard: 手順 13、 3の画像 1 HP Z2 Mini G3 Motherboard Replacement, Motherboard: 手順 13、 3の画像 2 HP Z2 Mini G3 Motherboard Replacement, Motherboard: 手順 13、 3の画像 3
    • Remove the thermal sensor cable from the motherboard.

    • Grab and lift the cable from the chassis to finish removing the thermal sensor.

  14. HP Z2 Mini G3 Motherboard Replacement: 手順 14、 1の画像 1
    • Some models may have a wireless LAN module installed under the GPU fan.

    • In this case, use a T15 Torx screwdriver to remove the 9mm Torx screw from the module and take the component out.

  15. HP Z2 Mini G3 Motherboard Replacement: 手順 15、 1の画像 1
    • Unplug, then carefully detach the system speaker from the chassis by gripping the frame and pulling back.

    • You do not need to remove the speaker from its frame.

  16. HP Z2 Mini G3 Motherboard Replacement: 手順 16、 2の画像 1 HP Z2 Mini G3 Motherboard Replacement: 手順 16、 2の画像 2
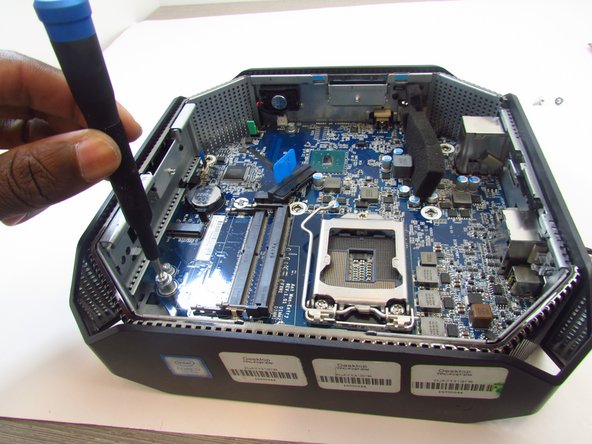
    • Use a T15 Torx screw driver to remove the 9mm and the two 16mm Torx head screws that secure the motherboard to the chassis.

  17. HP Z2 Mini G3 Motherboard Replacement: 手順 17、 2の画像 1 HP Z2 Mini G3 Motherboard Replacement: 手順 17、 2の画像 2
    • Slide the motherboard forward and to the left to clear it from chassis.

    • Carefully pull and lift the motherboard out by holding on to the ports.

終わりに

To reassemble your device, follow these instructions in reverse order.

作成者

4人の作成者と共同で作成されました。

Sympson Placide

メンバー登録日: 01/14/20

279 ポイント

2のガイドは作成済み

0 件のコメント

コメントを追加

統計データ:

過去 24時間: 2

過去 7 日: 11

過去 30 日: 52

今までの合計 2,012