メインコンテンツにスキップ

HP Stream 13-c002dx Wireless Card Replacement

必要な工具と部品

  1. HP Stream 13-c002dx Wireless Card  Replacement, Keyboard: 手順 1、 2の画像 1 HP Stream 13-c002dx Wireless Card  Replacement, Keyboard: 手順 1、 2の画像 2
    • Begin by placing your laptop on a clean surface such as a table and away from any liquids which may spill and damage components.

    • Flip the laptop over so the bottom is facing up.

    • Use your Phillips #0 screwdriver to remove the eleven visible 5 mm screws on the back of the laptop.

    • There are some screws underneath the rubber feet. Use a spudger to remove them and gain access.

    • Unscrew the two remaining 2.5mm screws. Keep these screws separate from the first eleven 5mm screws.

  2. HP Stream 13-c002dx Wireless Card  Replacement: 手順 2、 3の画像 1 HP Stream 13-c002dx Wireless Card  Replacement: 手順 2、 3の画像 2 HP Stream 13-c002dx Wireless Card  Replacement: 手順 2、 3の画像 3
    • Flip the laptop back over so it's right side up and open the screen.

    • Using a spudger, separate the keyboard surface from the bottom of the laptop.

    • While lifting the keyboard surface from the bottom, you will notice three cables still attaching them together. Gently unplug each of these cables from the motherboard.

    • Remove the keyboard assembly.

  3. HP Stream 13-c002dx Wireless Card  Replacement, Wireless Card: 手順 3、 3の画像 1 HP Stream 13-c002dx Wireless Card  Replacement, Wireless Card: 手順 3、 3の画像 2 HP Stream 13-c002dx Wireless Card  Replacement, Wireless Card: 手順 3、 3の画像 3
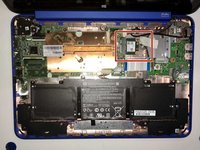
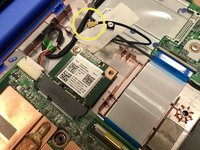
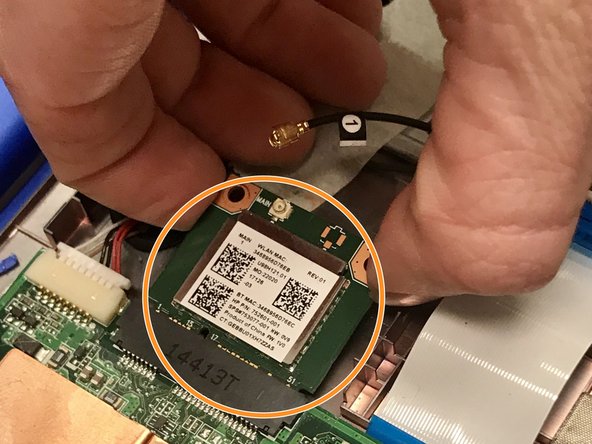
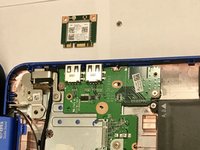
    • Inside the laptop you will notice the wireless card located in the upper middle. This will be what you are replacing.

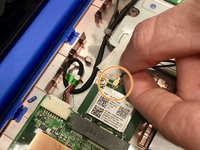
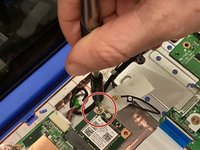
    • Attached to the Wi-Fi card is a black wire that must be removed. Using your hand, lift gently on the wire as close as you can to where it connects to the Wi-Fi card.

    • Once the wire is removed, set it aside so it does not get damaged.

  4. HP Stream 13-c002dx Wireless Card  Replacement: 手順 4、 3の画像 1 HP Stream 13-c002dx Wireless Card  Replacement: 手順 4、 3の画像 2 HP Stream 13-c002dx Wireless Card  Replacement: 手順 4、 3の画像 3
    • Remove the screw holding the wireless card in place.

    • With the screw removed, gently pull back the Wi-Fi card and then lift it out of the laptop. You are now ready to insert the new wireless card.

終わりに

To reassemble your device, follow these instructions in reverse order.

ある他の人がこのガイドを完成しました。

作成者

8人の作成者と共同で作成されました。

Hailee McCraw

メンバー登録日: 01/23/18

221 ポイント

1ガイドが承認済み

チーム

Western Carolina University, Team S1-G1, Virtue Spring 2018 Western Carolina University, Team S1-G1, Virtue Spring 2018人のメンバー

WCU-VIRTUE-S18S1G1

4 メンバー

11のガイドは作成済み

0 件のコメント

コメントを追加

統計データ:

過去 24時間: 1

過去 7 日: 3

過去 30 日: 7

今までの合計 1,239