メインコンテンツにスキップ

HP Star Wars Special Edition 15-an051dx Hard Drive Replacement

必要な工具と部品

  1. HP Star Wars Special Edition 15-an051dx Hard Drive Replacement, Battery: 手順 1、 3の画像 1 HP Star Wars Special Edition 15-an051dx Hard Drive Replacement, Battery: 手順 1、 3の画像 2 HP Star Wars Special Edition 15-an051dx Hard Drive Replacement, Battery: 手順 1、 3の画像 3
    • Make sure the device is fully powered down and unplugged from external power.

    • Close the device and turn it over so it will be on its back.

  2. HP Star Wars Special Edition 15-an051dx Hard Drive Replacement: 手順 2、 3の画像 1 HP Star Wars Special Edition 15-an051dx Hard Drive Replacement: 手順 2、 3の画像 2 HP Star Wars Special Edition 15-an051dx Hard Drive Replacement: 手順 2、 3の画像 3
    • In the red is the battery and the battery's holding/locking latches.

    • Slide the latches in the direction the arrows face. This will unlock and release the battery.

    • Set the old battery aside or dispose of properly by following the manufacturers instructions written on the battery or check online of battery disposal services.

  3. HP Star Wars Special Edition 15-an051dx Hard Drive Replacement: 手順 3、 3の画像 1 HP Star Wars Special Edition 15-an051dx Hard Drive Replacement: 手順 3、 3の画像 2 HP Star Wars Special Edition 15-an051dx Hard Drive Replacement: 手順 3、 3の画像 3
    • Check the battery port on your device and make sure it is clear of debris and pins are not bent or damaged.

    • Install the new battery into the port and press down gently.

    • Make sure it latches on to its locking clip.

    • Once installed and you have followed the battery manufacturer's instructions, turn your device on to its upright position and boot your device.

  4. HP Star Wars Special Edition 15-an051dx Hard Drive Replacement, HDD/SSD: 手順 4、 3の画像 1 HP Star Wars Special Edition 15-an051dx Hard Drive Replacement, HDD/SSD: 手順 4、 3の画像 2 HP Star Wars Special Edition 15-an051dx Hard Drive Replacement, HDD/SSD: 手順 4、 3の画像 3
    • Make sure device is fully shut down before starting.

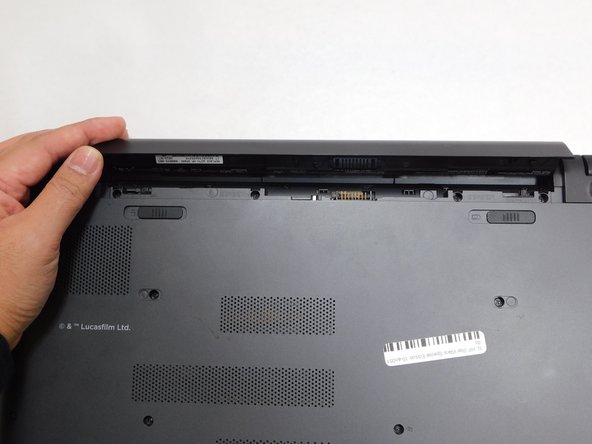
    • Remove battery by pushing the slide tabs towards the left.

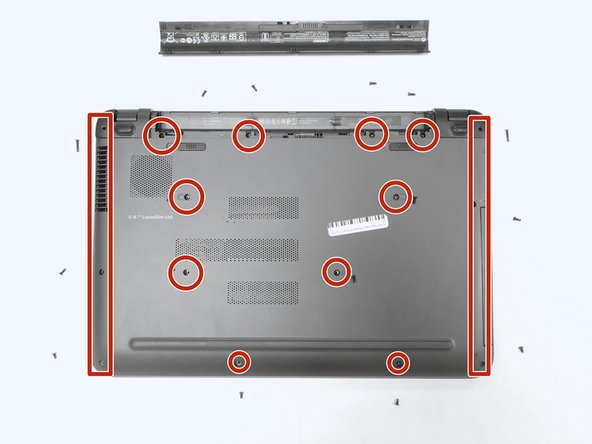
    • Use a Phillips #1 screwdriver to remove the two 12.5 mm screws, four 5.5 mm screws, and six 7.25 mm screws.

    • Write down or label where each screw goes.

    • Remove two corner panels along the ends of the battery slot and this will expose another set of screws (1 under each panel).

    • Remove the remaining six Phillips #1 7.25 mm screws hidden in the battery area and underneath the covers.

  5. HP Star Wars Special Edition 15-an051dx Hard Drive Replacement: 手順 5、 3の画像 1 HP Star Wars Special Edition 15-an051dx Hard Drive Replacement: 手順 5、 3の画像 2 HP Star Wars Special Edition 15-an051dx Hard Drive Replacement: 手順 5、 3の画像 3
    • Remove the optical drive by pulling on the plastic cover panel.

    • Using a prying tool, gently pry the back panel off.

    • Starting with the corners of the device and carefully slide the tool towards the middle, lifting the panel as you go.

  6. HP Star Wars Special Edition 15-an051dx Hard Drive Replacement: 手順 6、 3の画像 1 HP Star Wars Special Edition 15-an051dx Hard Drive Replacement: 手順 6、 3の画像 2 HP Star Wars Special Edition 15-an051dx Hard Drive Replacement: 手順 6、 3の画像 3
    • Gently lift the left end of the drive and remove it from the device.

    • The drive will have two rubber pieces on its side that helps it stay mounted on the device.

    • Remove the two rubber pieces by gently pulling them away from the drive

    • On the HDD, remove the connecting cable by gently prying the plastic tab off.

  7. HP Star Wars Special Edition 15-an051dx Hard Drive Replacement: 手順 7、 3の画像 1 HP Star Wars Special Edition 15-an051dx Hard Drive Replacement: 手順 7、 3の画像 2 HP Star Wars Special Edition 15-an051dx Hard Drive Replacement: 手順 7、 3の画像 3
    • Observe the port connection and match it with the drives slot.

    • Connect and press firmly.

    • Install black rubber pieces on to the drive.

    • Place the drive into its slot.

    • Install the drive by placing the end with connectors in first, then push the other end down gently on to its slot.

終わりに

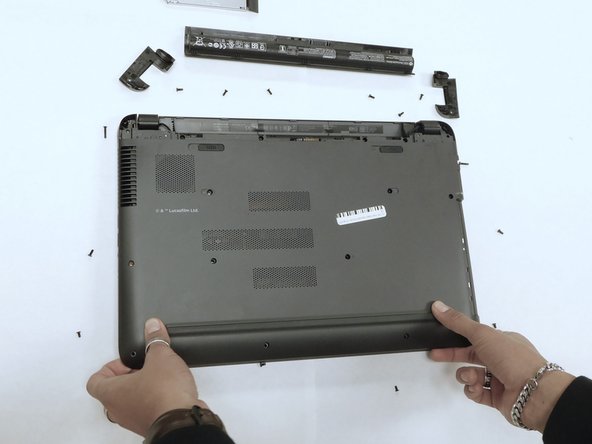
To reassemble your device, follow these instructions in reverse order.

2 の人々がこのガイドを完成させました。

作成者

3人の作成者と共同で作成されました。

Fernando Mendez

メンバー登録日: 08/25/22

643 ポイント

5のガイドは作成済み

チーム

Gateway, Team 1-2, Pee Fall 2022 Gateway, Team 1-2, Pee Fall 2022人のメンバー

GCC-PEE-F22S1G2

4 メンバー

5のガイドは作成済み

0 件のコメント

コメントを追加

統計データ:

過去 24時間: 0

過去 7 日: 4

過去 30 日: 26

今までの合計 526