メインコンテンツにスキップ

HP Sprocket 2-in-1 Battery Replacement

必要な工具と部品

  1. HP Sprocket 2-in-1 Battery Replacement, Outer Casing: 手順 1、 2の画像 1 HP Sprocket 2-in-1 Battery Replacement, Outer Casing: 手順 1、 2の画像 2
    • Remove the back cover and any printer paper inside the device.

  2. HP Sprocket 2-in-1 Battery Replacement: 手順 2、 2の画像 1 HP Sprocket 2-in-1 Battery Replacement: 手順 2、 2の画像 2
    • Using the Jimmy, slowly pry open the outer edge of the remaining white plastic on the back.

    • Remove the plastic from the device once it lifts out freely.

  3. HP Sprocket 2-in-1 Battery Replacement: 手順 3、 3の画像 1 HP Sprocket 2-in-1 Battery Replacement: 手順 3、 3の画像 2 HP Sprocket 2-in-1 Battery Replacement: 手順 3、 3の画像 3
    • Remove two 2.5mm JIS #00 located on the small circuit board in view.

    • Use the Jimmy to remove the board after the screws have been removed.

    • Be careful not to crease or damage the ribbon cable.

  4. HP Sprocket 2-in-1 Battery Replacement: 手順 4、 3の画像 1 HP Sprocket 2-in-1 Battery Replacement: 手順 4、 3の画像 2 HP Sprocket 2-in-1 Battery Replacement: 手順 4、 3の画像 3
    • Remove two 2.5mm JIS #00 screws from the translucent plastic bracket.

    • One will be located beneath the ribbon cable.

    • Remove the translucent plastic bracket by hand.

  5. HP Sprocket 2-in-1 Battery Replacement: 手順 5、 2の画像 1 HP Sprocket 2-in-1 Battery Replacement: 手順 5、 2の画像 2
    • Remove four 2.5mm JIS #00 screws from the beige casing.

  6. HP Sprocket 2-in-1 Battery Replacement: 手順 6、 3の画像 1 HP Sprocket 2-in-1 Battery Replacement: 手順 6、 3の画像 2 HP Sprocket 2-in-1 Battery Replacement: 手順 6、 3の画像 3
    • Use the iFixit opening tool to slowly work between the white and beige casing around the device.

    • Flip the device over and seperate the white casing from the rest of the device.

    • Be careful not to break the plastic while removing the case.

    • Gently remove the white casing as there is a ribbon cable connecting the two pieces.

  7. HP Sprocket 2-in-1 Battery Replacement: 手順 7、 1の画像 1
    • Carefully remove the ribbon cable that connects the flash to the outer casing.

  8. HP Sprocket 2-in-1 Battery Replacement, Battery: 手順 8、 2の画像 1 HP Sprocket 2-in-1 Battery Replacement, Battery: 手順 8、 2の画像 2
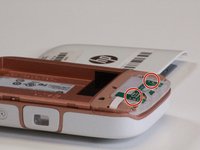
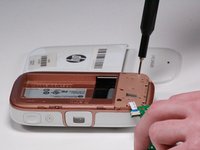
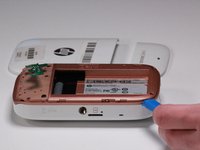
    • Use a JIS #00 screwdriver to remove a single black screw near the viewfinder.

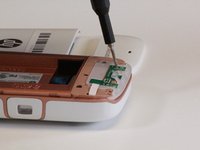
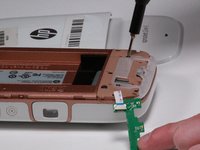
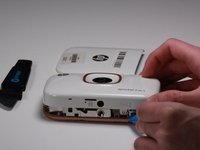
    • Remove a single silver 2.5mm JIS #00 screw near the USB port of the device.

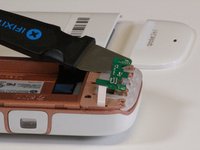
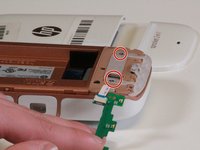
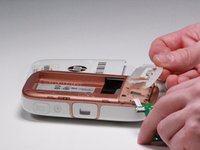
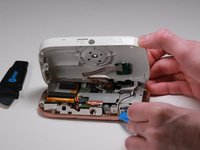
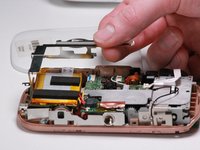
    • Carefully remove the metal bracket.

  9. HP Sprocket 2-in-1 Battery Replacement: 手順 9、 1の画像 1
    • Work the battery free from the device with the iFixit opening tool.

    • Carefully disconnect the battery from the board.

終わりに

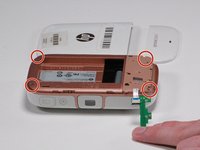
To reassemble your device, follow these instructions in reverse order.

2 の人々がこのガイドを完成させました。

作成者

4人の作成者と共同で作成されました。

Paulo Warren

メンバー登録日: 02/05/19

458 ポイント

4のガイドは作成済み

チーム

University of Michigan, Team S1-G4, Li Winter 2019 University of Michigan, Team S1-G4, Li Winter 2019人のメンバー

UMIC-LI-W19S1G4

4 メンバー

10のガイドは作成済み

7 件のコメント

Awesome guide. Just turned on my sprocket after 9 months and the battery is definitely dead. I will definitely be using your guide in the days to come. But where did you get the replacement battery from?

Cheers,

Big Peltch - 返信

Did you ever figure out where to buy a battery?

Michael Staats -

The original post is old asking where to find a replacement battery, but hopefully this post will help those that find this installation video. Amazon has the batteries for about $26.00. Here’s a link to help out.

Replacement Battery for HP Sprocket 200,PN:1AS84-60006,Photo Printer Battery https://a.co/d/2gML4tv

Cafe Chic -

Hola, donde puedo comprar la bateria de HP Sprocket 100? Li-ion Polymer Battery Model: P0562-LF. Desde ya muchas gracias.

Daniel Stizza - 返信

Muy bonito todo.

Acudí al soporte HP y me dicen que no hay batería de reemplazo. La he buscado en muchos sitios y nada.

¿En qué sitio la podré conseguir?

Fernando - 返信

コメントを追加

統計データ:

過去 24時間: 4

過去 7 日: 13

過去 30 日: 53

今までの合計 5,280