メインコンテンツにスキップ

HP Spectre 13-3010dx Fan Replacement

必要な工具と部品

  1. HP Spectre 13-3010dx Fan Replacement, Removal of the Back Case: 手順 1、 2の画像 1 HP Spectre 13-3010dx Fan Replacement, Removal of the Back Case: 手順 1、 2の画像 2
    この手順で使用する道具:
    Anti-Static Wrist Strap
    $7.95
    購入する
    • Put on Anti Static Wrist Strap.

    • It is always a good idea to ground yourself when working with electronics to prevent static buildup. You wear this strap to protect you and your device from accidental electrostatic discharge (ESD) damage during repairs.]

    • Flip Computer Upside down.

    • Unscrew the eight 3.3mm black screws on the back casing with the T4 Torx Screwdriver.

  2. HP Spectre 13-3010dx Fan Replacement: 手順 2、 2の画像 1 HP Spectre 13-3010dx Fan Replacement: 手順 2、 2の画像 2
    • Use the plastic opening tool to lift the back case off.

    • Use the plastic opening tools first; metal spudgers can damage your device.

  3. HP Spectre 13-3010dx Fan Replacement, Battery: 手順 3、 1の画像 1
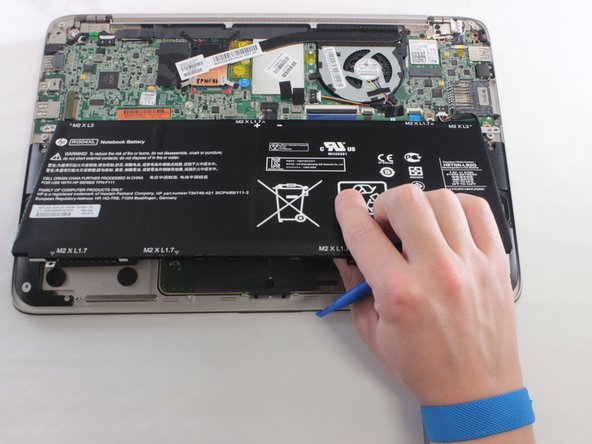
    • Remove the six 2.0mm silver screws and the two 3.2 mm black screws using the PH00 Phillips Screw Head.

  4. HP Spectre 13-3010dx Fan Replacement: 手順 4、 1の画像 1
    • Gently unplug from CONO851 plug, using the plastic opening tool.

  5. HP Spectre 13-3010dx Fan Replacement: 手順 5、 2の画像 1 HP Spectre 13-3010dx Fan Replacement: 手順 5、 2の画像 2
    • Gently lift up the battery and remove using the plastic opening tools.

  6. HP Spectre 13-3010dx Fan Replacement, Fan: 手順 6、 1の画像 1
    • Unscrew three 2.0 mm screws using the Phillips Head #0

  7. HP Spectre 13-3010dx Fan Replacement: 手順 7、 1の画像 1
    • Disconnect the plug.

  8. HP Spectre 13-3010dx Fan Replacement: 手順 8、 1の画像 1
    • Remove the fan.

終わりに

To reassemble your device, follow these instructions in reverse order.

6 の人々がこのガイドを完成させました。

作成者

2人の作成者と共同で作成されました。

Laurisa Titterud

メンバー登録日: 01/25/16

1,257 ポイント

6のガイドは作成済み

チーム

University of Wisconsin Stout, Team 1-2, Schneider-Bateman Spring 2016 University of Wisconsin Stout, Team 1-2, Schneider-Bateman Spring 2016人のメンバー

UWSTOUT-SCHNEIDER-BATEMAN-S16S1G2

3 メンバー

6のガイドは作成済み

2 件のコメント

Why did you physically remove the battery? It seems like unplugging the battery’s CONO851 plug would be good enough? It’s funny, even in the photo where you remove the fan, the battery is still there.

tshong - 返信

I replaced the fan in my computer. As tshong said, I did not have to remove the battery. Just unplugged it then skipped steps 3 and 5. and voila.

Trach Nguyen - 返信

コメントを追加

統計データ:

過去 24時間: 0

過去 7 日: 3

過去 30 日: 9

今までの合計 3,434