メインコンテンツにスキップ

HP Spectre 13 4003dx x360 Motherboard Replacement

必要な工具と部品

  1. HP Spectre 13 4003dx x360 Motherboard Replacement, Battery: 手順 1、 2の画像 1 HP Spectre 13 4003dx x360 Motherboard Replacement, Battery: 手順 1、 2の画像 2
    この手順で使用する道具:
    Magnetic Project Mat
    $19.95
    購入する
    • Before you begin, be sure to turn off your laptop and discharge the battery down to 25%.

    • Turn the computer upside down.

    • Use the T5 Torx Screwdriver to remove the eight 3.3 mm screws.

    • Make sure to use the magnetic project mat to help you keep track of the small screws.

  2. HP Spectre 13 4003dx x360 Motherboard Replacement: 手順 2、 2の画像 1 HP Spectre 13 4003dx x360 Motherboard Replacement: 手順 2、 2の画像 2
    • Use an opening tool to pry up and loosen the back case from the laptop.

    • If the back case doesn't loosen easily, there may be screws hidden underneath the rubber feet. Carefully pry a foot up and remove any hidden screws.

    • Remove the back case.

  3. HP Spectre 13 4003dx x360 Motherboard Replacement: 手順 3、 2の画像 1 HP Spectre 13 4003dx x360 Motherboard Replacement: 手順 3、 2の画像 2
    • Remove the four 2mm Phillips #00 screws securing the battery.

    • The screw locations are marked by small white arrows on the battery.

  4. HP Spectre 13 4003dx x360 Motherboard Replacement: 手順 4、 3の画像 1 HP Spectre 13 4003dx x360 Motherboard Replacement: 手順 4、 3の画像 2 HP Spectre 13 4003dx x360 Motherboard Replacement: 手順 4、 3の画像 3
    • Peel off the adhesive on the left side of the battery holding the speaker wire down.

    • Move the battery slightly to gain access to the battery plug, located on the left edge of the battery.

    • Carefully unplug the battery by pulling the connector towards the battery.

    • Pull parallel to the battery, not straight up.

    • Remove the battery.

    • It is normal for your battery to flex and bend a bit where the wider section meets the narrower section.

    Super article qui rend bien service et sécurise ce remplacement !

    Peut-être quelques précisions après avoir remplacé cette batterie :

    - Côtés extrêmes gauche et droite en haut, 2 vis plus longs que les autres. Un tournevis Torx T5 est plus approprié que le 4 car 2 vis étaient bien scellés.

    Il vaut mieux soulever le capot côté charnière en commençant par cet endroit mais en finalisant par l’avant de l’appareil. En effet, le côté charnière du PC en contient également sous le capot gênant la sortie de cette partie arrière.

    Le tournevis cruciforme 2,5 est plus approprié que le 2.

    Merci pour vos astuces :-)

    Patrice BONNEFOY - 返信

    Bonjour

    J'arrive à dégager la partie avant du couvercle mais ça bloque juste sous les pieds arrière.. et je n'ose pas forcer…. avez vous une astuce ????

    BAIGUE RENE - 返信

    Bonjour, Il faut vérifier qu'il n'y a plus de vis qui maintient la pièce. Attention, sur certains modèles de PC portables il peut y avoir des vis sous le caoutchouc des pieds du pc.

    Brendan -

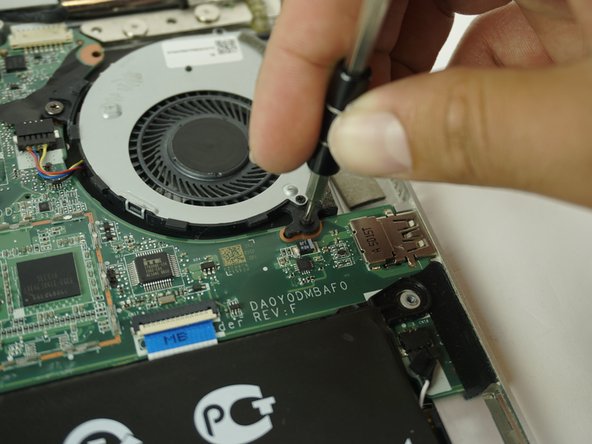
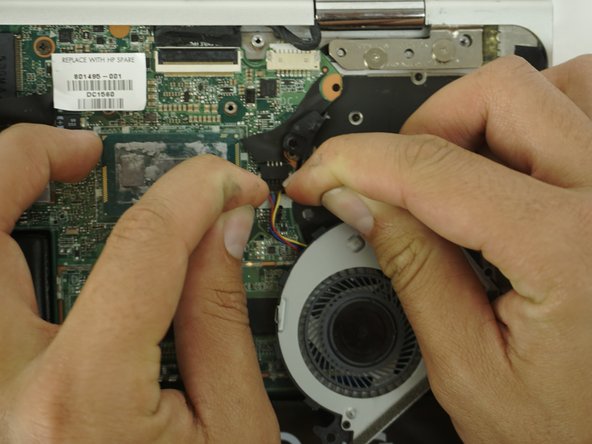
  5. HP Spectre 13 4003dx x360 Motherboard Replacement, Motherboard: 手順 5、 3の画像 1 HP Spectre 13 4003dx x360 Motherboard Replacement, Motherboard: 手順 5、 3の画像 2 HP Spectre 13 4003dx x360 Motherboard Replacement, Motherboard: 手順 5、 3の画像 3
    • Remove the two 2mm Phillips #00 screws from the fan.

    • Disconnect the fan from the motherboard.

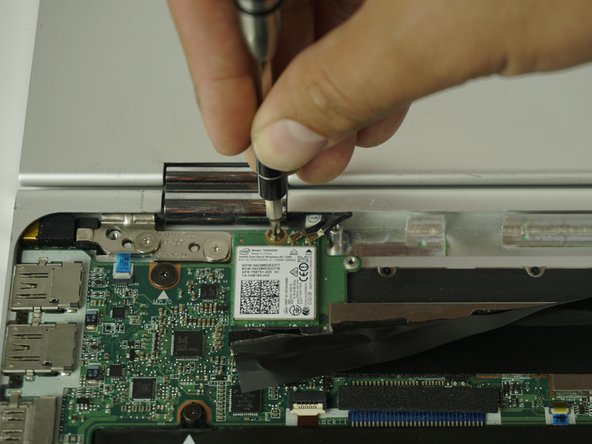
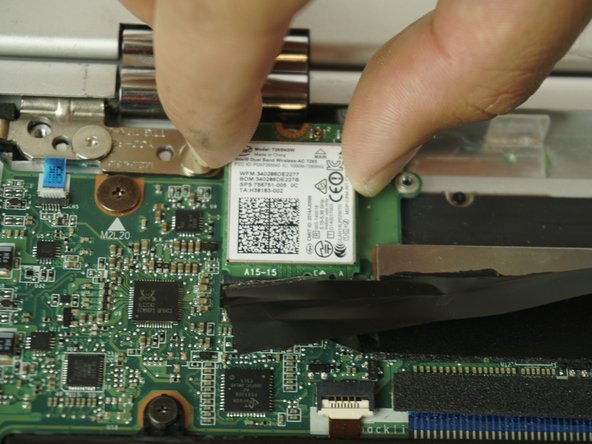
  6. HP Spectre 13 4003dx x360 Motherboard Replacement: 手順 6、 3の画像 1 HP Spectre 13 4003dx x360 Motherboard Replacement: 手順 6、 3の画像 2 HP Spectre 13 4003dx x360 Motherboard Replacement: 手順 6、 3の画像 3
    • Using a plastic opening tool, disconnect the antenna wires from the WiFi card.

    • Remove the single Phillips #00 screw from the WiFi card.

    • Slide the module up until it is completely removed.

  7. HP Spectre 13 4003dx x360 Motherboard Replacement: 手順 7、 2の画像 1 HP Spectre 13 4003dx x360 Motherboard Replacement: 手順 7、 2の画像 2
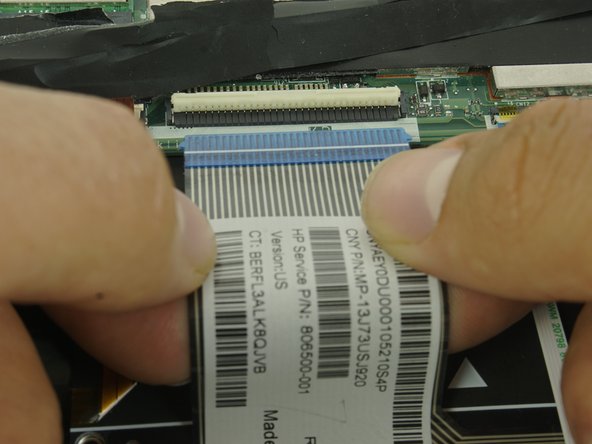
    • Use a plastic opening tool to flip up the retaining flap on the ribbon cable ZIF socket.

    • Pull the ribbon cable out of the ZIF connector.

  8. HP Spectre 13 4003dx x360 Motherboard Replacement: 手順 8、 1の画像 1
    • Using two plastic opening tools, Disconnect the right speaker cable from the motherboard.

  9. HP Spectre 13 4003dx x360 Motherboard Replacement: 手順 9、 3の画像 1 HP Spectre 13 4003dx x360 Motherboard Replacement: 手順 9、 3の画像 2 HP Spectre 13 4003dx x360 Motherboard Replacement: 手順 9、 3の画像 3
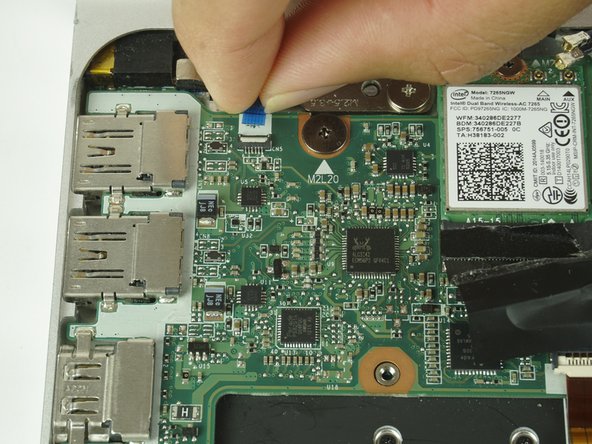
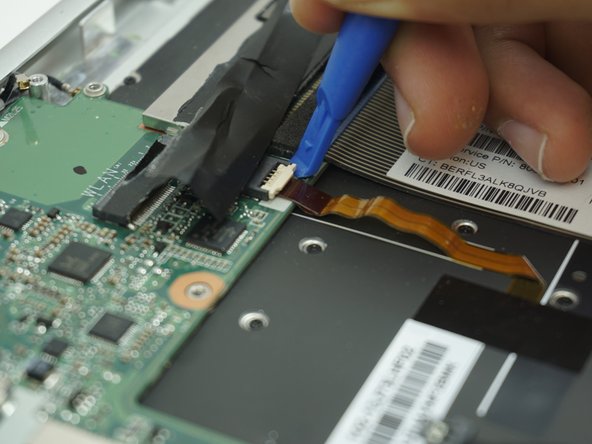
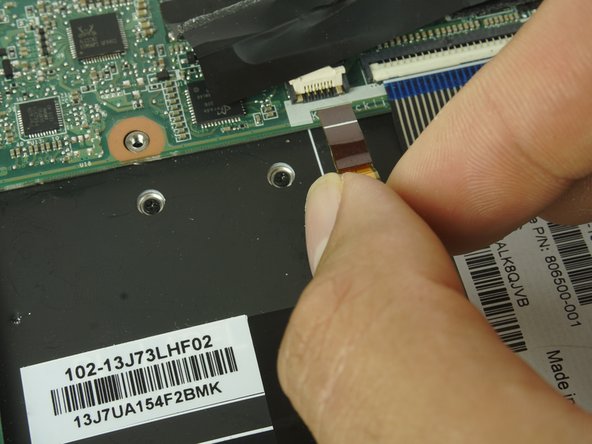
    • Identify the ZIF connector that connects the keyboard to the back light as shown in the image.

    • Using a plastic opening tool, lift the locking bar on the ZIF connector that connects the keyboard back light to the motherboard.

    • Gently pull the cable out.

  10. HP Spectre 13 4003dx x360 Motherboard Replacement: 手順 10、 3の画像 1 HP Spectre 13 4003dx x360 Motherboard Replacement: 手順 10、 3の画像 2 HP Spectre 13 4003dx x360 Motherboard Replacement: 手順 10、 3の画像 3
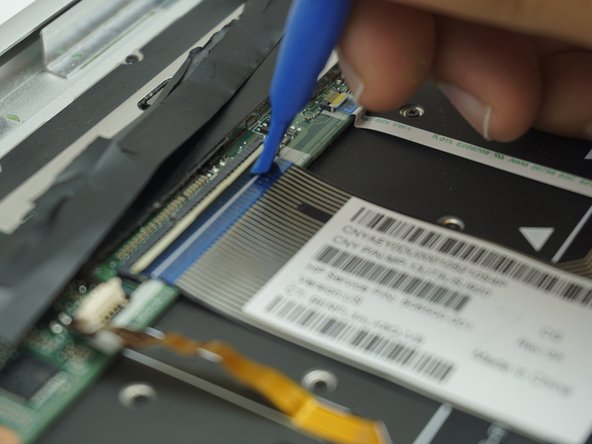
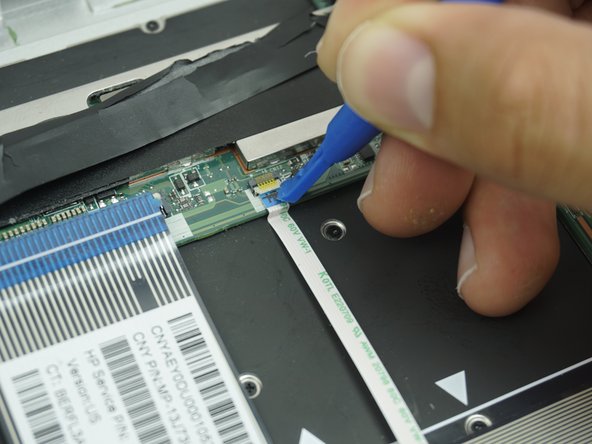
    • Gently peel back the tape on the locking bar of the keyboard connector.

    • Using a plastic opening tool, pull up on the locking bar.

    • Gently pull the cable out.

  11. HP Spectre 13 4003dx x360 Motherboard Replacement: 手順 11、 3の画像 1 HP Spectre 13 4003dx x360 Motherboard Replacement: 手順 11、 3の画像 2 HP Spectre 13 4003dx x360 Motherboard Replacement: 手順 11、 3の画像 3
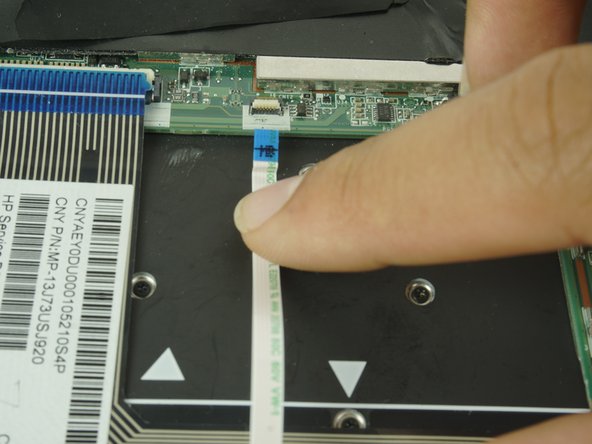
    • Identify the touch pad ZIF cable as shown in the image.

    • Using a plastic opening tool, Gently lift up the locking bar on the touch pad ZIF.

    • Gently slide the cable out.

  12. HP Spectre 13 4003dx x360 Motherboard Replacement: 手順 12、 2の画像 1 HP Spectre 13 4003dx x360 Motherboard Replacement: 手順 12、 2の画像 2
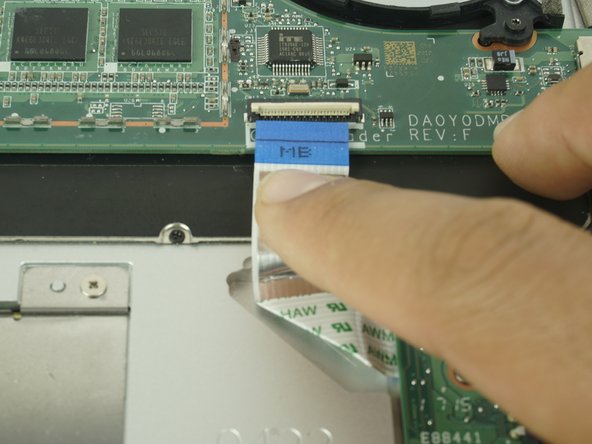
    • Using a plastic opening tool, Lift the locking bar on the card reader ZIF connector.

    • Gently slide the cable out.

  13. HP Spectre 13 4003dx x360 Motherboard Replacement: 手順 13、 1の画像 1
    • Using two plastic opening tools, Disconnect the left speaker cable.

  14. HP Spectre 13 4003dx x360 Motherboard Replacement: 手順 14、 1の画像 1
    • Using two plastic opening tools, Unplug the power cable connector.

  15. HP Spectre 13 4003dx x360 Motherboard Replacement: 手順 15、 2の画像 1 HP Spectre 13 4003dx x360 Motherboard Replacement: 手順 15、 2の画像 2
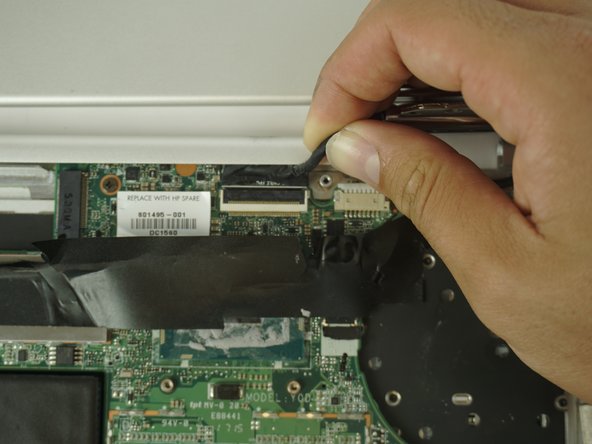
    • Using a plastic opening tool, Lift the locking bar on the display connector.

    • Grip the black tape and pull up to unplug.

  16. HP Spectre 13 4003dx x360 Motherboard Replacement: 手順 16、 3の画像 1 HP Spectre 13 4003dx x360 Motherboard Replacement: 手順 16、 3の画像 2 HP Spectre 13 4003dx x360 Motherboard Replacement: 手順 16、 3の画像 3
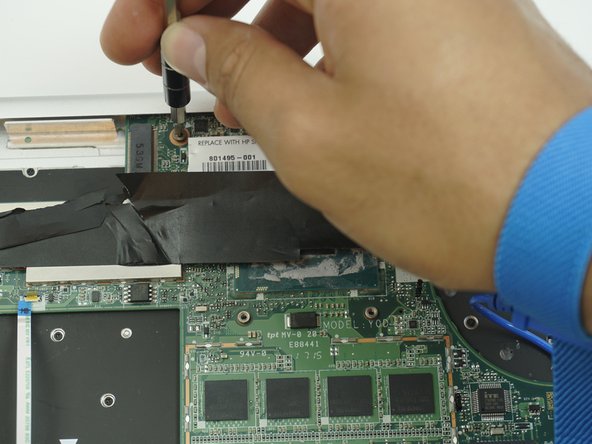
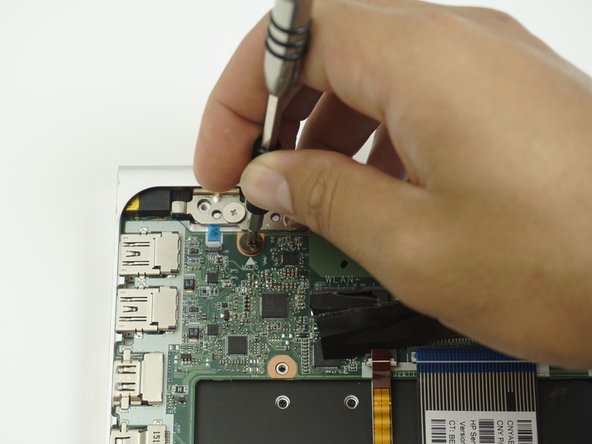
    • Remove the 3.5mm Phillips #00 screw securing the motherboard to the top cover.

    • Remove the 2mm Phillips #00 screw securing the motherboard to the top cover.

  17. HP Spectre 13 4003dx x360 Motherboard Replacement: 手順 17、 2の画像 1 HP Spectre 13 4003dx x360 Motherboard Replacement: 手順 17、 2の画像 2
    • Remove the motherboard from the alignment pins on the top cover.

終わりに

To reassemble your device, follow these instructions in reverse order.

7 の人々がこのガイドを完成させました。

作成者

7人の作成者と共同で作成されました。

Alie Antar

メンバー登録日: 01/29/18

661 ポイント

2のガイドは作成済み

チーム

USF Tampa, Team S5-G4, Passmore Spring 2018 USF Tampa, Team S5-G4, Passmore Spring 2018人のメンバー

USFT-PASSMORE-S18S5G4

3 メンバー

8のガイドは作成済み

3 件のコメント

Thanks good instructions once I source a replacement board I will apply you're method. I live near Barcelona Spain any ideas on sourcing a new board??

Arthur David Mc Kee - 返信

Thanks, it’s easy with your explications

Stéphane M - 返信

Merci pour vos explications très détaillés qui m'ont permis de changer la carte mère d'un hp spectre x360-13 sans trop de difficultées le 13 juillet 2020.

J'ai tout particuliérement apprécié les détails pour ouvrir les différents connecteurs.

Seule difficulté était l'ouverture de la vis de fixation de la carte wifi, qui état extrêmement ferme.

Une fois la nouvelle carte mère installé le portable a démarré sans aucune autre intervention.

J'ai horreur de jetter des équipements dont seulement un élément est défectueux et je suis donc très reconnaissant de votre publication.

Un grand Merci

Albrect E.

Chantilly France

ENDRES Albrecht - 返信

コメントを追加

統計データ:

過去 24時間: 1

過去 7 日: 6

過去 30 日: 23

今までの合計 9,024