メインコンテンツにスキップ

HP ProBook x360 11 G5 EE Charging Port Replacement

必要な工具と部品

  1. HP ProBook x360 11 G5 EE Charging Port Replacement, Keyboard Assembly: 手順 1、 3の画像 1 HP ProBook x360 11 G5 EE Charging Port Replacement, Keyboard Assembly: 手順 1、 3の画像 2 HP ProBook x360 11 G5 EE Charging Port Replacement, Keyboard Assembly: 手順 1、 3の画像 3
    • Remove the 4.1 mm screws with a T5 Torx screwdriver.

    • Remove the 4.1 mm screws using a JIS #0 screwdriver.

  2. HP ProBook x360 11 G5 EE Charging Port Replacement: 手順 2、 1の画像 1
    • Use an opening pick to pry the corners of the keyboard deck.

  3. HP ProBook x360 11 G5 EE Charging Port Replacement: 手順 3、 3の画像 1 HP ProBook x360 11 G5 EE Charging Port Replacement: 手順 3、 3の画像 2 HP ProBook x360 11 G5 EE Charging Port Replacement: 手順 3、 3の画像 3
    • Use an opening pick or opening tool to pry around the sides of the keyboard assembly.

  4. HP ProBook x360 11 G5 EE Charging Port Replacement: 手順 4、 3の画像 1 HP ProBook x360 11 G5 EE Charging Port Replacement: 手順 4、 3の画像 2 HP ProBook x360 11 G5 EE Charging Port Replacement: 手順 4、 3の画像 3
    • Lift the keyboard assembly to expose two ribbon cables.

    • Lift the two plastic tabs that hold the cables in place on the motherboard

    • Slide the ribbon cables out of each connector.

  5. HP ProBook x360 11 G5 EE Charging Port Replacement: 手順 5、 2の画像 1 HP ProBook x360 11 G5 EE Charging Port Replacement: 手順 5、 2の画像 2
    • Remove the keyboard assembly from the rest of the computer.

  6. HP ProBook x360 11 G5 EE Charging Port Replacement, Battery: 手順 6、 2の画像 1 HP ProBook x360 11 G5 EE Charging Port Replacement, Battery: 手順 6、 2の画像 2
    • Remove the four 3 mm screws from the battery with the JIS #0 screwdriver.

  7. HP ProBook x360 11 G5 EE Charging Port Replacement: 手順 7、 3の画像 1 HP ProBook x360 11 G5 EE Charging Port Replacement: 手順 7、 3の画像 2 HP ProBook x360 11 G5 EE Charging Port Replacement: 手順 7、 3の画像 3
    • Pry the battery up from the laptop using an opening pick.

    • Lift the battery out of its place.

  8. HP ProBook x360 11 G5 EE Charging Port Replacement, Charging Port: 手順 8、 2の画像 1 HP ProBook x360 11 G5 EE Charging Port Replacement, Charging Port: 手順 8、 2の画像 2
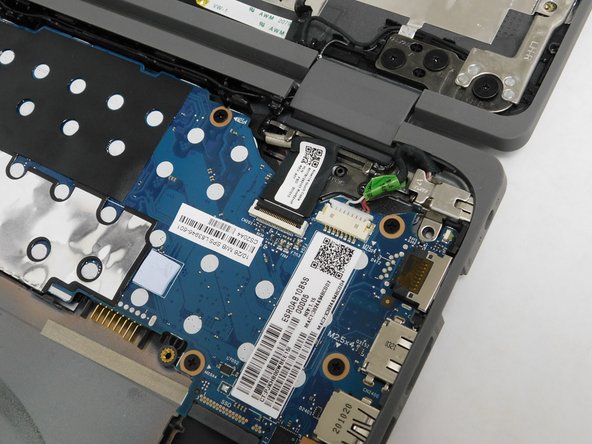
    • Remove the single 3 mm screw from the charging port using a T5 Torx screwdriver.

  9. HP ProBook x360 11 G5 EE Charging Port Replacement: 手順 9、 3の画像 1 HP ProBook x360 11 G5 EE Charging Port Replacement: 手順 9、 3の画像 2 HP ProBook x360 11 G5 EE Charging Port Replacement: 手順 9、 3の画像 3
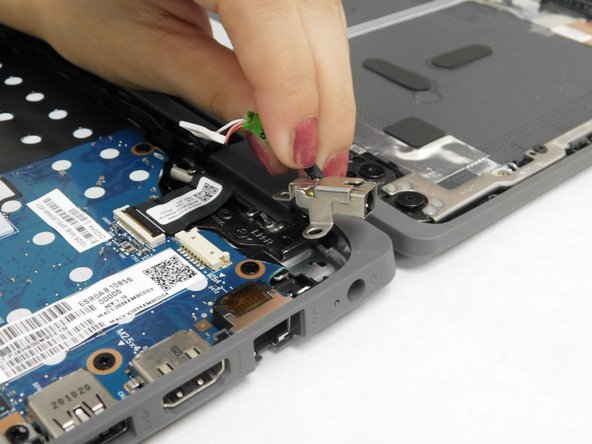
    • Disconnect the charging port wire from the motherboard.

    • Remove the charging port from your device.

終わりに

To reassemble your device, follow these instructions in reverse order.

ある他の人がこのガイドを完成しました。

作成者

1人の作成者と共同作成されました。

Michelle Pina

メンバー登録日: 10/26/21

479 ポイント

4のガイドは作成済み

チーム

Gateway, Team 1-4, Pee Fall 2021 Gateway, Team 1-4, Pee Fall 2021人のメンバー

GCC-PEE-F21S1G4

5 メンバー

5のガイドは作成済み

コメント 1 件

Hi!! I have the same model of notebook with 64 giga emmc. Is it possible installing an ssd or an hdd?

Riccardo Insolera - 返信

コメントを追加

統計データ:

過去 24時間: 0

過去 7 日: 9

過去 30 日: 19

今までの合計 949