メインコンテンツにスキップ

HP Photosmart c4780 Scanner Glass Assembly Replacement

必要な工具と部品

  1. HP Photosmart c4780 Scanner Glass Assembly Replacement, Outer Shell Disassembly: 手順 1、 2の画像 1 HP Photosmart c4780 Scanner Glass Assembly Replacement, Outer Shell Disassembly: 手順 1、 2の画像 2
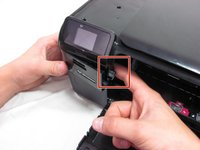
    • Unplug the device from any energy sources.

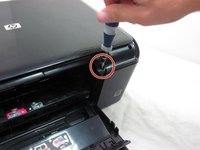
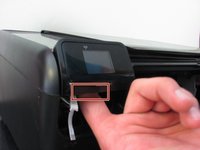
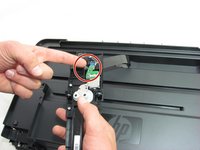
    • Lift the top cover of the scanner.

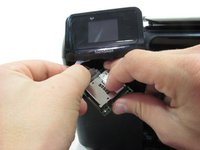
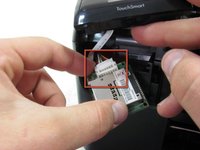
    • Use a plastic opening tool to remove the plastic frame surrounding the glass.

  2. HP Photosmart c4780 Scanner Glass Assembly Replacement: 手順 2、 1の画像 1
    • Carefully pull the frame away from the glass.

    • If it doesn't remove easily, use the iFixit Opening Tool again to pry stuck sections.

  3. HP Photosmart c4780 Scanner Glass Assembly Replacement: 手順 3、 1の画像 1
    • Use a T10 screwdriver to unscrew the two screws that fasten the frame to the printer hood.

  4. HP Photosmart c4780 Scanner Glass Assembly Replacement: 手順 4、 2の画像 1 HP Photosmart c4780 Scanner Glass Assembly Replacement: 手順 4、 2の画像 2
    • Put your finger behind the panel with the power button.

    • Then, pull the piece outwards.

  5. HP Photosmart c4780 Scanner Glass Assembly Replacement: 手順 5、 2の画像 1 HP Photosmart c4780 Scanner Glass Assembly Replacement: 手順 5、 2の画像 2
    • Unscrew the screw inside the power button panel space.

    • Then, unscrew the screw that is across the printer slider.

  6. HP Photosmart c4780 Scanner Glass Assembly Replacement: 手順 6、 1の画像 1
    • Pull the white circuit board outwards which is located under the small screen.

    • Unplug the small ribbon cable from the circuit board.

    • Be careful when you unplug the ribbon cable not to use too much force. Using too much force may damage or rip the cable.

    • Unplug the small ribbon cable from the circuit board. Be careful when you unplug the ribbon cable not to use too much force. Using too much force may damage or rip the cable.

  7. HP Photosmart c4780 Scanner Glass Assembly Replacement: 手順 8、 2の画像 1 HP Photosmart c4780 Scanner Glass Assembly Replacement: 手順 8、 2の画像 2
    • Pull the memory card reader's circuit board out.

    • Detach the white wiring connector from the back of the circuit board.

    • You may need to use a finger nail or a plastic opening tool to detach the white wiring connector from the circuit board.

  8. HP Photosmart c4780 Scanner Glass Assembly Replacement: 手順 9、 2の画像 1 HP Photosmart c4780 Scanner Glass Assembly Replacement: 手順 9、 2の画像 2
    • Put your finger behind the small screen.

    • Then, pull it up.

    • Do not hesitate to use force to remove the TouchSmart panel.

    • Disconnect the ribbon cable from the small screen.

  9. HP Photosmart c4780 Scanner Glass Assembly Replacement: 手順 10、 1の画像 1
    • Pull the printer hood upward.

  10. HP Photosmart c4780 Scanner Glass Assembly Replacement, Scanner Glass Assembly: 手順 11、 2の画像 1 HP Photosmart c4780 Scanner Glass Assembly Replacement, Scanner Glass Assembly: 手順 11、 2の画像 2
    • Lift the scanning lid from the lower portion of the printer hood.

  11. HP Photosmart c4780 Scanner Glass Assembly Replacement: 手順 12、 2の画像 1 HP Photosmart c4780 Scanner Glass Assembly Replacement: 手順 12、 2の画像 2
    • Leaving the ribbon connected, lift the sliding scanner off the track.

    • Pull the ribbon cable out of the slot on the scanner circuit board.

    • Insert the scanning piece into the rolling track.

終わりに

To reassemble the sliding scan piece, follow these instructions in reverse order.

作成者

8人の作成者と共同で作成されました。

Renee Lamb

メンバー登録日: 09/26/12

235 ポイント

3のガイドは作成済み

チーム

Cal Poly, Team 2-11, Propen Fall 2012 Cal Poly, Team 2-11, Propen Fall 2012人のメンバー

CPSU-PROPEN-F12S2G11

4 メンバー

6のガイドは作成済み

コメント 1 件

Where can i buy the scaning piece? Im from Spain.

Bogdan Cosmin - 返信

コメントを追加

統計データ:

過去 24時間: 0

過去 7 日: 1

過去 30 日: 3

今までの合計 1,504