メインコンテンツにスキップ

HP Photosmart Premium e-All-in-One C310a Scanning Glass Replacement

必要な工具と部品

  1. HP Photosmart Premium e-All-in-One C310a Scanning Glass Replacement, Remove the Mounting Screws: 手順 1、 2の画像 1 HP Photosmart Premium e-All-in-One C310a Scanning Glass Replacement, Remove the Mounting Screws: 手順 1、 2の画像 2
    • Tilt the touchscreen as far forward as possible.

    • Remove the two (2) 15mm T-10 Torx screws from behind the screen.

  2. HP Photosmart Premium e-All-in-One C310a Scanning Glass Replacement, Separate the Touchpad from the Printer: 手順 2、 1の画像 1
    • Once the screws are removed, apply a steady upward force on the front bottom corners of the screen until it pops loose.

    • Be careful to not move the screen too far from the printer before disconnecting it. You may damage the connections within the printer if you do.

  3. HP Photosmart Premium e-All-in-One C310a Scanning Glass Replacement, Disconnect the Ribbon Cables: 手順 3、 2の画像 1 HP Photosmart Premium e-All-in-One C310a Scanning Glass Replacement, Disconnect the Ribbon Cables: 手順 3、 2の画像 2
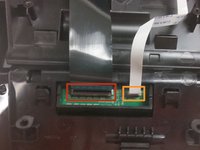
    • Before removing the ribbon cable, flip the black bar up to unlock the cable. Grab the blue area of the cable near the connector and pull straight out of the socket.

    • Pull this plug straight out of the socket slowly.

    • Be careful when pulling out these ribbon cables. If you pull too hard or don't unlock the cable, you can damage the connection.

  4. HP Photosmart Premium e-All-in-One C310a Scanning Glass Replacement, Remove the Touchpad: 手順 4、 1の画像 1
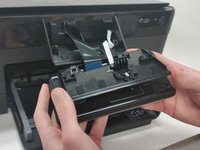
    • Once the ribbon cables have been removed, your screen should be free of the printer.

  5. HP Photosmart Premium e-All-in-One C310a Scanning Glass Replacement, Remove the Scanning Cover: 手順 5、 1の画像 1
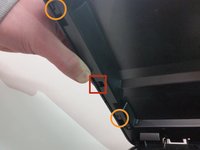
    • Lift the scanning cover until it is vertical.

    • Press on the cover near the two hinges.

  6. HP Photosmart Premium e-All-in-One C310a Scanning Glass Replacement, Remove the Side Plates: 手順 6、 2の画像 1 HP Photosmart Premium e-All-in-One C310a Scanning Glass Replacement, Remove the Side Plates: 手順 6、 2の画像 2
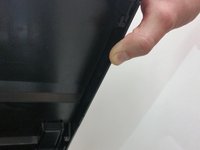
    • Pull the plate from the middle away from the printer until the tab is free.

    • Slide the plate towards the back of the printer until the latches are released.

    • Remove both side plates before you proceed.

  7. HP Photosmart Premium e-All-in-One C310a Scanning Glass Replacement, Remove the Scanner Surface: 手順 7、 1の画像 1
    • Remove the five (5) 15mm T10 Torx screws.

    • Lift the scanner surface from the front where the screen was to remove it.

    • If you are only trying to clean the glass, stop here and follow the instructions in reverse order to reassemble your device.

  8. HP Photosmart Premium e-All-in-One C310a Scanning Glass Replacement, Remove the Glass from the Scanner Surface: 手順 8、 1の画像 1
    • Make sure you are careful with the glass, as it can cut you if it breaks.

    • Apply force to the glass near where it is joined with the scanner surface.

    • Once the glass is removed, insert your new replacement glass and make sure it is firmly attached to the scanner surface.

終わりに

To reassemble your device, follow these instructions in reverse order.

作成者

4人の作成者と共同で作成されました。

Andrew Schaub

メンバー登録日: 10/23/14

569 ポイント

5のガイドは作成済み

チーム

Michigan Tech, Team 1-4, Lauer Fall 2014 Michigan Tech, Team 1-4, Lauer Fall 2014人のメンバー

MTU-LAUER-F14S1G4

3 メンバー

5のガイドは作成済み

0 件のコメント

コメントを追加

統計データ:

過去 24時間: 0

過去 7 日: 1

過去 30 日: 10

今までの合計 826