はじめに
この修理ガイドでは、プリントヘッドを取り外してプリンターをクリーニングします。通常、プリントヘッドパークスロットはインクとほこりが溶けています。
必要な工具と部品
-
-
プリンターの電源を入れます。
-
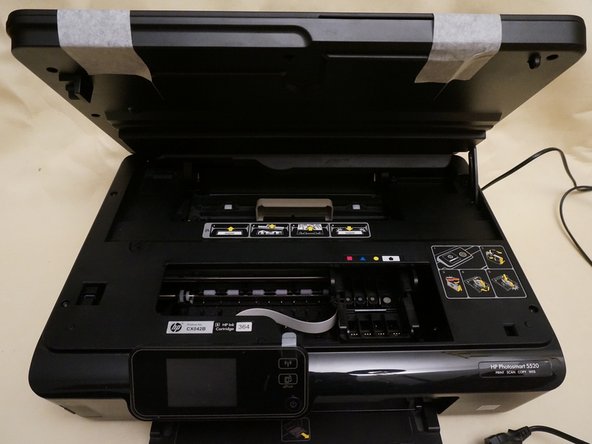
スキャナーガラスと上部カバーを持ち上げ、プリンターヘッドをプリンターケースの中央に配置します。
-
インクカートリッジを取り外します。
-
プリンタの電源を切りますが、正面のI / Oボタンで電源を切らないでください。そうしなければ、プリントヘッドがパークスロットに戻ります。
-
粘着テープを使用して、スキャナーのガラスとカバーを固定します。
-
-
-
-
7本のトルクスネジを外します。プリンタラベルの下にあるネジを忘れないでください(右下端のプリンタラベルを剥がす必要があります)
-
LCDパネルの背面にあるクリップを押し、同時にLCDパネルを外側に引っ張ります。クリップは、中央の写真でHPのラベルが見えるプラスチックの下にありますが、目視で確認はできません。4枚目の画像を参照してください。
-
次に、LCDパネルに接続されているリボンを引っ張って、LCDパネルをプリンターから取り外します。
-
LCDパネルに隠れている残り2本のトルクスネジを外します
-
クリップの場所を確認してください。(青い矢印)
-
-
-
プリントヘッドを固定しているスプリング(バネ)を取り外します。
-
リボンを引っ張ってプリントヘッドを取り外します。これらはデリケートで、アルコールで洗浄しようとすると傷つきやすいのでご注意ください。
-
クリーニングまたはパーツ交換後にプリントヘッドを挿入する際は、3番目の画像に示すように、プラスチックガイドの間にプラスチックリボンが水平に装着されているか確認してください。この作業を間違えると、最後に電源を入れたときにプリントヘッドが詰まることがあります。
-
-
-
プリンタには、プリントヘッドをクリーニングする自動機能があります。通常、プリントヘッドがクリーニングされるエリアには、大量のインク(おそらくほこりで溶けている)が付着してます。
-
画像のように、5本のトルクスネジのうち4本を外します。ユーザーコメントにあるように、右上の1本はこのパーツの2つのピースを結合するためのものです。
-
プリントヘッドが取り外してある場合(画像には表示されていません)、プラスチックプレートを軽く傾けて取り外します。
-
まだ手袋を着用していない場合は、ここで手袋をつける時間です!
-
次に、プリントヘッドクリーニングシステムを固定するキャリッジを押します。(赤い矢印)
-
プリントヘッドクリーニングシステムを固定しているキャリッジがきれいになりました。(最後の画像)
-


デバイスを再組み立てするには、これらの手順を逆の順序で実行します。
デバイスを再組み立てするには、これらの手順を逆の順序で実行します。
62 の人々がこのガイドを完成させました。
以下の翻訳者の皆さんにお礼を申し上げます:
100%


これらの翻訳者の方々は世界を修理する私たちのサポートをしてくれています。 あなたも貢献してみませんか?
翻訳を始める ›
41 件のコメント
A l'étape 3, je n'arrive pas à retirer l'écran LCD. quand on me dit de pousser les deux clips à l'arrière, je ne vois les pas. tout semble solide et j'ai peur de casser quelque chose en forçant. comment franchir cette étape?
J'ai aussi eu un peu de difficulté à enlever l'écran LCD. Il ne faut pas hésiter à tirer dessus. Quand un clip est enlevé, les autres viennent plus facilement
LENNON -
Bonjour : très bon tutoriel, mais ..., manquent des précisions ; Etape 2 : comment est fixée et se démonte cette charnière-glissière ? Etape 3 : MISSION IMPOSSIBLE pour le démontage de l'écran LCD ! combien de clips ? à quoi ressemblent-ils ? comment faut-il agir sur ces clips, "à tâtons et en aveugle" ? etc ... ; je n'ai pas réussi à franchir cette étape qui demande des explications supplémentaires ... Merci : MJL
MJL -
J'ai étais ravie d'avoir ce tutoriel entre les mains car j'avais de gros problèmes et la tout est très bien détaillé en image c'est parfait même les références pour les pièces à changer d'indiquer c'est très bien
The print head cleaning system carriage can be completely removed. Need to push the carriage to back of printer. Remove screw in back right corner, next to the black cylindrical pump with rubber hoses, and another in the gear assembly that runs this pump. Then wiggle and remove this pump/gear assembly. Now the carriage can be moved forward on the track till a slot allows getting past a small metal shaft and a gear. Now you can clean it in the sink with hot water. Be careful to put the two springs back on this carriage before putting it back into the printer.
And be sure all the tubing will freely flow water, or the pumping action will not work!