メインコンテンツにスキップ

HP Pavilion x360 m3-u001dx Display Replacement

必要な工具と部品

  1. HP Pavilion x360 m3-u001dx Display Replacement, Keyboard: 手順 1、 1の画像 1
    • Shut down the computer.

    • Disconnect the power and all external devices connected to the computer.

    • Working on your device while it is turned on may result in electric shock.

  2. HP Pavilion x360 m3-u001dx Display Replacement: 手順 2、 2の画像 1 HP Pavilion x360 m3-u001dx Display Replacement: 手順 2、 2の画像 2
    • Use a Metal Spudger and remove the rubber foot closet from the bottom of the laptop.

  3. HP Pavilion x360 m3-u001dx Display Replacement: 手順 3、 1の画像 1
    • Remove all of the screws located on the bottom of the laptop:

    • 5 Phillips 2.4 x 5.7 mm screws

    • 5 Phillips 2.0 x 5.0 mm screws

    • Make special note of each screw and screw lock size and location during removal and replacement.

  4. HP Pavilion x360 m3-u001dx Display Replacement: 手順 4、 1の画像 1
    • Turn the computer over onto its base, with the computer open and the keyboard facing upward.

  5. HP Pavilion x360 m3-u001dx Display Replacement: 手順 5、 2の画像 1 HP Pavilion x360 m3-u001dx Display Replacement: 手順 5、 2の画像 2
    • The keyboard is attached internally by clips. Use a small amount of force when removing the keyboard.

    • Use the Plastic Opening Tool to separate the keyboard from the base of the laptop.

  6. HP Pavilion x360 m3-u001dx Display Replacement: 手順 6、 1の画像 1
    • Raise the keyboard slightly to access the touch pad and keyboard cables.

    • Raising the keyboard too far or with excessive force may cause damage to the keyboard, touch pad cables, or their connectors.

  7. HP Pavilion x360 m3-u001dx Display Replacement: 手順 7、 1の画像 1
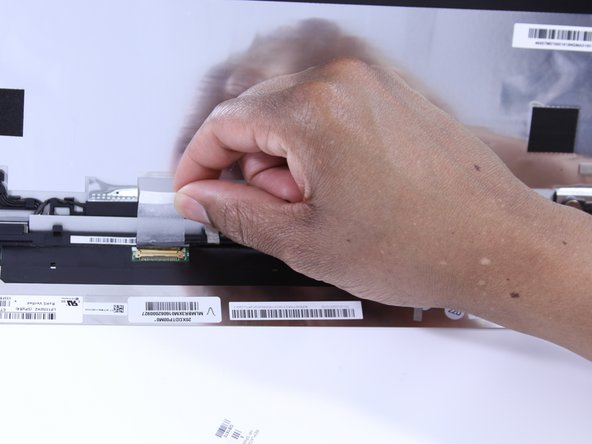
    • Disconnect the ribbon cables attaching the touch pad and keyboard to the system board (motherboard).

    • Using the Heavy-Duty Spudger lift up the plastic locks connecting the ribbon cable to the motherboard.

    • Use the blue plastic tab on the ribbon cable to pull it out from the lock on the motherboard.

  8. HP Pavilion x360 m3-u001dx Display Replacement: 手順 8、 1の画像 1
    • Lift the keyboard away from the base of the laptop.

  9. HP Pavilion x360 m3-u001dx Display Replacement, Battery: 手順 9、 1の画像 1
    • Using the Phillips 00 Screwdriver, remove 6 Phillips 2.0 x 4.6 mm screws from the perimeter of the battery.

    • Make special note of each screw and screw lock size and location during removal and replacement.

  10. HP Pavilion x360 m3-u001dx Display Replacement: 手順 10、 1の画像 1
    • Carefully lift the battery up from lower right corner and disconnect it from the motherboard.

  11. HP Pavilion x360 m3-u001dx Display Replacement, USB Port Shield: 手順 11、 3の画像 1 HP Pavilion x360 m3-u001dx Display Replacement, USB Port Shield: 手順 11、 3の画像 2 HP Pavilion x360 m3-u001dx Display Replacement, USB Port Shield: 手順 11、 3の画像 3
    • (You don't NEED to remove this shielding as you can remove the board with it still there.)

    • Remove the adhesive strip.

    • Lift the shield away from the base of the laptop.

  12. HP Pavilion x360 m3-u001dx Display Replacement, System Board (Motherboard): 手順 12、 3の画像 1 HP Pavilion x360 m3-u001dx Display Replacement, System Board (Motherboard): 手順 12、 3の画像 2 HP Pavilion x360 m3-u001dx Display Replacement, System Board (Motherboard): 手順 12、 3の画像 3
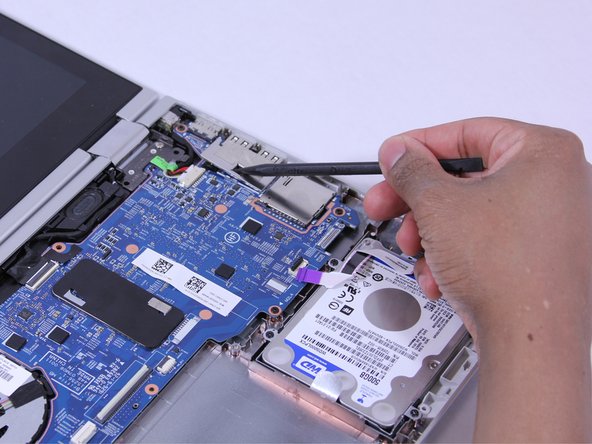
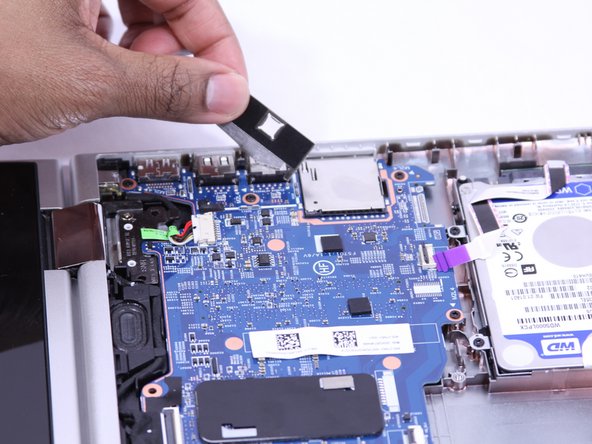
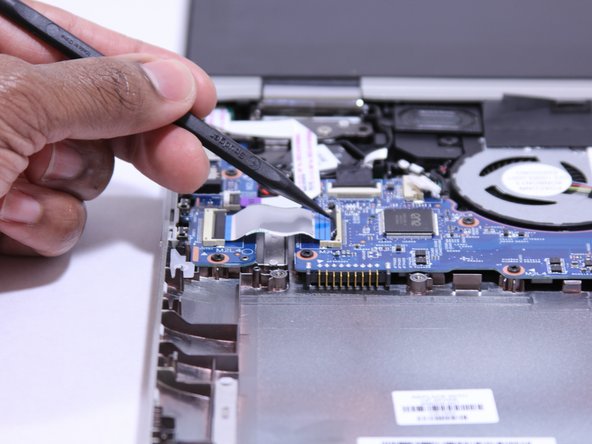
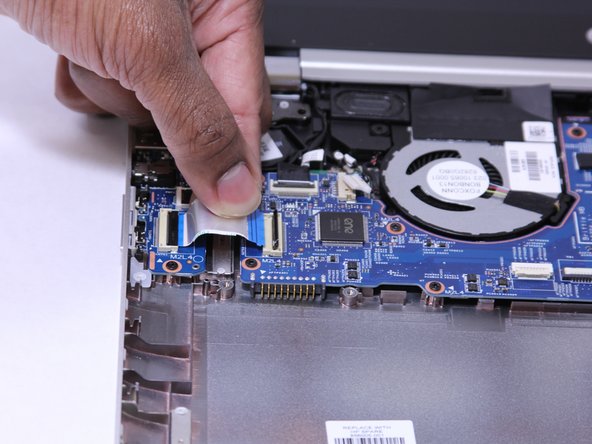
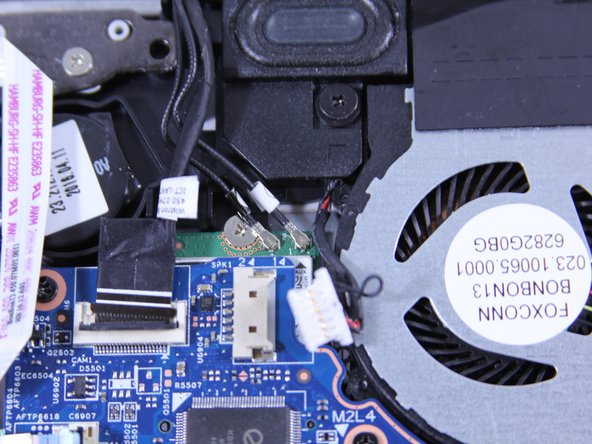
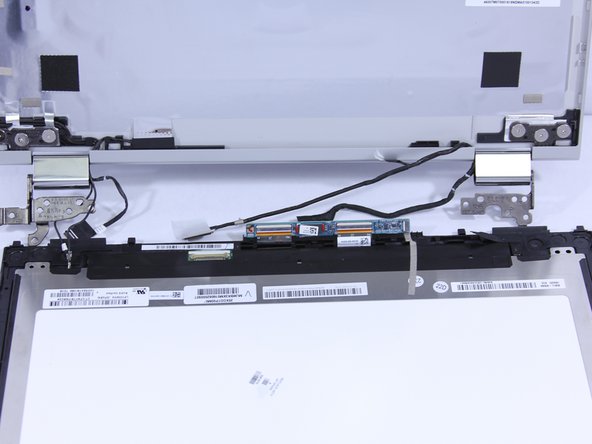
    • Disconnect the ribbon cables attached to the system board (motherboard).

    • Using the Heavy-Duty Spudger lift up the plastic locks connecting the ribbon cable to the motherboard.

    • Use the plastic tab on the ribbon cable to pull it out from the lock on the motherboard.

  13. HP Pavilion x360 m3-u001dx Display Replacement: 手順 13、 2の画像 1 HP Pavilion x360 m3-u001dx Display Replacement: 手順 13、 2の画像 2
    • Disconnect the fastened cables from the system board (motherboard) by carefully pushing the cable's plastic edges using the Heavy Duty Spudger.

  14. HP Pavilion x360 m3-u001dx Display Replacement: 手順 14、 2の画像 1 HP Pavilion x360 m3-u001dx Display Replacement: 手順 14、 2の画像 2
    • Pull the clipped cables from system board (motherboard).

  15. HP Pavilion x360 m3-u001dx Display Replacement: 手順 15、 3の画像 1 HP Pavilion x360 m3-u001dx Display Replacement: 手順 15、 3の画像 2 HP Pavilion x360 m3-u001dx Display Replacement: 手順 15、 3の画像 3
    • Remove the system board (motherboard).

    • Using the Phillips 00 Screw Driver, remove 9 Phillips 2.0 x 4.7 mm screws with "M2L4" next to them.

    • Using the Phillips 00 Screw Driver, remove the silver screw.

    • Make special note of each screw and screw lock size and location during removal and replacement.

  16. HP Pavilion x360 m3-u001dx Display Replacement: 手順 16、 1の画像 1
    • Carefully lift the front side of the system board (motherboard).

  17. HP Pavilion x360 m3-u001dx Display Replacement: 手順 17、 1の画像 1
    • Using a Heavy Duty Spudger, disconnect the black and red RTC battery cable on the left side of the system board (motherboard).

  18. HP Pavilion x360 m3-u001dx Display Replacement: 手順 18、 1の画像 1
    • Release the system board (motherboard) from the base enclosure.

    • Place the motherboard somewhere safe since it is the most delicate and expensive part of the laptop.

  19. HP Pavilion x360 m3-u001dx Display Replacement, Display: 手順 19、 1の画像 1
    • Using the Phillips 00 Screw Driver, remove 5 Phillips 2.5 x 4.2 screws from the hinges from the laptop's base.

    • Make special note of each screw and screw lock size and location during removal and replacement.

  20. HP Pavilion x360 m3-u001dx Display Replacement: 手順 20、 2の画像 1 HP Pavilion x360 m3-u001dx Display Replacement: 手順 20、 2の画像 2
    • Gently pull the display away from the base panel to unhinge.

  21. HP Pavilion x360 m3-u001dx Display Replacement: 手順 21、 1の画像 1
    • Use a Metal Spudger to pry the display panel from the outer casing.

    • Start from the top of the display panel and move along the edges and do not to push the metal spudger too far into the screen.

    • Be cautious not to apply heavy pressure to the display panel. This could damage the touch screen.

  22. HP Pavilion x360 m3-u001dx Display Replacement: 手順 22、 1の画像 1
    • Open the display panel to expose the connecting cables.

    • Open carefully to avoid causing damage to the connecting cables.

  23. HP Pavilion x360 m3-u001dx Display Replacement: 手順 23、 2の画像 1 HP Pavilion x360 m3-u001dx Display Replacement: 手順 23、 2の画像 2
    • Peel off the adhesive tape and remove the connected cable from the screen.

  24. HP Pavilion x360 m3-u001dx Display Replacement: 手順 24、 2の画像 1 HP Pavilion x360 m3-u001dx Display Replacement: 手順 24、 2の画像 2
    • Lift the circuit board out of the way to expose the wire underneath. Remove the wire from the base of the laptop.

終わりに

Follow these instructions in reverse order to reassemble your device.

5 の人々がこのガイドを完成させました。

作成者

4人の作成者と共同で作成されました。

_ thinhh@uw.edu

メンバー登録日: 02/01/17

297 ポイント

2のガイドは作成済み

チーム

UW Tacoma, Team 1-6, Rose Winter 2017 UW Tacoma, Team 1-6, Rose Winter 2017人のメンバー

UWT-ROSE-W17S1G6

4 メンバー

8のガイドは作成済み

5 件のコメント

Question, why not just do step 21 on?

ETHREAL1 - 返信

You can. Fold the computer all the way over and go from there. The only advantage to opening the bottom would be to disconnect the battery: a highly recommended procedure.

Corvallis Computer - 返信

A little extra pulling the mother board out. But I guess better safe then sorry. All in all this was a good guide!

Brandon Courtney - 返信

REMEMBER if your new touch screen does not work (no touch screen) go into the device manager and uninstall i2c hid device. restart the laptop and the driver (and touch) should work again.

Akeem Scrubb - 返信

I was able to install a new screen. However, the “touch” does not work. I tried the uninstall i2c hid (and also HID- compliant touch screen) trick, but no luck. My guess is its my fault during install. Before I go diving back in for a loose connection, does anyone know which connection I should focus on?

allynz - 返信

コメントを追加

統計データ:

過去 24時間: 1

過去 7 日: 5

過去 30 日: 22

今までの合計 7,245