メインコンテンツにスキップ

HP Pavilion x360 Convertible 14-dw1025nr Battery Replacement

必要な工具と部品

  1. HP Pavilion x360 Convertible 14-dw1025nr Battery Replacement, Battery: 手順 1、 3の画像 1 HP Pavilion x360 Convertible 14-dw1025nr Battery Replacement, Battery: 手順 1、 3の画像 2 HP Pavilion x360 Convertible 14-dw1025nr Battery Replacement, Battery: 手順 1、 3の画像 3
    • Turn off the device and set it upside down. Orient the hinges away from you.

    • Wedge the opening pick under the grip. Lift the end of the grip.

    • Pull the grip off all the way. Repeat for the second grip.

  2. HP Pavilion x360 Convertible 14-dw1025nr Battery Replacement: 手順 2、 3の画像 1 HP Pavilion x360 Convertible 14-dw1025nr Battery Replacement: 手順 2、 3の画像 2 HP Pavilion x360 Convertible 14-dw1025nr Battery Replacement: 手順 2、 3の画像 3
    • Use a Phillips #0 screwdriver to remove the 3 mm screw from the center bottom.

    • Use a Phillips #1 screwdriver to remove the 6 mm screw from all four corners of the bottom cover.

  3. HP Pavilion x360 Convertible 14-dw1025nr Battery Replacement: 手順 3、 3の画像 1 HP Pavilion x360 Convertible 14-dw1025nr Battery Replacement: 手順 3、 3の画像 2 HP Pavilion x360 Convertible 14-dw1025nr Battery Replacement: 手順 3、 3の画像 3
    • Use the opening pick to separate the back panel from the device.

    • Begin near the hinge and carefully follow the perimeter until you have taken the pick around all four sides.

    • The back panel will come loose once the pick has been around the whole edge of the device.

    • Lift the panel off.

  4. HP Pavilion x360 Convertible 14-dw1025nr Battery Replacement: 手順 4、 2の画像 1 HP Pavilion x360 Convertible 14-dw1025nr Battery Replacement: 手順 4、 2の画像 2
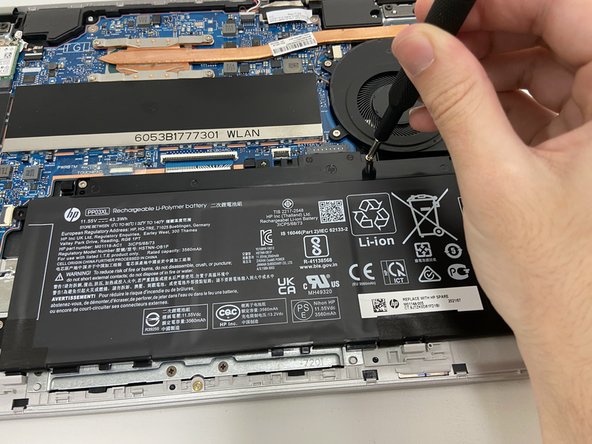
    • Use a Phillips #1 screwdriver to remove all four of the 4 mm screws that secure each corner of the battery.

  5. HP Pavilion x360 Convertible 14-dw1025nr Battery Replacement: 手順 5、 3の画像 1 HP Pavilion x360 Convertible 14-dw1025nr Battery Replacement: 手順 5、 3の画像 2 HP Pavilion x360 Convertible 14-dw1025nr Battery Replacement: 手順 5、 3の画像 3
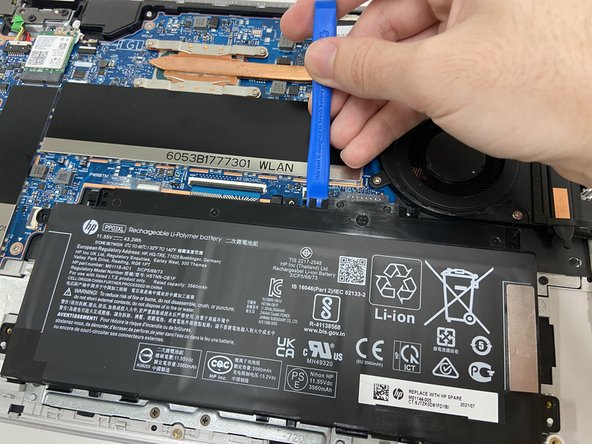
    • Use the opening tool near the connector to gently apply pressure and lift the battery away from the device.

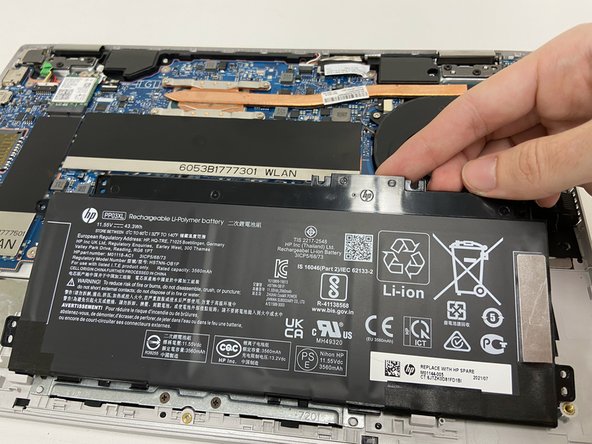
    • Once loose, lift the battery from the connector side to separate it from the device.

    • The stabilizer for the battery (small black part held in by the top left screw) may come loose. Leave the part in its original position.

終わりに

To reassemble your device, follow these instructions in reverse order.

作成者

4人の作成者と共同で作成されました。

Jordan Oldenburg

メンバー登録日: 09/16/22

221 ポイント

1ガイドが承認済み

チーム

Western Carolina University, Team 1-3, Virtue Fall 2022 Western Carolina University, Team 1-3, Virtue Fall 2022人のメンバー

WCU-VIRTUE-F22S1G3

4 メンバー

5のガイドは作成済み

コメント 1 件

Guide is also useful for HP Envy x360 convertible! There is just two more T2 screws in step 1. Also there is a cable next to the battery which is run alongside the battery. This has to be removed carefully before swapping it out.

Sebastian Wohlrab - 返信

コメントを追加

統計データ:

過去 24時間: 4

過去 7 日: 9

過去 30 日: 22

今までの合計 473