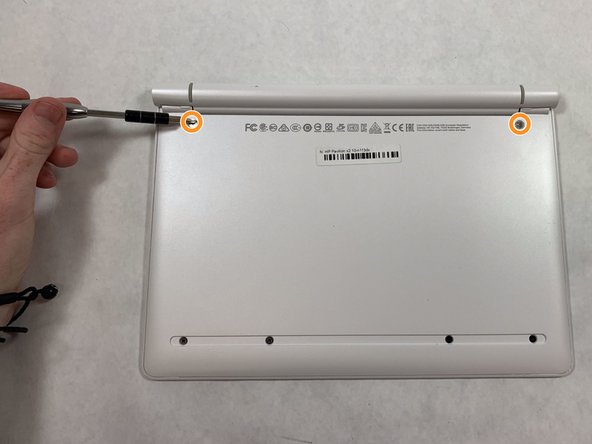
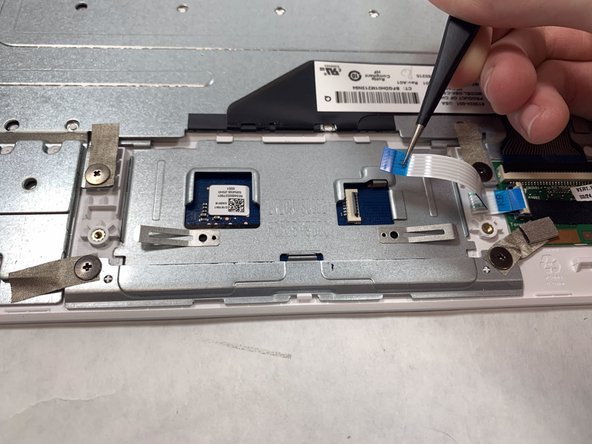
メインコンテンツにスキップ

HP Pavilion x2 10-n113dx Touch Pad Replacement

必要な工具と部品

  1. HP Pavilion x2 10-n113dx Touch Pad Replacement, Touch Pad: 手順 1、 2の画像 1 HP Pavilion x2 10-n113dx Touch Pad Replacement, Touch Pad: 手順 1、 2の画像 2
    • Separate the screen from the keyboard.

  2. HP Pavilion x2 10-n113dx Touch Pad Replacement: 手順 2、 1の画像 1
    この手順で使用する道具:
    Tweezers
    $4.99
    購入する
    • Loosen the adhesive under the gray plastic bar using a heat pad or a heat gun.

    • Remove the gray plastic bar after 5 minutes of light heat with tweezers by pulling up.

  3. HP Pavilion x2 10-n113dx Touch Pad Replacement: 手順 3、 1の画像 1
    • Remove the 4 screws with a Phillips #0 screwdriver.

    • These 4 screws have a diameter of 4.3 mm and a height of 3.7 mm.

  4. HP Pavilion x2 10-n113dx Touch Pad Replacement: 手順 4、 2の画像 1 HP Pavilion x2 10-n113dx Touch Pad Replacement: 手順 4、 2の画像 2
    • Remove the rubber stoppers at the top left and right with tweezers.

    • Remove the screws at the top and right with at Phillips #0 screwdriver.

    • These two screws have a diameter of 5.3 mm and a height of 4.3 mm.

  5. HP Pavilion x2 10-n113dx Touch Pad Replacement: 手順 5、 3の画像 1 HP Pavilion x2 10-n113dx Touch Pad Replacement: 手順 5、 3の画像 2 HP Pavilion x2 10-n113dx Touch Pad Replacement: 手順 5、 3の画像 3
    • Pry open the back case with a metal spudger.

    • Then pry open the back layer with the metal spudger.

  6. HP Pavilion x2 10-n113dx Touch Pad Replacement: 手順 6、 2の画像 1 HP Pavilion x2 10-n113dx Touch Pad Replacement: 手順 6、 2の画像 2
    • Fully take off the back panel by lifting up the panel.

  7. HP Pavilion x2 10-n113dx Touch Pad Replacement: 手順 7、 2の画像 1 HP Pavilion x2 10-n113dx Touch Pad Replacement: 手順 7、 2の画像 2
    • Pop open the ribbon cable piece on the touch pad with the blue plastic spudger.

    • Remove the ribbon cable with tweezers by pulling it out.

  8. HP Pavilion x2 10-n113dx Touch Pad Replacement: 手順 8、 2の画像 1 HP Pavilion x2 10-n113dx Touch Pad Replacement: 手順 8、 2の画像 2
    • Remove 4 screws with at Phillips #0 screwdriver. All 4 screws have a diameter of 4.3 mm and a height of 3.7 mm.

    • Lift the tape shown with orange boxes with tweezers.

    • Remove metal bar with a blue spudger.

  9. HP Pavilion x2 10-n113dx Touch Pad Replacement: 手順 9、 3の画像 1 HP Pavilion x2 10-n113dx Touch Pad Replacement: 手順 9、 3の画像 2 HP Pavilion x2 10-n113dx Touch Pad Replacement: 手順 9、 3の画像 3
    • Lift up the touch pad by the metal edge with a blue plastic spudger.

    • Remove the touch pad from the computer.

終わりに

To reassemble your device, follow these instructions in reverse order.

作成者

2人の作成者と共同で作成されました。

Cayla Skaggs

メンバー登録日: 04/01/19

337 ポイント

2のガイドは作成済み

チーム

IUPUI, Team S1-G4, Harley Spring 2019 IUPUI, Team S1-G4, Harley Spring 2019人のメンバー

IUPUI-HARLEY-S19S1G4

3 メンバー

3のガイドは作成済み

0 件のコメント

コメントを追加

統計データ:

過去 24時間: 2

過去 7 日: 4

過去 30 日: 7

今までの合計 705