メインコンテンツにスキップ

HP Pavilion dv7-3065dx Keyboard Replacement

必要な工具と部品

  1. HP Pavilion dv7-3065dx Keyboard Replacement, Battery: 手順 1、 2の画像 1 HP Pavilion dv7-3065dx Keyboard Replacement, Battery: 手順 1、 2の画像 2
    • Turn off the device before removing the battery.

    • Place the laptop upside down on a flat surface so that the bottom is facing up.

    • The battery is the long rectangle above the latch.

  2. HP Pavilion dv7-3065dx Keyboard Replacement: 手順 2、 1の画像 1
    • Slide the battery latch to the left to release the battery.

  3. HP Pavilion dv7-3065dx Keyboard Replacement: 手順 3、 2の画像 1 HP Pavilion dv7-3065dx Keyboard Replacement: 手順 3、 2の画像 2
    • Carefully pull out the battery while holding the latch to the open position with your finger.

  4. HP Pavilion dv7-3065dx Keyboard Replacement, Hard Drive: 手順 4、 1の画像 1
    • Loosen the four screws that secure the hard drive panel with a Phillips head screwdriver.

    • Do not completely remove the screws from the panel.

  5. HP Pavilion dv7-3065dx Keyboard Replacement: 手順 5、 1の画像 1
    • Lift the drive cover to expose the hard drive.

    • This device did not have a physical hard drive to work with.

    • Gently tug on the black tabs located on each end of the hard drive in order to loosen the hard drive from the motherboard.

    • Be careful when working with the hard drive cable.

    • Separate the hard drive from the cable by firmly gripping the hard drive and the black plug.

    • Remove the four Phillips screws that secure the hard drive to its carrier.

    • There are two screws on each side.

    • Lift and remove the hard drive from the metal surrounding its perimeter.

  6. HP Pavilion dv7-3065dx Keyboard Replacement, Keyboard: 手順 10、 1の画像 1
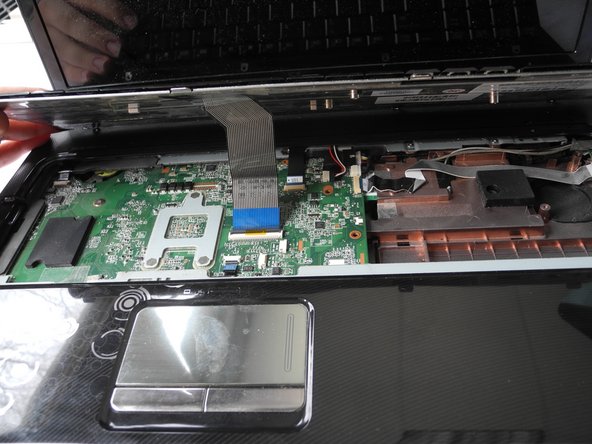
    • Locate these seven screws that fasten the keyboard and switch cover to the computer.

    • Remove these screws

  7. HP Pavilion dv7-3065dx Keyboard Replacement: 手順 11、 1の画像 1
    • Flip over the computer to the upright position and locate the switch cover.

    • Carefully pry the switch cover up until it detaches from the computer.

    • The switch cover is held in with plastic clips. They may break if they are removed too forcefully.

  8. HP Pavilion dv7-3065dx Keyboard Replacement: 手順 12、 1の画像 1
    • Raise the switch cover to expose the speaker assembly.

    • Carefully detach the ribbon cables from the speaker assembly.

    • Locate and remove these four screws from the switch cover.

  9. HP Pavilion dv7-3065dx Keyboard Replacement: 手順 13、 2の画像 1 HP Pavilion dv7-3065dx Keyboard Replacement: 手順 13、 2の画像 2
    • Locate and remove the screws that hold the keyboard to the computer.

    • Lift the keyboard up to expose the keyboard connector.

    • The keyboard connector is the small cord located near the screen of the computer.

  10. HP Pavilion dv7-3065dx Keyboard Replacement: 手順 14、 2の画像 1 HP Pavilion dv7-3065dx Keyboard Replacement: 手順 14、 2の画像 2
    • Disconnect the keyboard connector by unhinging the blue plastic clips and gently pulling the cord.

    • The keyboard can now be removed from the computer.

終わりに

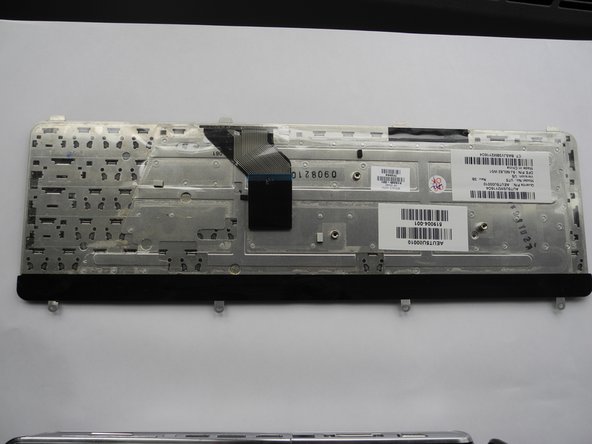
To reassemble your device, follow these instructions in reverse order.

2 の人々がこのガイドを完成させました。

作成者

1人の作成者と共同作成されました。

Nicholas Moore

メンバー登録日: 02/07/17

302 ポイント

2のガイドは作成済み

チーム

Ohio State, Team 1-5, Wilder Spring 2017 Ohio State, Team 1-5, Wilder Spring 2017人のメンバー

OSU-WILDER-S17S1G5

4 メンバー

5のガイドは作成済み

0 件のコメント

コメントを追加

統計データ:

過去 24時間: 1

過去 7 日: 6

過去 30 日: 9

今までの合計 1,806