はじめに
If your keyboard is not responding or you want to add in a new one, this guide is for you.
必要な工具と部品
-
-
Remove the battery from the back of the computer.
-
Remove the two 7.2mm screws underneath holding the keyboard in.
-
Use a Phillips screwdriver to remove the three screws in the battery well.
-
-
-
Use a Phillips screwdriver to remove the two screws securing the RAM door.
-
Lift and remove the RAM door.
-
Use a Phillips screwdriver to remove the screw securing the keyboard to the laptop.
-
-
-
-
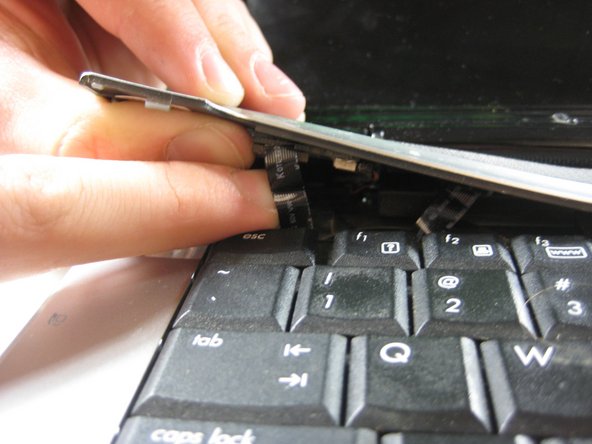
Gently lift the keyboard out of the casing by holding the top edge (as shown). Be careful to keep the lower edge of the keyboard in place as you lift because there is a ribbon attached to the back (marked in red).
-
The keyboard is held in by six small tabs (2 on the top and 4 on the bottom). Lifting the bevel frees the top two. Free the bottom four tabs by sliding the keyboard forward towards the screen.
There is an other screw to remove under the memory cover to allow the removing of the keyboard.
-


To reassemble your device, follow these instructions in reverse order.
To reassemble your device, follow these instructions in reverse order.
10 の人々がこのガイドを完成させました。
チーム

Cal Poly, Team 21-33, Regan Fall 2010 Cal Poly, Team 21-33, Regan Fall 2010人のメンバー
CPSU-REGAN-F10S21G33
4 メンバー
12のガイドは作成済み
3 件のコメント
Actually I was able to remove the keyboard fairly easily following the steps provided. However even after quite a few attempts at replacing it with either the new one I purchased or even the old one I am still unable to secure the data ribbon into the appropriate connector.therefore the keyboard is not functional… HELP!!! PLEASE??
You need probably put flat cable under the plastic connector and push small plastic in. First I put cable on top and it doesn’t work.
But the easier is to unscrew tree additional screws in battery compartment and not disconnect cables.
Pawel -