メインコンテンツにスキップ

HP Pavilion dv5000 Optical Drive Replacement

必要な工具と部品

  1. HP Pavilion dv5000 Optical Drive Replacement, Battery: 手順 1、 1の画像 1
    • Turn off the computer, and unplug it from all external power sources.

    • Lay the computer face-down on a flat surface. Orient the computer to match the image.

    • Locate the battery release switch, as indicated in the image by the red rectangle. Slide the switch from right to left, and remove the battery.

  2. HP Pavilion dv5000 Optical Drive Replacement, RAM Cover: 手順 2、 3の画像 1 HP Pavilion dv5000 Optical Drive Replacement, RAM Cover: 手順 2、 3の画像 2 HP Pavilion dv5000 Optical Drive Replacement, RAM Cover: 手順 2、 3の画像 3
    • Remove the two 5mm Phillips screws on the right side of the RAM cover.

    • Lift the right side of the RAM cover, and remove it.

  3. HP Pavilion dv5000 Optical Drive Replacement, Optical Drive: 手順 3、 1の画像 1
    • Remove the 11.0mm screw securing the optical drive to the computer.

  4. HP Pavilion dv5000 Optical Drive Replacement: 手順 4、 3の画像 1 HP Pavilion dv5000 Optical Drive Replacement: 手順 4、 3の画像 2 HP Pavilion dv5000 Optical Drive Replacement: 手順 4、 3の画像 3
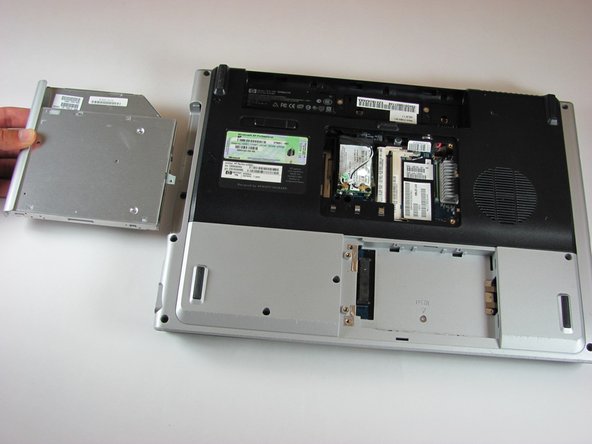
    • Locate the optical drive. The optical drive is located on the left side of the RAM bay.

    • Press the exposed edge of the optical drive gently with the spudger until the drive releases from the computer frame.

    • Pull the optical drive completely out of the computer frame.

終わりに

To reassemble your device, follow these instructions in reverse order.

ある他の人がこのガイドを完成しました。

作成者

9人の作成者と共同で作成されました。

Alex Kwok

メンバー登録日: 10/05/10

271 ポイント

3のガイドは作成済み

チーム

Cal Poly, Team 21-34, Regan Fall 2010 Cal Poly, Team 21-34, Regan Fall 2010人のメンバー

CPSU-REGAN-F10S21G34

4 メンバー

11のガイドは作成済み

0 件のコメント

コメントを追加

統計データ:

過去 24時間: 0

過去 7 日: 0

過去 30 日: 1

今までの合計 4,620