メインコンテンツにスキップ

HP Pavilion Wave 600-a014 System Fan Replacement

必要な工具と部品

  1. HP Pavilion Wave 600-a014 System Fan Replacement, Hard Drive: 手順 1、 1の画像 1
    • Disconnect the PC from power source and any other devices.

  2. HP Pavilion Wave 600-a014 System Fan Replacement: 手順 2、 2の画像 1 HP Pavilion Wave 600-a014 System Fan Replacement: 手順 2、 2の画像 2
    • Turn the computer over and remove the rubber feet.

    • Remove the three 8mm Philips screws with a Philips #0 Screwdriver.

    • Use a pry tool and lift up on the lid.

  3. HP Pavilion Wave 600-a014 System Fan Replacement: 手順 3、 2の画像 1 HP Pavilion Wave 600-a014 System Fan Replacement: 手順 3、 2の画像 2
    • Remove the two cables circled in red for the front IO panel.

  4. HP Pavilion Wave 600-a014 System Fan Replacement: 手順 4、 2の画像 1 HP Pavilion Wave 600-a014 System Fan Replacement: 手順 4、 2の画像 2
    • From back IO panel pry open the casing as indicated.

  5. HP Pavilion Wave 600-a014 System Fan Replacement: 手順 5、 3の画像 1 HP Pavilion Wave 600-a014 System Fan Replacement: 手順 5、 3の画像 2 HP Pavilion Wave 600-a014 System Fan Replacement: 手順 5、 3の画像 3
    • To remove the hard drive, remove the four 8mm Philips screws using a Philips #0 Screwdriver.

    • Remove Power and SATA cables from on top of the drive.

  6. HP Pavilion Wave 600-a014 System Fan Replacement: 手順 6、 1の画像 1
    • After screws have been removed grab the Hard Drive and pull it out of the dock.

  7. HP Pavilion Wave 600-a014 System Fan Replacement, System Fan: 手順 7、 2の画像 1 HP Pavilion Wave 600-a014 System Fan Replacement, System Fan: 手順 7、 2の画像 2
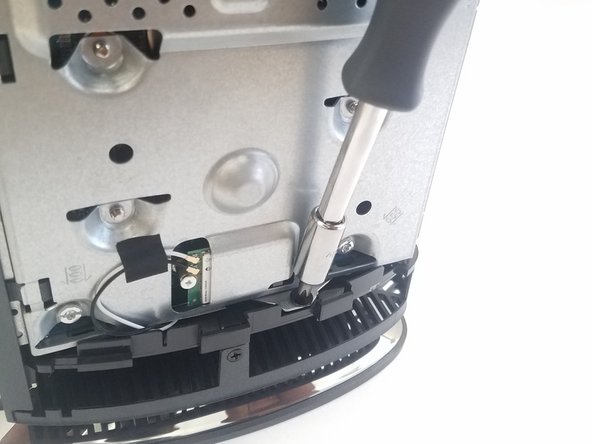
    • After removing your hard drive, remove the two 1.2mm Phillips #1 screws from the bottom of your case .

  8. HP Pavilion Wave 600-a014 System Fan Replacement: 手順 8、 2の画像 1 HP Pavilion Wave 600-a014 System Fan Replacement: 手順 8、 2の画像 2
    • Remove the 8 mm Phillips #0 screw that is connected the top bezel and the top cover using the driver kit.

  9. HP Pavilion Wave 600-a014 System Fan Replacement: 手順 9、 2の画像 1 HP Pavilion Wave 600-a014 System Fan Replacement: 手順 9、 2の画像 2
    • Using a flathead screwdriver, remove the 8 mm Phillips #1 screw that connects the body casing and the top bezel(the one at the bottom of memory card slot).

  10. HP Pavilion Wave 600-a014 System Fan Replacement: 手順 10、 1の画像 1
    • Remove the top bezel.

    • You will have to take off a pair of wire connecting the bezel with the body to be able to completely detach it.

  11. HP Pavilion Wave 600-a014 System Fan Replacement: 手順 11、 3の画像 1 HP Pavilion Wave 600-a014 System Fan Replacement: 手順 11、 3の画像 2 HP Pavilion Wave 600-a014 System Fan Replacement: 手順 11、 3の画像 3
    • Turn the device to the top side where you can see the top cover and the speaker.

    • Using a flathead or Phillips #1 screwdriver, unscrew all the eight 8.0 mm screws that connect the top cover to the other components of the casing.

    • Gently remove the top cover.

  12. HP Pavilion Wave 600-a014 System Fan Replacement: 手順 12、 3の画像 1 HP Pavilion Wave 600-a014 System Fan Replacement: 手順 12、 3の画像 2 HP Pavilion Wave 600-a014 System Fan Replacement: 手順 12、 3の画像 3
    • After removing the top cover, locate the system fan on the left side of memory compartment.

    • Remove three 1.2 cm Phillips #1 screws that connect the fan with the main body.

  13. HP Pavilion Wave 600-a014 System Fan Replacement: 手順 13、 2の画像 1 HP Pavilion Wave 600-a014 System Fan Replacement: 手順 13、 2の画像 2
    • Simply slide up the fan after removing the screws.

終わりに

To reassemble your device, follow these instructions in reverse order.

作成者

1人の作成者と共同作成されました。

Kyaw Soe

メンバー登録日: 09/27/17

321 ポイント

2のガイドは作成済み

チーム

Cal Poly, Team S8-G4, Banghart Fall 2017 Cal Poly, Team S8-G4, Banghart Fall 2017人のメンバー

CPSU-BANGHART-F17S8G4

4 メンバー

5のガイドは作成済み

0 件のコメント

コメントを追加

統計データ:

過去 24時間: 0

過去 7 日: 4

過去 30 日: 12

今までの合計 1,138