メインコンテンツにスキップ

HP Pavilion Wave 600-a010 Fan Replacement

必要な工具と部品

  1. HP Pavilion Wave 600-a010 Fan Replacement, Hard Drive: 手順 1、 1の画像 1
    • Remove the three rubber footings by prying from the bottom cover using the plastic opening tool.

  2. HP Pavilion Wave 600-a010 Fan Replacement: 手順 2、 1の画像 1
    • Remove the three 24 mm screws from the bottom cover using a Phillips #2 screwdriver.

  3. HP Pavilion Wave 600-a010 Fan Replacement: 手順 3、 1の画像 1
    • Remove the bottom cover by lifting it up from chassis.

  4. HP Pavilion Wave 600-a010 Fan Replacement: 手順 4、 1の画像 1
    • Remove the three wires connecting the outer cover and front I/O port to the internal components (front usb and auxiliary assembly).

  5. HP Pavilion Wave 600-a010 Fan Replacement: 手順 5、 2の画像 1 HP Pavilion Wave 600-a010 Fan Replacement: 手順 5、 2の画像 2
    • Remove the outer cover by gently pulling apart and pulling away from the chassis.

  6. HP Pavilion Wave 600-a010 Fan Replacement: 手順 6、 2の画像 1 HP Pavilion Wave 600-a010 Fan Replacement: 手順 6、 2の画像 2
    • Remove rear I/O bezel using plastic opening tool to pry apart the four clips holding the I/O bezel to the chassis.

    • Remove all other remaining cables from unit using the plastic opening tool to carefully pry apart the connections.

  7. HP Pavilion Wave 600-a010 Fan Replacement: 手順 8、 2の画像 1 HP Pavilion Wave 600-a010 Fan Replacement: 手順 8、 2の画像 2
    • Remove the HDD by first using the Phillips #2 screwdriver to remove the four 23 mm screws holding together the assembly and then pulling the HDD out of the chassis.

  8. HP Pavilion Wave 600-a010 Fan Replacement, Microphone: 手順 9、 1の画像 1
    • Remove the three 24 mm screws that connect the top cover to the chasis inside the HDD compartment using theTorx #15 screwdriver (an extension and torque lever might be useful).

  9. HP Pavilion Wave 600-a010 Fan Replacement: 手順 10、 1の画像 1
    • Disconnect the microphone computer chip from the internal components by first peeling away the black adhesive holding the wires to the chassis and gently pulling the chip and wires from its connection.

  10. HP Pavilion Wave 600-a010 Fan Replacement: 手順 11、 2の画像 1 HP Pavilion Wave 600-a010 Fan Replacement: 手順 11、 2の画像 2
    • Remove the top bezel from the unit using a Torx Head #15 screwdriver to remove three 24 mm screws and a Phillips Head #00 screwdriver to remove the single 24 mm screw around the outside edge of the chassis.

  11. HP Pavilion Wave 600-a010 Fan Replacement, Speaker: 手順 12、 2の画像 1 HP Pavilion Wave 600-a010 Fan Replacement, Speaker: 手順 12、 2の画像 2
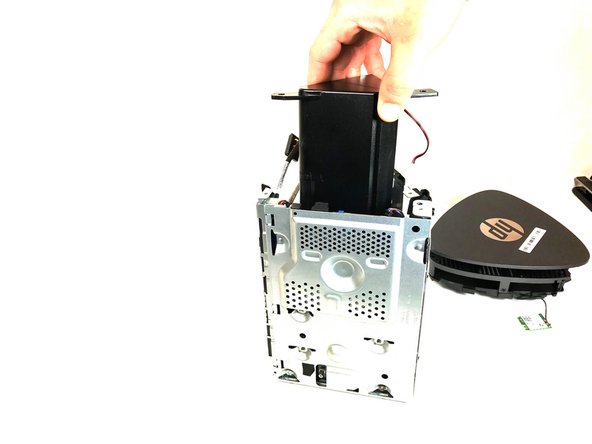
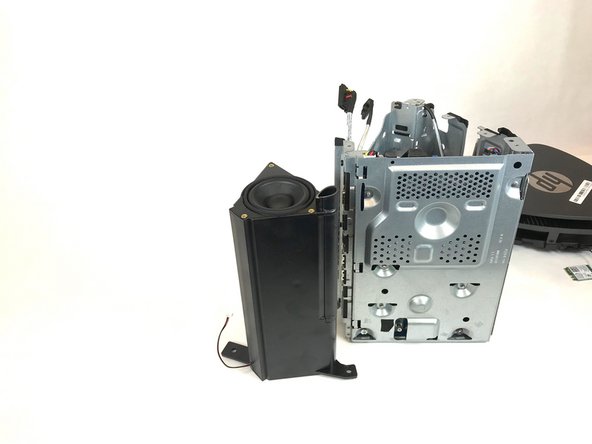
    • Remove the top chassis cover from the main chassis using the Torx Head #15 screwdriver to remove the nine 24 mm screws and then use the metal prying tool to pry the top chassis cover from the clips holding it to the main chassis and lift carefully away from internal components.

  12. HP Pavilion Wave 600-a010 Fan Replacement: 手順 13、 3の画像 1 HP Pavilion Wave 600-a010 Fan Replacement: 手順 13、 3の画像 2 HP Pavilion Wave 600-a010 Fan Replacement: 手順 13、 3の画像 3
    • Remove the speaker by removing three 24 mm screws using the Torx Head #15 screwdriver and carefully lifting up and out from internal components.

  13. HP Pavilion Wave 600-a010 Fan Replacement, Fan: 手順 14、 2の画像 1 HP Pavilion Wave 600-a010 Fan Replacement, Fan: 手順 14、 2の画像 2
    • Remove the memory cover by removing the single 24 mm screw holding it to the main chassis using the Torx Head #15 screwdriver and sliding it up and out of its locking clips.

  14. HP Pavilion Wave 600-a010 Fan Replacement: 手順 15、 1の画像 1
    • Remove the memory circuit board by pushing down on the white tabs on either side of the memory circuit board until it slightly pops up.

  15. HP Pavilion Wave 600-a010 Fan Replacement: 手順 16、 1の画像 1
    • Lift the memory circuit board up and out of its connection, and out of the main chassis.

  16. HP Pavilion Wave 600-a010 Fan Replacement: 手順 17、 1の画像 1
    • Remove the fan by removing the three 23 mm silver screws that hold the fan to the chassis using a Phillips Head #0 screwdriver.

  17. HP Pavilion Wave 600-a010 Fan Replacement: 手順 18、 1の画像 1
    • Remove the fan from the chassis by sliding it up and out of the the clips holding the fan to the chassis.

終わりに

To reassemble your device, follow these instructions in reverse order.

作成者

3人の作成者と共同で作成されました。

clayton stokes

メンバー登録日: 09/20/17

652 ポイント

5のガイドは作成済み

チーム

Idaho State University, Team S4-G3, Watkins Fall 2017 Idaho State University, Team S4-G3, Watkins Fall 2017人のメンバー

ISU-WATKINS-F17S4G3

4 メンバー

5のガイドは作成済み

0 件のコメント

コメントを追加

統計データ:

過去 24時間: 0

過去 7 日: 0

過去 30 日: 3

今までの合計 784