メインコンテンツにスキップ

HP Pavilion Notebook 15-ab293cl Hard Drive Replacement

必要な工具と部品

  1. HP Pavilion Notebook 15-ab293cl Hard Drive Replacement, Hard Drive: 手順 1、 2の画像 1 HP Pavilion Notebook 15-ab293cl Hard Drive Replacement, Hard Drive: 手順 1、 2の画像 2
    • Flip the laptop over so that the battery is facing upward.

  2. HP Pavilion Notebook 15-ab293cl Hard Drive Replacement: 手順 2、 3の画像 1 HP Pavilion Notebook 15-ab293cl Hard Drive Replacement: 手順 2、 3の画像 2 HP Pavilion Notebook 15-ab293cl Hard Drive Replacement: 手順 2、 3の画像 3
    • Slide both tab buttons inward to open the battery cover. Gently push the battery out to remove.

  3. HP Pavilion Notebook 15-ab293cl Hard Drive Replacement: 手順 3、 2の画像 1 HP Pavilion Notebook 15-ab293cl Hard Drive Replacement: 手順 3、 2の画像 2
    • Remove the black plastic hinge covers at the top corners of the laptop.

    • Use the Phillips #1 to remove the two 7.5mm screws.

    • Use the opening tool to pry the black covers off of the laptop.

  4. HP Pavilion Notebook 15-ab293cl Hard Drive Replacement: 手順 4、 3の画像 1 HP Pavilion Notebook 15-ab293cl Hard Drive Replacement: 手順 4、 3の画像 2 HP Pavilion Notebook 15-ab293cl Hard Drive Replacement: 手順 4、 3の画像 3
    • Remember to remove the tabs shown in the second picture.

    • Remove all 16 - 7.5mm screws with the Phillips #1 screwdriver.

    • Pry and slide the CD/DVD drive out of the laptop case.

  5. HP Pavilion Notebook 15-ab293cl Hard Drive Replacement: 手順 5、 1の画像 1
    • Unscrew the two 3.5mm silver screws with the Phillips #000 and the Philips # 1.

  6. HP Pavilion Notebook 15-ab293cl Hard Drive Replacement: 手順 6、 3の画像 1 HP Pavilion Notebook 15-ab293cl Hard Drive Replacement: 手順 6、 3の画像 2 HP Pavilion Notebook 15-ab293cl Hard Drive Replacement: 手順 6、 3の画像 3
    • Turn the computer so that the screen faces you.

    • Use the pry tool to pry off the edge of the keyboard side of laptop.

  7. HP Pavilion Notebook 15-ab293cl Hard Drive Replacement: 手順 7、 3の画像 1 HP Pavilion Notebook 15-ab293cl Hard Drive Replacement: 手順 7、 3の画像 2 HP Pavilion Notebook 15-ab293cl Hard Drive Replacement: 手順 7、 3の画像 3
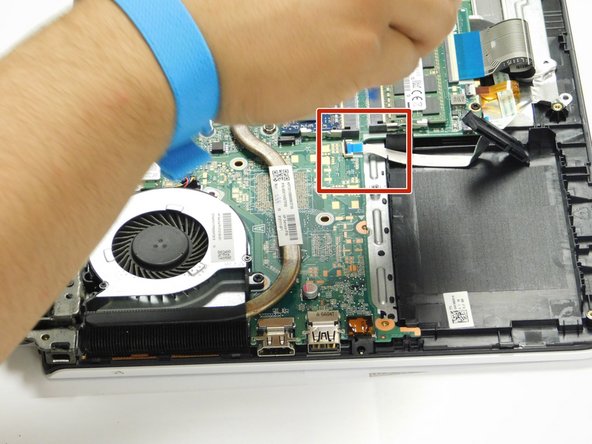
    • The hard drive is located in the bottom corner of the laptop.

    • Gently lift up the hard drive and pry off the white tab to release the hard drive.

  8. HP Pavilion Notebook 15-ab293cl Hard Drive Replacement: 手順 8、 2の画像 1 HP Pavilion Notebook 15-ab293cl Hard Drive Replacement: 手順 8、 2の画像 2
    • Once you release the white tab from the green board, remove the hard drive.

終わりに

To reassemble your device, follow these instructions in reverse order.

ある他の人がこのガイドを完成しました。

作成者

9人の作成者と共同で作成されました。

Efren Solis

メンバー登録日: 09/10/18

228 ポイント

1ガイドが承認済み

チーム

Gateway, Team S1-G2, Luster Fall 2018 Gateway, Team S1-G2, Luster Fall 2018人のメンバー

GCC-LUSTER-F18S1G2

4 メンバー

4のガイドは作成済み

0 件のコメント

コメントを追加

統計データ:

過去 24時間: 3

過去 7 日: 20

過去 30 日: 71

今までの合計 2,037