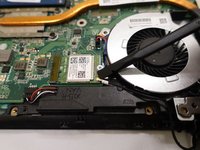
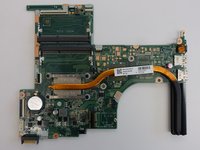
メインコンテンツにスキップ

HP Pavilion 15-ab165us Motherboard Replacement

必要な工具と部品

  1. HP Pavilion 15-ab165us Motherboard Replacement, Battery and Back Cover: 手順 1、 2の画像 1 HP Pavilion 15-ab165us Motherboard Replacement, Battery and Back Cover: 手順 1、 2の画像 2
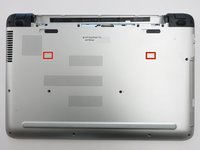
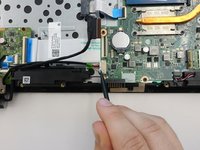
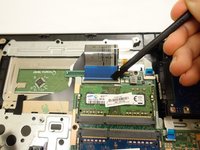
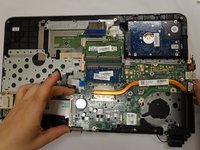
    • Flip the computer over so that the bottom cover is facing you.

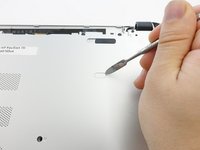
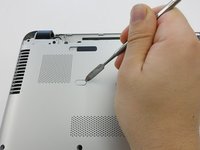
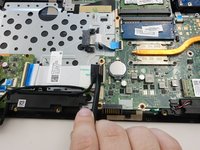
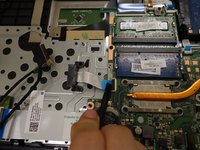
    • Slide the two locks to the "unlock" position and remove the battery.

  2. HP Pavilion 15-ab165us Motherboard Replacement: 手順 2、 3の画像 1 HP Pavilion 15-ab165us Motherboard Replacement: 手順 2、 3の画像 2 HP Pavilion 15-ab165us Motherboard Replacement: 手順 2、 3の画像 3
    • Remove the two 8mm screws underneath with a Phillips #1 screwdriver.

    • Use a plastic opening tool to remove the plastic feet.

  3. HP Pavilion 15-ab165us Motherboard Replacement: 手順 3、 3の画像 1 HP Pavilion 15-ab165us Motherboard Replacement: 手順 3、 3の画像 2 HP Pavilion 15-ab165us Motherboard Replacement: 手順 3、 3の画像 3
    • Remove the two plastic tabs with a metal spudger.

  4. HP Pavilion 15-ab165us Motherboard Replacement: 手順 4、 1の画像 1
    • Remove the sixteen 8mm screws that hold the bottom cover with a Phillips #1 screwdriver.

  5. HP Pavilion 15-ab165us Motherboard Replacement: 手順 5、 1の画像 1
    • Pull the Optical Drive out.

  6. HP Pavilion 15-ab165us Motherboard Replacement: 手順 6、 1の画像 1
    • Remove the 3mm screws that were hidden under the Optical Drive with a Phillips #0 screwdriver.

  7. HP Pavilion 15-ab165us Motherboard Replacement: 手順 7、 2の画像 1 HP Pavilion 15-ab165us Motherboard Replacement: 手順 7、 2の画像 2
    • Flip the computer back over.

    • Use a plastic opening tool to release the clips holding the keyboard section in place.

  8. HP Pavilion 15-ab165us Motherboard Replacement: 手順 8、 1の画像 1
    • Close the lid and pull the screen and keyboard section up and away from the disconnected bottom cover.

    • The hard drive is NOT screwed into place on the underside of the keyboard section.

  9. HP Pavilion 15-ab165us Motherboard Replacement, Motherboard: 手順 9、 1の画像 1
    • Locate the motherboard.

  10. HP Pavilion 15-ab165us Motherboard Replacement: 手順 10、 2の画像 1 HP Pavilion 15-ab165us Motherboard Replacement: 手順 10、 2の画像 2
    • Disconnect the wire connected to the Wifi card.

  11. HP Pavilion 15-ab165us Motherboard Replacement: 手順 11、 1の画像 1
    • Disconnect the speakers.

  12. HP Pavilion 15-ab165us Motherboard Replacement: 手順 12、 3の画像 1 HP Pavilion 15-ab165us Motherboard Replacement: 手順 12、 3の画像 2 HP Pavilion 15-ab165us Motherboard Replacement: 手順 12、 3の画像 3
    • Unlock and disconnect cables attached to the motherboard that connect to the display.

  13. HP Pavilion 15-ab165us Motherboard Replacement: 手順 13、 2の画像 1 HP Pavilion 15-ab165us Motherboard Replacement: 手順 13、 2の画像 2
    • Unlock and remove the cable connected to the optical drive.

  14. HP Pavilion 15-ab165us Motherboard Replacement: 手順 14、 2の画像 1 HP Pavilion 15-ab165us Motherboard Replacement: 手順 14、 2の画像 2
    • Unlock and remove the cable that connects to the hard drive.

  15. HP Pavilion 15-ab165us Motherboard Replacement: 手順 15、 3の画像 1 HP Pavilion 15-ab165us Motherboard Replacement: 手順 15、 3の画像 2 HP Pavilion 15-ab165us Motherboard Replacement: 手順 15、 3の画像 3
    • Unlock and remove the cables connected to the keyboard.

  16. HP Pavilion 15-ab165us Motherboard Replacement: 手順 16、 1の画像 1
    • Remove the 4mm screws holding the motherboard in place with a Phillips #1 screwdriver.

  17. HP Pavilion 15-ab165us Motherboard Replacement: 手順 17、 1の画像 1
    • Remove the 4mm screws holding the motherboard in place with a Phillips #1 screwdriver.

  18. HP Pavilion 15-ab165us Motherboard Replacement: 手順 18、 2の画像 1 HP Pavilion 15-ab165us Motherboard Replacement: 手順 18、 2の画像 2
    • Disconnect the fan pins.

    • Lift up to remove the fan.

  19. HP Pavilion 15-ab165us Motherboard Replacement: 手順 19、 1の画像 1
    • Release motherboard from the clip at the base of the hard drive.

  20. HP Pavilion 15-ab165us Motherboard Replacement: 手順 20、 2の画像 1 HP Pavilion 15-ab165us Motherboard Replacement: 手順 20、 2の画像 2
    • Lift the motherboard up and flip it around to reveal the cable connected on the underside.

  21. HP Pavilion 15-ab165us Motherboard Replacement: 手順 21、 2の画像 1 HP Pavilion 15-ab165us Motherboard Replacement: 手順 21、 2の画像 2
    • Unlock and disconnect the cable connected to the underside of the motherboard.

    • Pull the motherboard out of the chassis.

終わりに

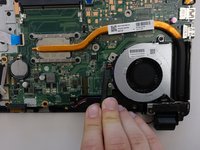
To reassemble your device, follow these instructions in reverse order.

3 の人々がこのガイドを完成させました。

作成者

2人の作成者と共同で作成されました。

Dillon Hubble

メンバー登録日: 10/20/17

653 ポイント

3のガイドは作成済み

チーム

UW Tacoma, Team S1-G2, Rose Fall 2017 UW Tacoma, Team S1-G2, Rose Fall 2017人のメンバー

UWT-ROSE-F17S1G2

5 メンバー

14のガイドは作成済み

0 件のコメント

コメントを追加

統計データ:

過去 24時間: 0

過去 7 日: 4

過去 30 日: 14

今までの合計 1,500