メインコンテンツにスキップ

HP Pavilion 14 hard drive

必要な工具と部品

  1. HP Pavilion 14 hard drive, Keyboard & Touchpad Panel: 手順 1、 2の画像 1 HP Pavilion 14 hard drive, Keyboard & Touchpad Panel: 手順 1、 2の画像 2
    • Turn the laptop over.

    • Remove all nine 3mm screws on back panel with a Phillips Head 1 driver.

  2. HP Pavilion 14 hard drive: 手順 2、 3の画像 1 HP Pavilion 14 hard drive: 手順 2、 3の画像 2 HP Pavilion 14 hard drive: 手順 2、 3の画像 3
    • Pry off the four rubber bumpers, located at the top corners and center of the back panel, off with a pair of tweezers.

    • Bumpers are delicate and can be easily ripped.

    • Unscrew the four 3mm screws under the bumpers using a Phillips Head 1 screwdriver.

  3. HP Pavilion 14 hard drive: 手順 3、 2の画像 1 HP Pavilion 14 hard drive: 手順 3、 2の画像 2
    • Flip the laptop right side up and open the clamshell.

    • Starting at the bottom right corner, slide the opening tool into the crevice between the blue and silver panels.

    • Carefully pry the top casing up around the edges, moving counterclockwise.

    • Keep the tool steady throughout, as prying in a rough manner can break the casing.

    • You will hear audible clicking sounds as the clips connecting the two halves disconnect from each other.

  4. HP Pavilion 14 hard drive: 手順 4、 1の画像 1
    • Close the laptop and orient it on its side (clamshell hinge up), carefully holding it steady to ensure its safety.

    • Insert the opening tool inside of the hinge and pry with an even amount of force to disconnect the keyboard panel from the fan grate.

  5. HP Pavilion 14 hard drive: 手順 5、 3の画像 1 HP Pavilion 14 hard drive: 手順 5、 3の画像 2 HP Pavilion 14 hard drive: 手順 5、 3の画像 3
    • Reorient the laptop in an upright fashion and open the clamshell.

    • If needed, continue to pry the silver keyboard panel from the rest of the hardware with minimal force.

    • Slowly slide the silver keyboard panel towards you while lifting gently to separate the halves.

    • The panel is still connected by a series of delicate connectors glued to the mainframe, so do not pull the panel right off.

  6. HP Pavilion 14 hard drive: 手順 6、 3の画像 1 HP Pavilion 14 hard drive: 手順 6、 3の画像 2 HP Pavilion 14 hard drive: 手順 6、 3の画像 3
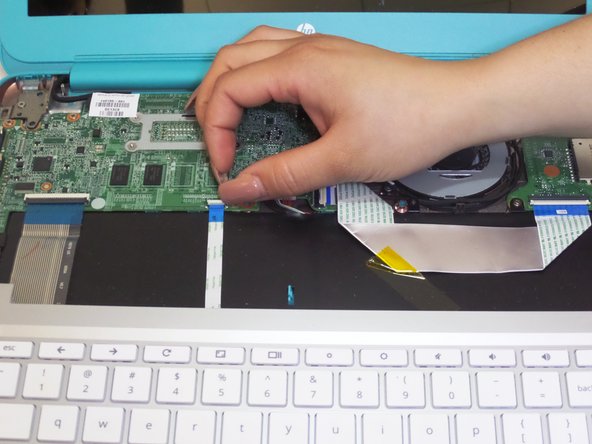
    • While keeping silver keyboard panel hovering above the laptop, locate the touchpad connector ribbon attached to both the silver panel and motherboard.

    • With your finger, flip up the white clasp that holds the connector, releasing the connector ribbon.

    • Unpeel the connector ribbon from its position on the motherboard.

  7. HP Pavilion 14 hard drive: 手順 7、 3の画像 1 HP Pavilion 14 hard drive: 手順 7、 3の画像 2 HP Pavilion 14 hard drive: 手順 7、 3の画像 3
    • With your finger, flip up the white clasp that connects the larger keyboard connector to the motherboard, releasing the connector ribbon.

    • Gently pull the connector ribbon from the clasp.

  8. HP Pavilion 14 hard drive: 手順 8、 1の画像 1
    • Lift the keyboard panel up and away from the CPU, completely revealing the mainframe.

  9. HP Pavilion 14 hard drive, Battery and Speakers: 手順 9、 1の画像 1
    • With the internal hardware exposed, disconnect the battery cable from the motherboard.

    • If tightly fastened, gently wiggle the plug out of the jack.

  10. HP Pavilion 14 hard drive: 手順 10、 1の画像 1
    • Remove the three 4mm screws around the perimeter of the battery pack with a Phillips Head 1 screwdriver.

  11. HP Pavilion 14 hard drive: 手順 11、 3の画像 1 HP Pavilion 14 hard drive: 手順 11、 3の画像 2 HP Pavilion 14 hard drive: 手順 11、 3の画像 3
    • Flip up the two white clasps that hold the connector ribbon to the battery to release the ribbon.

    • Remove the 'motherboard to USB board' connector ribbon from its place.

  12. HP Pavilion 14 hard drive: 手順 12、 1の画像 1
    • Detach the speaker cable from its fastener on the motherboard by pulling it out with your fingers or using a spudger.

  13. HP Pavilion 14 hard drive: 手順 13、 3の画像 1 HP Pavilion 14 hard drive: 手順 13、 3の画像 2 HP Pavilion 14 hard drive: 手順 13、 3の画像 3
    • Using your fingers, gently pry out the two L-shaped speaker panels from between the external casing and battery pack.

    • Be sure to apply an evenly distributed upwards force on the speaker when lifting it out

    • Both speaker components (located adjacent to each other) will remain connected by a red cable after removal

  14. HP Pavilion 14 hard drive: 手順 14、 1の画像 1
    • Lift out battery pack.

  15. HP Pavilion 14 hard drive, Motherboard: 手順 15、 2の画像 1 HP Pavilion 14 hard drive, Motherboard: 手順 15、 2の画像 2
    • Remove the two Wi-Fi antenna cables that are attached to the Wi-Fi card by pulling them up.

  16. HP Pavilion 14 hard drive: 手順 16、 1の画像 1
    • Using your fingers, pull the cooling fan cable from its fastener on the motherboard

  17. HP Pavilion 14 hard drive: 手順 17、 1の画像 1
    • Remove the 3mm screw that holds down the Wifi mini-PCI card using a Phillips Head 1 driver.

  18. HP Pavilion 14 hard drive: 手順 18、 1の画像 1
    • Remove the three 3mm screws that hold the cooling fan in place using a Phillips Head 1 driver.

  19. HP Pavilion 14 hard drive: 手順 19、 1の画像 1
    • In the upper right hand corner of the device, remove the 6mm screw holding the PCB board in place by using a Phillips Head 1.

  20. HP Pavilion 14 hard drive: 手順 20、 3の画像 1 HP Pavilion 14 hard drive: 手順 20、 3の画像 2 HP Pavilion 14 hard drive: 手順 20、 3の画像 3
    • Remove the three 3mm screws from the surface of the motherboard using a Phillips Head 1.

  21. HP Pavilion 14 hard drive: 手順 21、 2の画像 1 HP Pavilion 14 hard drive: 手順 21、 2の画像 2
    • Carefully lift the motherboard up towards the screen as if it was hinged on one side.

    • To prevent possible scratching, cover the screen with a cloth.

  22. HP Pavilion 14 hard drive, HP Pavilion 14 hard drive: 手順 22、 1の画像 1
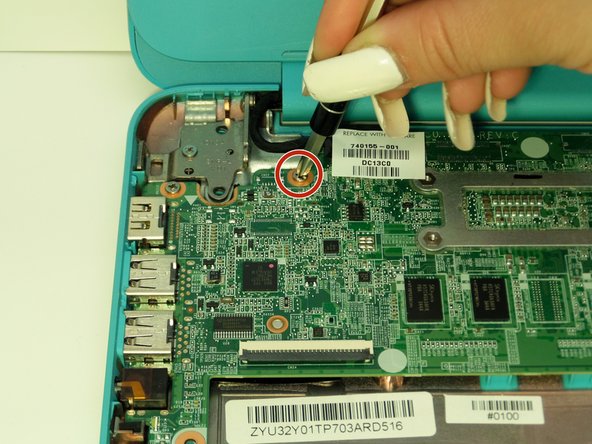
    • Remove the 3mm screw located directly above the NGFF SSD card using a Phillips Head 1 driver.

  23. HP Pavilion 14 hard drive: 手順 23、 2の画像 1 HP Pavilion 14 hard drive: 手順 23、 2の画像 2
    • Pull the SSD card up and out using your fingers.

    • Do not use tweezers or any other metal tool to extract the card, as it is fragile.

終わりに

To reassemble your device, follow these instructions in reverse order.

2 の人々がこのガイドを完成させました。

作成者

4人の作成者と共同で作成されました。

Danica Dunville

メンバー登録日: 09/11/17

349 ポイント

3のガイドは作成済み

チーム

CSU Fullerton, Team S2-G2, Bruce Fall 2017 CSU Fullerton, Team S2-G2, Bruce Fall 2017人のメンバー

CSUF-BRUCE-F17S2G2

3 メンバー

6のガイドは作成済み

0 件のコメント

コメントを追加

統計データ:

過去 24時間: 11

過去 7 日: 24

過去 30 日: 80

今までの合計 4,664