メインコンテンツにスキップ

HP OMEN 16 Series Hard Drive Replacement

必要な工具と部品

  1. HP OMEN 16 Series Hard Drive Replacement, Hard Drive: 手順 1、 3の画像 1 HP OMEN 16 Series Hard Drive Replacement, Hard Drive: 手順 1、 3の画像 2 HP OMEN 16 Series Hard Drive Replacement, Hard Drive: 手順 1、 3の画像 3
    この手順で使用する道具:
    Plastic Cards
    $2.99
    購入する
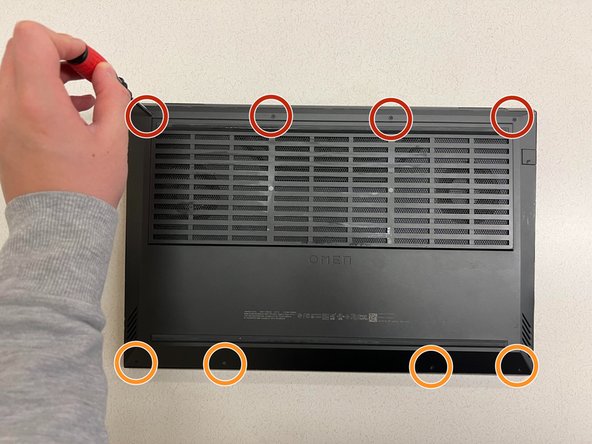
    • Remove the four 8 mm screws from the back panel of the laptop using a Phillips #1 screwdriver.

    • Remove the four 5 mm screws from the back panel of the laptop using a Phillips #1 screwdriver.

    • Slide a small plastic card between the crevice of the back panel of the laptop and the laptop itself.

    • Turn the card clockwise until you have a wide gap between the back panel and the laptop. Repeat this step all around the laptop to remove the back panel.

    • DO NOT insert the card too deep into the laptop, or you may damage or break the components inside the computer. Like the picture, you only need to insert a small corner of the card into the laptop.

  2. HP OMEN 16 Series Hard Drive Replacement: 手順 2、 2の画像 1 HP OMEN 16 Series Hard Drive Replacement: 手順 2、 2の画像 2
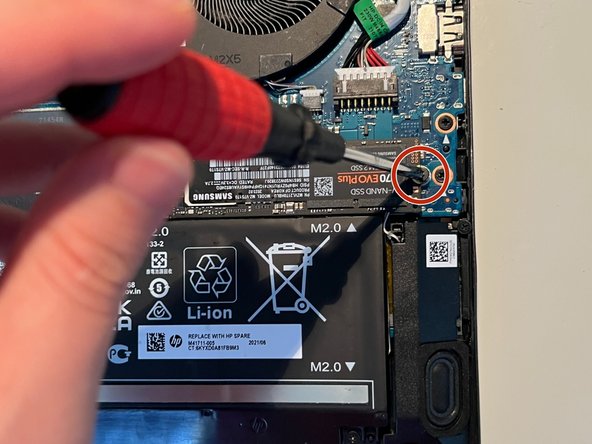
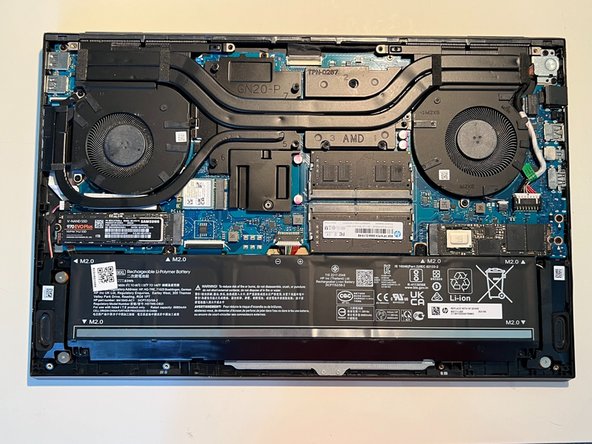
    • Locate the hard drive on the right.

    • Remove the screw fastening the hard drive in place with a Phillips #1 screwdriver.

  3. HP OMEN 16 Series Hard Drive Replacement: 手順 3、 3の画像 1 HP OMEN 16 Series Hard Drive Replacement: 手順 3、 3の画像 2 HP OMEN 16 Series Hard Drive Replacement: 手順 3、 3の画像 3
    • The SSD will pop up at a 25 or 35-degree angle.

    • Take the SSD out slowly at an angle. You may need to slightly wiggle the SSD out.

  4. HP OMEN 16 Series Hard Drive Replacement: 手順 4、 3の画像 1 HP OMEN 16 Series Hard Drive Replacement: 手順 4、 3の画像 2 HP OMEN 16 Series Hard Drive Replacement: 手順 4、 3の画像 3
    • Insert the new SSD into the slot at an angle without applying much pressure.

    • Re-screw the new SSD in with the Phillips #1 screwdriver.

  5. HP OMEN 16 Series Hard Drive Replacement: 手順 5、 3の画像 1 HP OMEN 16 Series Hard Drive Replacement: 手順 5、 3の画像 2 HP OMEN 16 Series Hard Drive Replacement: 手順 5、 3の画像 3
    • Locate the spare hard drive slot on the left side of the laptop.

    • Remove the screw from the spare hard drive slot, and set it carefully aside for later.

    • Obtain your new hard drive and insert the hard drive at around a 25 to 35-degree angle, as shown in the image.

    • Again, insert the hard drive carefully, and do not apply much pressure.

  6. HP OMEN 16 Series Hard Drive Replacement: 手順 6、 2の画像 1 HP OMEN 16 Series Hard Drive Replacement: 手順 6、 2の画像 2
    • Screw the hard drive securely to the hard drive slot using the screw that was set aside in step 5.

  7. HP OMEN 16 Series Hard Drive Replacement: 手順 7、 2の画像 1 HP OMEN 16 Series Hard Drive Replacement: 手順 7、 2の画像 2
    • Obtain the back panel and push the panel back onto the laptop.

    • Make sure that the panel is on the laptop completely; this means that you should push down firmly on multiple places so that the cover is securely on the laptop.

    • Re-screw in the four 8 mm screws with the Phillips #1 screwdriver.

    • Re-screw in the four 5 mm screws with the Phillips #1 screwdriver.

ゴール

2 の人々がこのガイドを完成させました。
作成者

2人の作成者と共同で作成されました。

James Heo

メンバー登録日: 10/25/23

172 ポイント

1ガイドが承認済み

チーム

CSU Los Angeles, Team 4-11, Kershman Fall 2023 CSU Los Angeles, Team 4-11, Kershman Fall 2023人のメンバー

CSULA-KERSHMAN-F23S4G11

1 メンバー

1のガイドは作成済み

0 件のコメント

コメントを追加

統計データ:

過去 24時間: 8

過去 7 日: 64

過去 30 日: 236

今までの合計 895