メインコンテンツにスキップ

HP Laserjet Pro 200 Color MFP Printer Roller Replacement

必要な工具と部品

  1. HP Laserjet Pro 200 Color MFP Printer Roller Replacement, Printer Roller: 手順 1、 1の画像 1
    • Plug in the printer to a wall outlet and place the printer on an accessible surface.

  2. HP Laserjet Pro 200 Color MFP Printer Roller Replacement: 手順 2、 2の画像 1 HP Laserjet Pro 200 Color MFP Printer Roller Replacement: 手順 2、 2の画像 2
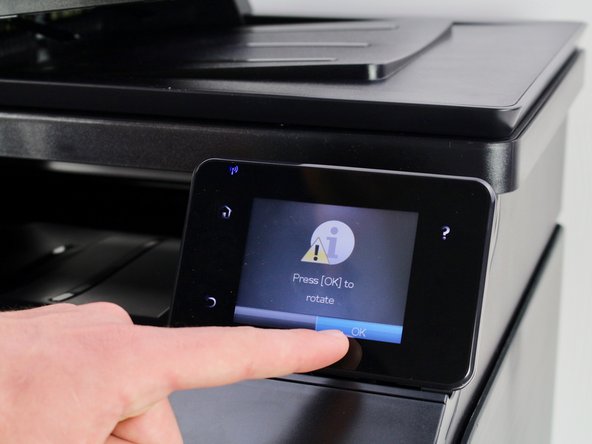
    • In order to rotate the roller to the maintenance position, a secondary menu must be unlocked via the display.

    • To unlock this menu, click on Settings tab (the wrench icon in the top left corner).

    • Once in the Settings menu , quickly click and hold the mid left side of the display (orange square).

    • While continuing to hold the left side, click the bottom right corner of the display (yellow square) and hold it. This should you bring you right back to the startup menu.

    • Once again, click on the Settings tab.

  3. HP Laserjet Pro 200 Color MFP Printer Roller Replacement: 手順 3、 2の画像 1 HP Laserjet Pro 200 Color MFP Printer Roller Replacement: 手順 3、 2の画像 2
    • Once in the Service menu, click on the "2ndary Service" tab.

    • Scroll down by pressing the down arrow on the bottom right corner of the screen until you find the tab labeled "Pick Roller."

    • Select "Pick Roller."

  4. HP Laserjet Pro 200 Color MFP Printer Roller Replacement: 手順 4、 1の画像 1
    • Press the "OK" button on the bottom right corner of the screen.

  5. HP Laserjet Pro 200 Color MFP Printer Roller Replacement: 手順 5、 1の画像 1
    • Unplug the printer from the side by pulling on the base of the cord.

    • Unplug the printer rather than manually turning it off using the power button in order for the roller to stay in maintenance position.

  6. HP Laserjet Pro 200 Color MFP Printer Roller Replacement: 手順 6、 1の画像 1
    • Remove the paper tray by pulling it out from the bottom completely.

  7. HP Laserjet Pro 200 Color MFP Printer Roller Replacement: 手順 7、 2の画像 1 HP Laserjet Pro 200 Color MFP Printer Roller Replacement: 手順 7、 2の画像 2
    • Rotate the printer as shown so that the front is facing your left.

    • Flip the printer so that its right side is facing down, and you are facing the bottom.

  8. HP Laserjet Pro 200 Color MFP Printer Roller Replacement: 手順 8、 1の画像 1
    • Use a metal spudger or a small flathead screwdriver to lift the tabs on each side of the roller.

  9. HP Laserjet Pro 200 Color MFP Printer Roller Replacement: 手順 9、 2の画像 1 HP Laserjet Pro 200 Color MFP Printer Roller Replacement: 手順 9、 2の画像 2
    • Pull out and remove the roller.

終わりに

To reassemble your device, follow these instructions in reverse order.

2 の人々がこのガイドを完成させました。

作成者

5人の作成者と共同で作成されました。

Kendall Gentzen

メンバー登録日: 04/18/19

981 ポイント

5のガイドは作成済み

チーム

Cal Poly, Team S9-G14, Maness Spring 2019 Cal Poly, Team S9-G14, Maness Spring 2019人のメンバー

CPSU-MANESS-S19S9G14

4 メンバー

11のガイドは作成済み

5 件のコメント

Simple and exact.

Jjay - 返信

I can not get the 2ndary Service menu to appear. I have followed these instructions very carefully. Is there another way to access this mennu?

James Herzog - 返信

@James Herzog. I had to try at least ten times before I got that key sequence working. Try pushing bit different spots and bit different speeds etc.

Rixa - 返信

Lord God. This worked just as you instructed. I'm still ready to throw the printer to the curb, but this did work!!

Karen-Glenn Richardson - 返信

Thank you so much, I reversed the rubber band in the roller and now it worked like new

Ali AlKhawaher - 返信

コメントを追加

統計データ:

過去 24時間: 2

過去 7 日: 23

過去 30 日: 124

今までの合計 9,022