メインコンテンツにスキップ

HP LaserJet 1160 or 1320 Main Board Replacement

必要な工具と部品

  1. HP LaserJet 1160 or 1320 Main Board Replacement, Left Side Cover: 手順 1、 3の画像 1 HP LaserJet 1160 or 1320 Main Board Replacement, Left Side Cover: 手順 1、 3の画像 2 HP LaserJet 1160 or 1320 Main Board Replacement, Left Side Cover: 手順 1、 3の画像 3
    • Pull on the two tabs on the back of the printer to release the left side cover.

    • Remove the cover by rotating it towards the front of the printer.

  2. HP LaserJet 1160 or 1320 Main Board Replacement, Right Side Cover: 手順 2、 3の画像 1 HP LaserJet 1160 or 1320 Main Board Replacement, Right Side Cover: 手順 2、 3の画像 2 HP LaserJet 1160 or 1320 Main Board Replacement, Right Side Cover: 手順 2、 3の画像 3
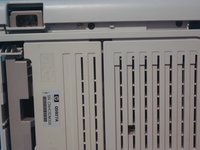
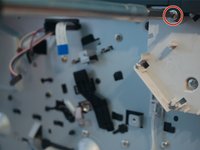
    • With the printer turned so that the right side is facing upwards, use a metal spudger to disengage 3 tabs holding the right side cover in place.

    • Lift the cover off of the printer.

  3. HP LaserJet 1160 or 1320 Main Board Replacement, Back Cover: 手順 3、 3の画像 1 HP LaserJet 1160 or 1320 Main Board Replacement, Back Cover: 手順 3、 3の画像 2 HP LaserJet 1160 or 1320 Main Board Replacement, Back Cover: 手順 3、 3の画像 3
    • Remove 4 screws on the back of the printer.

    • Remove the back cover.

  4. HP LaserJet 1160 or 1320 Main Board Replacement, Top Cover: 手順 4、 3の画像 1 HP LaserJet 1160 or 1320 Main Board Replacement, Top Cover: 手順 4、 3の画像 2 HP LaserJet 1160 or 1320 Main Board Replacement, Top Cover: 手順 4、 3の画像 3
    • Remove 2 screws on the back of the printer, one on the left, and one on the front.

    • The second image shows the formatter removed, but it is not necessary to remove the formatter to replace the top cover.

  5. HP LaserJet 1160 or 1320 Main Board Replacement, Top Cover: 手順 5、 1の画像 1
    • Disconnect the control panel cable and remove the top cover.

  6. HP LaserJet 1160 or 1320 Main Board Replacement, Fan: 手順 6、 2の画像 1 HP LaserJet 1160 or 1320 Main Board Replacement, Fan: 手順 6、 2の画像 2
    • Disconnect the fan cable from the main board of the printer.

    • Remove the retaining clip holding the fan in.

    • Remove the 2 screws holding the fan in.

  7. HP LaserJet 1160 or 1320 Main Board Replacement, Fan Cable: 手順 7、 3の画像 1 HP LaserJet 1160 or 1320 Main Board Replacement, Fan Cable: 手順 7、 3の画像 2 HP LaserJet 1160 or 1320 Main Board Replacement, Fan Cable: 手順 7、 3の画像 3
    • Remove the fan cable from the cable guide.

  8. HP LaserJet 1160 or 1320 Main Board Replacement, Duplexer PCB: 手順 8、 2の画像 1 HP LaserJet 1160 or 1320 Main Board Replacement, Duplexer PCB: 手順 8、 2の画像 2
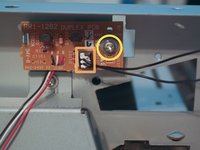
    • Disconnect one cable from the main board of the printer.

    • Disconnect the duplexer solenoid cable from the duplexer PCB.

    • Remove one screw on the duplexer PCB and remove the PCB from the printer.

  9. HP LaserJet 1160 or 1320 Main Board Replacement, Duplexer Gears: 手順 9、 2の画像 1 HP LaserJet 1160 or 1320 Main Board Replacement, Duplexer Gears: 手順 9、 2の画像 2
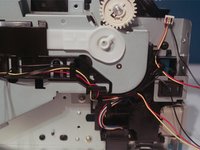
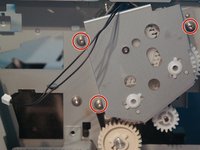
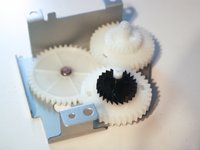
    • Remove 3 screws holding the duplexer gears to the printer and remove the gears.

  10. HP LaserJet 1160 or 1320 Main Board Replacement, Duplexer Solenoid: 手順 10、 1の画像 1
    • Remove one screw to remove the solenoid from the printer.

  11. HP LaserJet 1160 or 1320 Main Board Replacement, Left Side Cover: 手順 11、 3の画像 1 HP LaserJet 1160 or 1320 Main Board Replacement, Left Side Cover: 手順 11、 3の画像 2 HP LaserJet 1160 or 1320 Main Board Replacement, Left Side Cover: 手順 11、 3の画像 3
    • Pull on the two tabs on the back of the printer to release the left side cover.

    • Remove the cover by rotating it towards the front of the printer.

  12. HP LaserJet 1160 or 1320 Main Board Replacement, Formatter: 手順 12、 3の画像 1 HP LaserJet 1160 or 1320 Main Board Replacement, Formatter: 手順 12、 3の画像 2 HP LaserJet 1160 or 1320 Main Board Replacement, Formatter: 手順 12、 3の画像 3
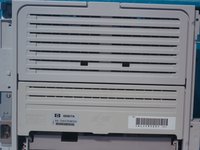
    • Remove 2 screws on the I/O port cover.

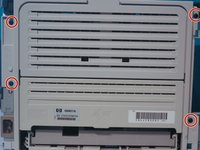
    • Remove 6 screws on the formatter.

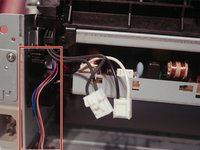
    • Disconnect 3 connectors from the formatter.

    • Disconnect 2 flat flexible cables from the formatter.

    • Remove the formatter from the printer.

    • Be careful not to fold, crease, or tear flat flexible cables.

    • The I/O port cover will need to be transferred to the new formatter before installing it.

  13. HP LaserJet 1160 or 1320 Main Board Replacement, Fuser Gear: 手順 13、 2の画像 1 HP LaserJet 1160 or 1320 Main Board Replacement, Fuser Gear: 手順 13、 2の画像 2
    • Remove the fuser gear by pushing in on the tab with a metal spudger.

  14. HP LaserJet 1160 or 1320 Main Board Replacement, Tray Connector: 手順 14、 3の画像 1 HP LaserJet 1160 or 1320 Main Board Replacement, Tray Connector: 手順 14、 3の画像 2 HP LaserJet 1160 or 1320 Main Board Replacement, Tray Connector: 手順 14、 3の画像 3
    • Disconnect the cable to the tray connector and route it through the hole in the chassis.

  15. HP LaserJet 1160 or 1320 Main Board Replacement, Fuser Cables: 手順 15、 3の画像 1 HP LaserJet 1160 or 1320 Main Board Replacement, Fuser Cables: 手順 15、 3の画像 2 HP LaserJet 1160 or 1320 Main Board Replacement, Fuser Cables: 手順 15、 3の画像 3
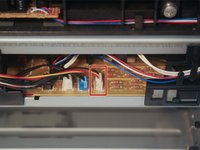
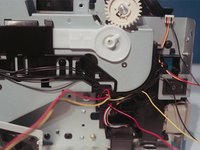
    • Disconnect 2 cables from the main board and route them through the cable guide.

  16. HP LaserJet 1160 or 1320 Main Board Replacement, Fuser Cables: 手順 16、 2の画像 1 HP LaserJet 1160 or 1320 Main Board Replacement, Fuser Cables: 手順 16、 2の画像 2
    • Remove the cable guide from the chassis.

  17. HP LaserJet 1160 or 1320 Main Board Replacement, Fuser Cables: 手順 17、 3の画像 1 HP LaserJet 1160 or 1320 Main Board Replacement, Fuser Cables: 手順 17、 3の画像 2 HP LaserJet 1160 or 1320 Main Board Replacement, Fuser Cables: 手順 17、 3の画像 3
    • Remove the cable guide from the other side of the chassis.

    • Disconnect 2 cables from the main board.

  18. HP LaserJet 1160 or 1320 Main Board Replacement, Fuser Cables: 手順 18、 2の画像 1 HP LaserJet 1160 or 1320 Main Board Replacement, Fuser Cables: 手順 18、 2の画像 2
    • Use needle nose pliers to disconnect the high voltage wire from the fuser.

  19. HP LaserJet 1160 or 1320 Main Board Replacement, Fuser Cables: 手順 19、 3の画像 1 HP LaserJet 1160 or 1320 Main Board Replacement, Fuser Cables: 手順 19、 3の画像 2 HP LaserJet 1160 or 1320 Main Board Replacement, Fuser Cables: 手順 19、 3の画像 3
    • Remove the tray connector cable from the cable guide.

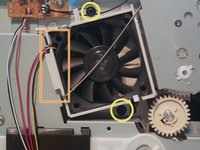
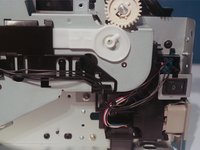
    • Disconnect the main motor cable.

  20. HP LaserJet 1160 or 1320 Main Board Replacement, Fuser: 手順 20、 3の画像 1 HP LaserJet 1160 or 1320 Main Board Replacement, Fuser: 手順 20、 3の画像 2 HP LaserJet 1160 or 1320 Main Board Replacement, Fuser: 手順 20、 3の画像 3
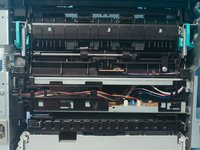
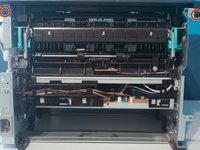
    • Remove 3 screws from the right side of the printer.

    • Remove 3 screws from the left side of the printer.

    • The fuser assembly can now be removed from the printer.

  21. HP LaserJet 1160 or 1320 Main Board Replacement, Midframe: 手順 21、 2の画像 1 HP LaserJet 1160 or 1320 Main Board Replacement, Midframe: 手順 21、 2の画像 2
    • Remove 4 screws from each side of the printer to remove the mainframe.

  22. HP LaserJet 1160 or 1320 Main Board Replacement, Safety Interlock Assembly: 手順 22、 1の画像 1
    • Remove 3 screws from the safety interlock assembly (one on top) and remove it from the printer.

  23. HP LaserJet 1160 or 1320 Main Board Replacement, Feed Plate: 手順 23、 2の画像 1 HP LaserJet 1160 or 1320 Main Board Replacement, Feed Plate: 手順 23、 2の画像 2
    • Remove the feed plate from over the main board.

  24. HP LaserJet 1160 or 1320 Main Board Replacement, Main Board Cables: 手順 24、 2の画像 1 HP LaserJet 1160 or 1320 Main Board Replacement, Main Board Cables: 手順 24、 2の画像 2
    • Remove the tray connector and motor cables from the cable guide.

  25. HP LaserJet 1160 or 1320 Main Board Replacement, Cable Guide: 手順 25、 3の画像 1 HP LaserJet 1160 or 1320 Main Board Replacement, Cable Guide: 手順 25、 3の画像 2 HP LaserJet 1160 or 1320 Main Board Replacement, Cable Guide: 手順 25、 3の画像 3
    • Remove one screw from the cable guide and remove the cable guide from the chassis.

    • Remove one screw from the chassis.

  26. HP LaserJet 1160 or 1320 Main Board Replacement, Main Board: 手順 26、 3の画像 1 HP LaserJet 1160 or 1320 Main Board Replacement, Main Board: 手順 26、 3の画像 2 HP LaserJet 1160 or 1320 Main Board Replacement, Main Board: 手順 26、 3の画像 3
    • Remove 2 screws from the left side of the chassis.

    • Push the formatter and safety interlock cables through the hole in the chassis.

  27. HP LaserJet 1160 or 1320 Main Board Replacement, Main Board: 手順 27、 3の画像 1 HP LaserJet 1160 or 1320 Main Board Replacement, Main Board: 手順 27、 3の画像 2 HP LaserJet 1160 or 1320 Main Board Replacement, Main Board: 手順 27、 3の画像 3
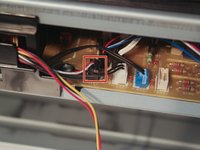
    • Bend the chassis to allow the control board to come loose, and disconnect the 2 cables from the paper feed assembly.

    • Remove the main board from the printer.

  28. HP LaserJet 1160 or 1320 Main Board Replacement, Main Board: 手順 28、 1の画像 1
    • Remove 4 screws on the control board to remove it from its metal plate.

終わりに

To reassemble your device, follow these instructions in reverse order.

ある他の人がこのガイドを完成しました。

jdp23

メンバー登録日: 08/22/13

1,302 ポイント

23のガイドは作成済み

0 件のコメント

コメントを追加

統計データ:

過去 24時間: 1

過去 7 日: 4

過去 30 日: 9

今までの合計 1,786