メインコンテンツにスキップ

HP Envy x360 m6-aq103dx Headphone Jack Replacement

必要な工具と部品

  1. HP Envy x360 m6-aq103dx Headphone Jack Replacement, Bottom Cover: 手順 1、 3の画像 1 HP Envy x360 m6-aq103dx Headphone Jack Replacement, Bottom Cover: 手順 1、 3の画像 2 HP Envy x360 m6-aq103dx Headphone Jack Replacement, Bottom Cover: 手順 1、 3の画像 3
    • Flip the laptop over to expose the underside.

    • Remove the two grip pads with blue plastic opening tool by inserting the tool between the laptop and the pads and slowly lifting up.

    • The grip pads are tacky, remove slowly to avoid separating the adhesive.

  2. HP Envy x360 m6-aq103dx Headphone Jack Replacement: 手順 2、 1の画像 1
    • Remove the two 8 mm Phillips Head screws that were under the grip pads using a Phillip's Head 1 Screwdriver.

  3. HP Envy x360 m6-aq103dx Headphone Jack Replacement: 手順 3、 1の画像 1
    • Remove the six 5 mm Torx screws using a T5 Torx Screwdriver.

  4. HP Envy x360 m6-aq103dx Headphone Jack Replacement: 手順 4、 3の画像 1 HP Envy x360 m6-aq103dx Headphone Jack Replacement: 手順 4、 3の画像 2 HP Envy x360 m6-aq103dx Headphone Jack Replacement: 手順 4、 3の画像 3
    • Use the nylon spudger to pop off the bottom cover by inserting it into the heat vent and twisting to the left or right.

    • You may hear a slight clicking or popping, but that is normal.

  5. HP Envy x360 m6-aq103dx Headphone Jack Replacement, Battery: 手順 5、 2の画像 1 HP Envy x360 m6-aq103dx Headphone Jack Replacement, Battery: 手順 5、 2の画像 2
    • Use the Phillips Head 1 Screwdriver to remove the six 4 mm screws.

  6. HP Envy x360 m6-aq103dx Headphone Jack Replacement: 手順 6、 3の画像 1 HP Envy x360 m6-aq103dx Headphone Jack Replacement: 手順 6、 3の画像 2 HP Envy x360 m6-aq103dx Headphone Jack Replacement: 手順 6、 3の画像 3
    • Disconnect the battery port from the motherboard by gently lifting it on both sides with the plastic opening tool.

    • Lift up the port with the tool.

  7. HP Envy x360 m6-aq103dx Headphone Jack Replacement: 手順 7、 3の画像 1 HP Envy x360 m6-aq103dx Headphone Jack Replacement: 手順 7、 3の画像 2 HP Envy x360 m6-aq103dx Headphone Jack Replacement: 手順 7、 3の画像 3
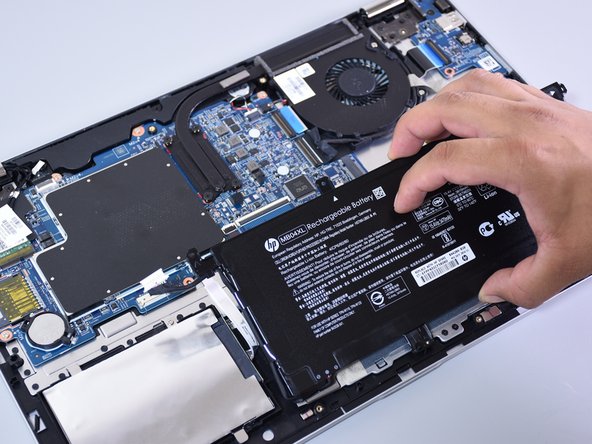
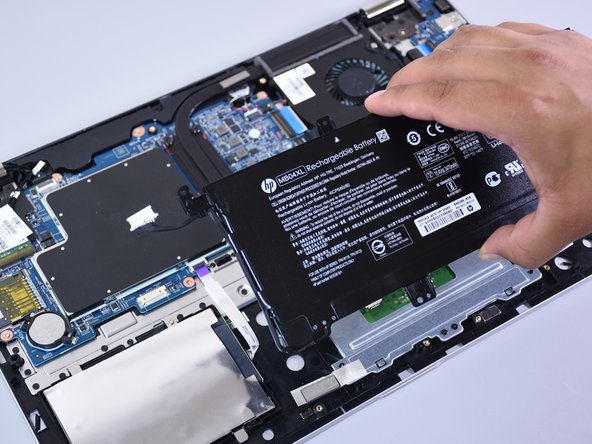
    • Lift the battery out of the laptop with your hands.

  8. HP Envy x360 m6-aq103dx Headphone Jack Replacement, Headphone Jack: 手順 8、 2の画像 1 HP Envy x360 m6-aq103dx Headphone Jack Replacement, Headphone Jack: 手順 8、 2の画像 2
    この手順で使用する道具:
    Anti-Static Wrist Strap
    $7.95
    購入する
    • Make sure you are wearing an anti-static wrist strap.

    • Remove the four screws from the blue board that contains the headphone jack using the Phillips head 1 screwdriver (one 4 mm black screw, one 3 mm black screw, and two 4.5 mm silver screws).

  9. HP Envy x360 m6-aq103dx Headphone Jack Replacement: 手順 9、 3の画像 1 HP Envy x360 m6-aq103dx Headphone Jack Replacement: 手順 9、 3の画像 2 HP Envy x360 m6-aq103dx Headphone Jack Replacement: 手順 9、 3の画像 3
    • Insert the plastic opening tool underneath the connector on the black flexible flat cable with the blue plastic stripe.

    • Lift the opening tool to open the connector.

    • Use your fingers to slide the ribbon cable out of the connector.

  10. HP Envy x360 m6-aq103dx Headphone Jack Replacement: 手順 10、 3の画像 1 HP Envy x360 m6-aq103dx Headphone Jack Replacement: 手順 10、 3の画像 2 HP Envy x360 m6-aq103dx Headphone Jack Replacement: 手順 10、 3の画像 3
    • Hold the left side of the board between your fingers.

    • Lift the edge upwards enough to clear the other components in the way.

    • Be gentle when lifting to avoid breaking the board.

    • Slide and rotate to lift the board out of the designated slot for the board.

    • You may have to wiggle the board back and forth, and up and down, to remove the board.

終わりに

To reassemble your device, follow these instructions in reverse order.

ある他の人がこのガイドを完成しました。

作成者

3人の作成者と共同で作成されました。

Jordan Eremeyeff

メンバー登録日: 10/01/17

597 ポイント

3のガイドは作成済み

チーム

Cal Poly, Team S4-G3, Livingston Fall 2017 Cal Poly, Team S4-G3, Livingston Fall 2017人のメンバー

CPSU-LIVINGSTON-F17S4G3

4 メンバー

9のガイドは作成済み

0 件のコメント

コメントを追加

統計データ:

過去 24時間: 0

過去 7 日: 2

過去 30 日: 8

今までの合計 1,510