メインコンテンツにスキップ

HP Envy Touchsmart m6-k125dx Mouse Touch Pad Replacement

必要な工具と部品

  1. HP Envy Touchsmart m6-k125dx Mouse Touch Pad Replacement, Back Panel: 手順 1、 2の画像 1 HP Envy Touchsmart m6-k125dx Mouse Touch Pad Replacement, Back Panel: 手順 1、 2の画像 2
    • Turn the laptop over so that the bottom is facing up

    • Using the J0 screwdriver, unscrew all 12 M2.5x5.5 screws from the back panel.

  2. HP Envy Touchsmart m6-k125dx Mouse Touch Pad Replacement: 手順 2、 1の画像 1
    • Carefully remove the back panel to reveal the inner components.

  3. HP Envy Touchsmart m6-k125dx Mouse Touch Pad Replacement, Mouse Touch Pad: 手順 3、 2の画像 1 HP Envy Touchsmart m6-k125dx Mouse Touch Pad Replacement, Mouse Touch Pad: 手順 3、 2の画像 2
    • The mouse touch pad is located in the bottom middle section of the back of the laptop.

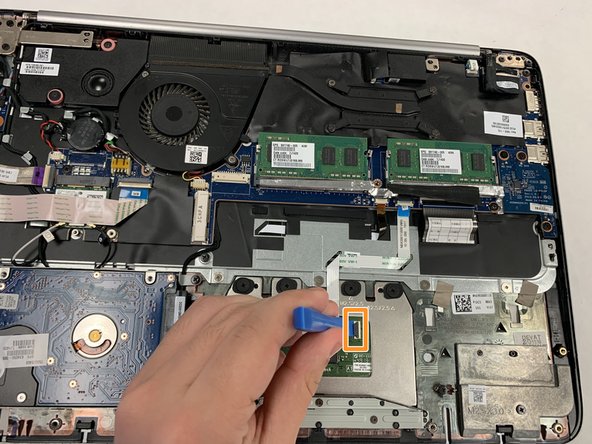
    • Lift the black ZIF tab and gently pull the ribbon cable free.

  4. HP Envy Touchsmart m6-k125dx Mouse Touch Pad Replacement: 手順 4、 1の画像 1
    • There are four M2.5X2.5 screws that need to be removed in order to take the mouse touch pad out.

    • Unscrew all four M2.5X2.5 screws with a JIS #0 screwdriver.

  5. HP Envy Touchsmart m6-k125dx Mouse Touch Pad Replacement: 手順 5、 1の画像 1
    • Flip the laptop over and open it.

    • Gently press on the two top corners of the mouse touch pad, snapping it down and out.

    • Remove through the bottom of the laptop and replace.

終わりに

To reassemble your device, follow these instructions in reverse order.

作成者

2人の作成者と共同で作成されました。

Aaron Burns

メンバー登録日: 04/06/19

97 ポイント

1ガイドが承認済み

チーム

IUPUI, Team S14-G14, Wilson Spring 2019 IUPUI, Team S14-G14, Wilson Spring 2019人のメンバー

IUPUI-WILSON-S19S14G14

4 メンバー

3のガイドは作成済み

0 件のコメント

コメントを追加

統計データ:

過去 24時間: 2

過去 7 日: 4

過去 30 日: 6

今までの合計 204