メインコンテンツにスキップ

HP Envy Sleekbook m6-k010dx Keyboard Replacement

必要な工具と部品

  1. HP Envy Sleekbook m6-k010dx Keyboard Replacement, Battery: 手順 1、 1の画像 1
    • Remove the twelve 9 mm Phillips #00 screws.

  2. HP Envy Sleekbook m6-k010dx Keyboard Replacement: 手順 2、 2の画像 1 HP Envy Sleekbook m6-k010dx Keyboard Replacement: 手順 2、 2の画像 2
    • Use the plastic opening tool and your hands to remove the bottom cover.

  3. HP Envy Sleekbook m6-k010dx Keyboard Replacement: 手順 3、 1の画像 1
    • Disconnect the battery power cable from the motherboard.

  4. HP Envy Sleekbook m6-k010dx Keyboard Replacement: 手順 4、 1の画像 1
    • Remove the six 6 mm Phillips #00 screws from the battery.

  5. HP Envy Sleekbook m6-k010dx Keyboard Replacement: 手順 5、 2の画像 1 HP Envy Sleekbook m6-k010dx Keyboard Replacement: 手順 5、 2の画像 2
    • Lift the battery out of the laptop.

  6. HP Envy Sleekbook m6-k010dx Keyboard Replacement, Fan: 手順 6、 1の画像 1
    • Remove two 3mm Phillips #00 screws from the fan.

  7. HP Envy Sleekbook m6-k010dx Keyboard Replacement: 手順 7、 2の画像 1 HP Envy Sleekbook m6-k010dx Keyboard Replacement: 手順 7、 2の画像 2
    • Disconnect the fan cable by pulling it out of the motherboard socket.

  8. HP Envy Sleekbook m6-k010dx Keyboard Replacement: 手順 8、 1の画像 1
    • Lift the fan upwards to remove it from the computer.

  9. HP Envy Sleekbook m6-k010dx Keyboard Replacement, Keyboard: 手順 9、 1の画像 1
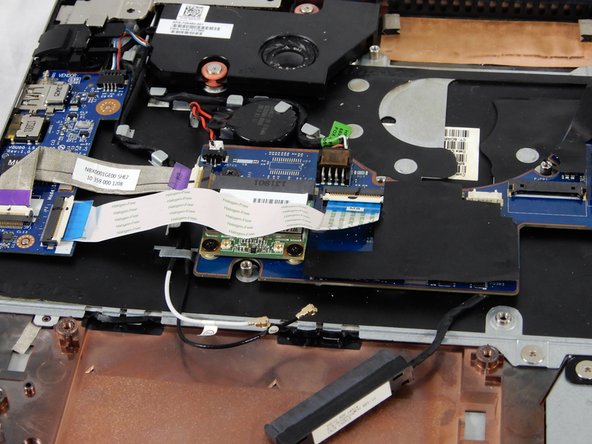
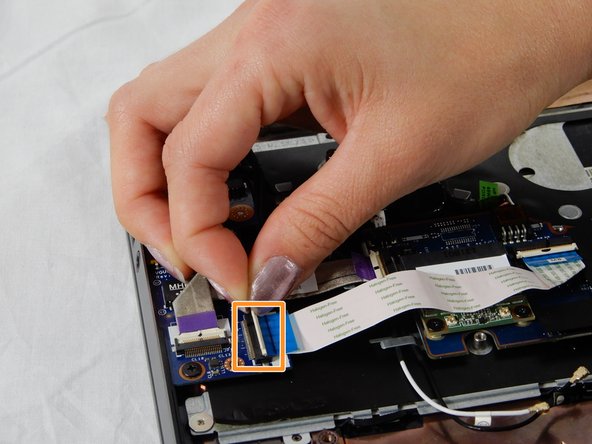
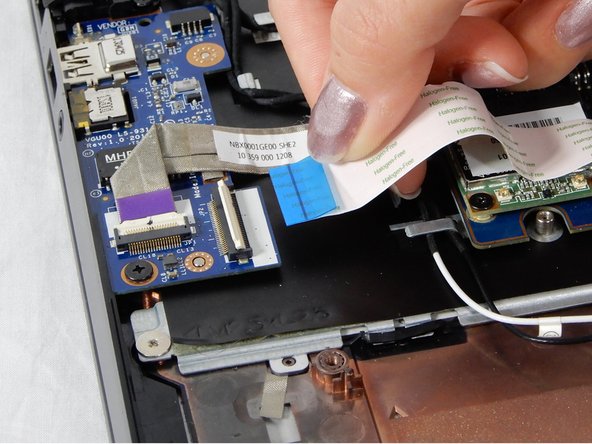
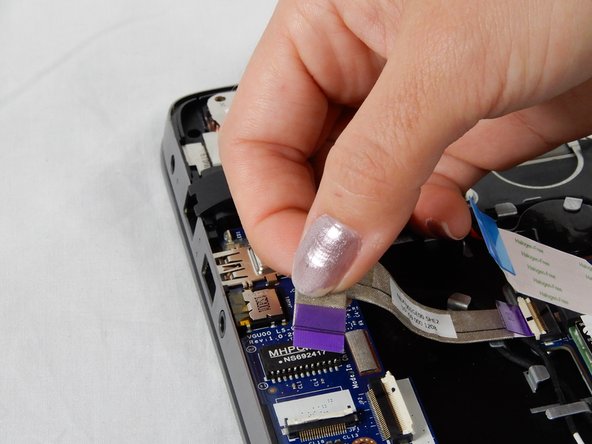
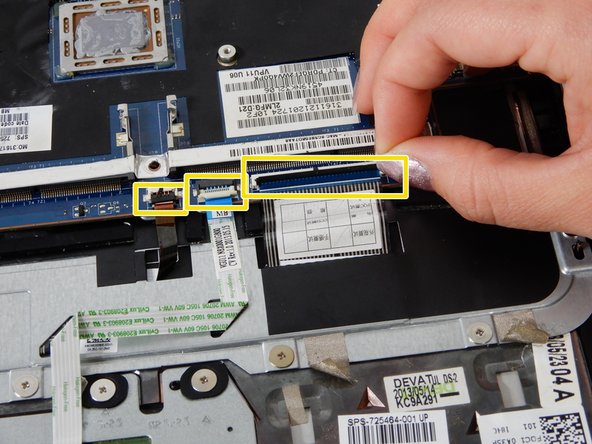
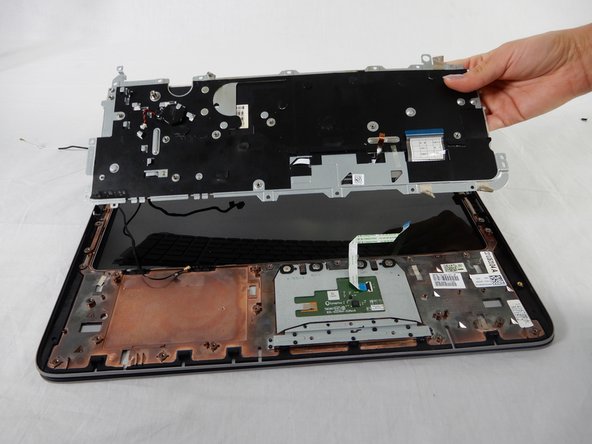
    • Flip up the black tab on the ZIF connector and pull the blue and white flex cable connecting the touchpad to the motherboard.

  10. HP Envy Sleekbook m6-k010dx Keyboard Replacement: 手順 10、 2の画像 1 HP Envy Sleekbook m6-k010dx Keyboard Replacement: 手順 10、 2の画像 2
    • Remove three 3mm Phillips #00 screws from the SD card board.

    • Remove the SD card board.

  11. HP Envy Sleekbook m6-k010dx Keyboard Replacement: 手順 11、 2の画像 1 HP Envy Sleekbook m6-k010dx Keyboard Replacement: 手順 11、 2の画像 2
    • In order to remove the RAM, pull each silver clip (one at a time) away from the RAM.

    • The RAM chip should pop up. Gently remove the RAM from the motherboard.

  12. HP Envy Sleekbook m6-k010dx Keyboard Replacement: 手順 12、 2の画像 1 HP Envy Sleekbook m6-k010dx Keyboard Replacement: 手順 12、 2の画像 2
    • Remove four 3mm Phillips #00 screws from the heatsink.

    • Lift the heat sink out from the device and set it aside.

  13. HP Envy Sleekbook m6-k010dx Keyboard Replacement: 手順 13、 2の画像 1 HP Envy Sleekbook m6-k010dx Keyboard Replacement: 手順 13、 2の画像 2
    • Remove the black and white antenna wires from the Wi-Fi card.

  14. HP Envy Sleekbook m6-k010dx Keyboard Replacement: 手順 14、 3の画像 1 HP Envy Sleekbook m6-k010dx Keyboard Replacement: 手順 14、 3の画像 2 HP Envy Sleekbook m6-k010dx Keyboard Replacement: 手順 14、 3の画像 3
    • Remove the two 3mm Phillips #00 screws that secure the speaker to the device.

    • Remove the four 4mm Phillips #00 screws from the bracket.

    • Locate the speaker cable connecting the speaker to the audio board. Gently tug on this cable to dislodge. Set the speaker aside.

  15. HP Envy Sleekbook m6-k010dx Keyboard Replacement: 手順 15、 3の画像 1 HP Envy Sleekbook m6-k010dx Keyboard Replacement: 手順 15、 3の画像 2 HP Envy Sleekbook m6-k010dx Keyboard Replacement: 手順 15、 3の画像 3
    • Remove the two 3mm Phillips #00 screws that secure the RJ-45 module.

    • Lift the white tab on the ZIF connector and pull the ribbon cable out.

  16. HP Envy Sleekbook m6-k010dx Keyboard Replacement: 手順 16、 3の画像 1 HP Envy Sleekbook m6-k010dx Keyboard Replacement: 手順 16、 3の画像 2 HP Envy Sleekbook m6-k010dx Keyboard Replacement: 手順 16、 3の画像 3
    • Remove the 3mm Phillips #00 screw connecting the chip to the housing.

    • Lift up silver bracket.

    • Lift up the white flap on the ZIF connector and remove the purple ribbon cable.

  17. HP Envy Sleekbook m6-k010dx Keyboard Replacement: 手順 17、 3の画像 1 HP Envy Sleekbook m6-k010dx Keyboard Replacement: 手順 17、 3の画像 2 HP Envy Sleekbook m6-k010dx Keyboard Replacement: 手順 17、 3の画像 3
    • Remove the cover for the RM-45 port.

    • Gently lift and remove the chip from its housing.

  18. HP Envy Sleekbook m6-k010dx Keyboard Replacement: 手順 18、 3の画像 1 HP Envy Sleekbook m6-k010dx Keyboard Replacement: 手順 18、 3の画像 2 HP Envy Sleekbook m6-k010dx Keyboard Replacement: 手順 18、 3の画像 3
    • Remove the 4mm Phillips #00 screws.

    • Remove the silver 3mm Phillips 3 mm screw.

    • Lift all three black flaps in the ZIF connectors and remove the attached ribbon cables.

  19. HP Envy Sleekbook m6-k010dx Keyboard Replacement: 手順 19、 3の画像 1 HP Envy Sleekbook m6-k010dx Keyboard Replacement: 手順 19、 3の画像 2 HP Envy Sleekbook m6-k010dx Keyboard Replacement: 手順 19、 3の画像 3
    • Use your hand and gently remove the connector to the back up battery for the motherboard.

    • Remove the four 4mm Phillips #00 screws from the motherboard.

    • Lift the board at an angle and pull outwards to dislodge it from the device.

  20. HP Envy Sleekbook m6-k010dx Keyboard Replacement: 手順 20、 2の画像 1 HP Envy Sleekbook m6-k010dx Keyboard Replacement: 手順 20、 2の画像 2
    • Remove the thirteen silver 3mm Phillips #00 screws that secure the keyboard to the frame.

    • Lift up the keyboard from the bracket and pull outwards to remove the keyboard from the device.

終わりに

To reassemble your device, follow these instructions in reverse order.

2 の人々がこのガイドを完成させました。

作成者

3人の作成者と共同で作成されました。

codi whittaker

メンバー登録日: 02/14/18

508 ポイント

3のガイドは作成済み

チーム

USF Tampa, Team S1-G4, Nance Spring 2018 USF Tampa, Team S1-G4, Nance Spring 2018人のメンバー

USFT-NANCE-S18S1G4

4 メンバー

15のガイドは作成済み

0 件のコメント

コメントを追加

統計データ:

過去 24時間: 1

過去 7 日: 1

過去 30 日: 7

今までの合計 1,897