はじめに
The print head of the HP Envy 5660 is the piece that puts the ink onto the paper inserted into the printer. This guide will go over the replacement of the print head.
必要な工具と部品
-
-
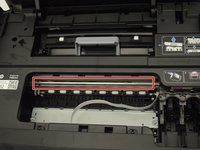
Remove right side of the printer using a plastic opening tool or metal spudger.
This is the wrong side of the printer. This grants access to a PCB and ribbon cables.
-
-
-
-
Remove spring from the side of the print head rail using a metal spudger.
-
-
-
Push the metal rail the print head rests on inwards to remove it from its bearings.
-
-
-
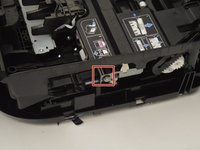
Remove the belt from the back of the print head using a metal spudger.
One needs to remove the print head from the drive gears. These are located under the plastic cover in the background.
Still zero mention of a ribbon cable.
-


To reassemble your device, follow these instructions in reverse order.
To reassemble your device, follow these instructions in reverse order.
ある他の人がこのガイドを完成しました。
チーム

Cal Poly, Team S1-G6, Livingston Winter 2018 Cal Poly, Team S1-G6, Livingston Winter 2018人のメンバー
CPSU-LIVINGSTON-W18S1G6
4 メンバー
10のガイドは作成済み
コメント 1 件
I wouldn't recommend this guide to anyone without prior experience as it's non-thorough and missing many steps. Started with a clogged printhead; finished with a torn ribbon cable and a couple other new damages.