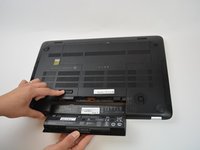
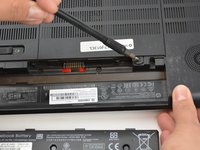
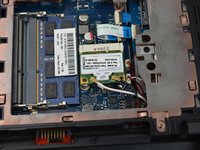
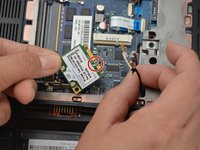
メインコンテンツにスキップ

HP Envy 17-J013CL WLAN Module Replacement

必要な工具と部品

  1. HP Envy 17-J013CL WLAN Module Replacement, Battery: 手順 1、 1の画像 1
    • Lay the laptop with the battery facing towards you.

    • Remember to disconnect the AC cable and other power sources from the device before replacing/repairing parts.

  2. HP Envy 17-J013CL WLAN Module Replacement: 手順 2、 1の画像 1
    • Grab hold of the small battery slider and apply pressure to the right.

    • The laptop itself will push the battery out for you once the switch slides all the way to the right.

  3. HP Envy 17-J013CL WLAN Module Replacement: 手順 3、 3の画像 1 HP Envy 17-J013CL WLAN Module Replacement: 手順 3、 3の画像 2 HP Envy 17-J013CL WLAN Module Replacement: 手順 3、 3の画像 3
    • Pull the battery out and let go of the battery slider.

  4. HP Envy 17-J013CL WLAN Module Replacement, Back Panel: 手順 4、 2の画像 1 HP Envy 17-J013CL WLAN Module Replacement, Back Panel: 手順 4、 2の画像 2
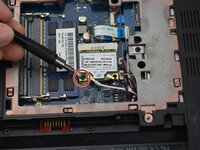
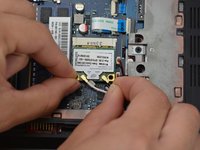
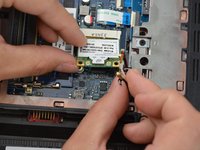
    • Use a PH1-screwdriver to loosen the 7mm screw. The screw will not fully come out as it is held by a washer underneath but will come out enough to open it.

  5. HP Envy 17-J013CL WLAN Module Replacement: 手順 5、 1の画像 1
    • Gently pull the back panel off starting from the battery side towards the back.

    • Pull it back as it snaps out of the holding sockets.

    • It is preferred to use both hands when pulling the back panel off to prevent bending it out of shape.

  6. HP Envy 17-J013CL WLAN Module Replacement, WLAN Module: 手順 6、 2の画像 1 HP Envy 17-J013CL WLAN Module Replacement, WLAN Module: 手順 6、 2の画像 2
    • Locate the WLAN module.

  7. HP Envy 17-J013CL WLAN Module Replacement: 手順 7、 2の画像 1 HP Envy 17-J013CL WLAN Module Replacement: 手順 7、 2の画像 2
    • Use a PH1-screwdriver to remove the 7mm screw from the motherboard.

  8. HP Envy 17-J013CL WLAN Module Replacement: 手順 8、 2の画像 1 HP Envy 17-J013CL WLAN Module Replacement: 手順 8、 2の画像 2
    • Lift the black and white wire from the module. Removing the wires from the ends will have a distinct popping noise.

    • Remember to put the white wire on the left side of the module and the black wire on the right side. Failure to do so may cause issues.

  9. HP Envy 17-J013CL WLAN Module Replacement: 手順 9、 2の画像 1 HP Envy 17-J013CL WLAN Module Replacement: 手順 9、 2の画像 2
    • Gently pull out the module away from the motherboard.

    • Make sure to put the module back in the correct orientation designated by the little arch in the end of the module.

終わりに

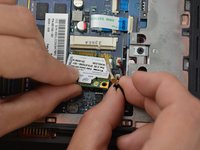
To reassemble your device, follow these instructions in reverse order.

ある他の人がこのガイドを完成しました。

作成者

1人の作成者と共同作成されました。

Matt McBride

メンバー登録日: 02/02/17

845 ポイント

6のガイドは作成済み

チーム

USF Tampa, Team 16-6, Blackwell Spring 2017 USF Tampa, Team 16-6, Blackwell Spring 2017人のメンバー

USFT-BLACKWELL-S17S16G6

3 メンバー

6のガイドは作成済み

0 件のコメント

コメントを追加

統計データ:

過去 24時間: 0

過去 7 日: 6

過去 30 日: 7

今までの合計 339