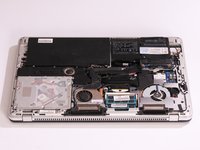
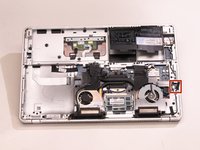
メインコンテンツにスキップ

HP Envy 17-3070NR Top Cover Replacement

必要な工具と部品

  1. HP Envy 17-3070NR Top Cover Replacement, Back Cover: 手順 1、 2の画像 1 HP Envy 17-3070NR Top Cover Replacement, Back Cover: 手順 1、 2の画像 2
    • Before you begin taking apart the computer, make sure that it is completely powered off.

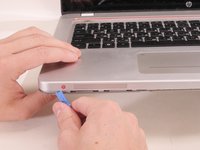
    • Slide the release latch away from the nearest edge.

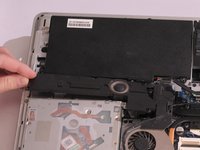
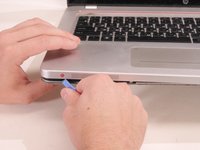
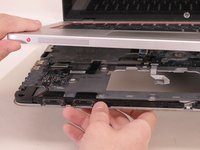
    • Slide the back cover off of the computer.

  2. HP Envy 17-3070NR Top Cover Replacement: 手順 2、 3の画像 1 HP Envy 17-3070NR Top Cover Replacement: 手順 2、 3の画像 2 HP Envy 17-3070NR Top Cover Replacement: 手順 2、 3の画像 3
    • Remove the six 3.7mm Phillips screws.

    • Slide the back cover until it clicks, then lift it straight off.

  3. HP Envy 17-3070NR Top Cover Replacement, Hard Drive: 手順 3、 3の画像 1 HP Envy 17-3070NR Top Cover Replacement, Hard Drive: 手順 3、 3の画像 2 HP Envy 17-3070NR Top Cover Replacement, Hard Drive: 手順 3、 3の画像 3
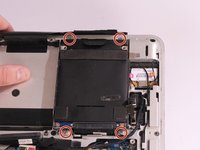
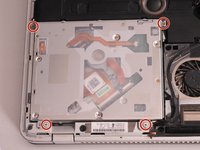
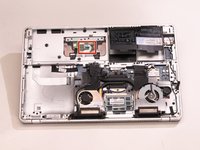
    • Remove the four 3.7mm Phillips screws that hold the hard drive onto the computer.

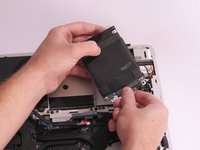
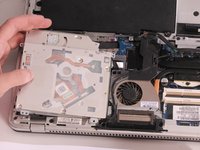
    • Remove the hard drive by lifting it out of its cavity.

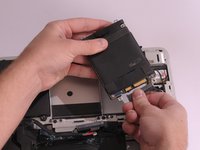
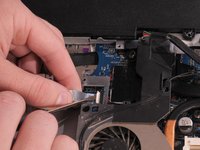
    • Unplug the hard drive cable that connects it to the main assembly.

  4. HP Envy 17-3070NR Top Cover Replacement, Optical Drive: 手順 4、 3の画像 1 HP Envy 17-3070NR Top Cover Replacement, Optical Drive: 手順 4、 3の画像 2 HP Envy 17-3070NR Top Cover Replacement, Optical Drive: 手順 4、 3の画像 3
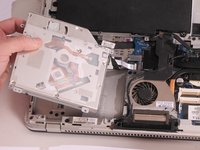
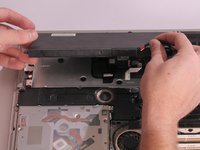
    • Remove the four 3.7mm Phillips screws that secure the optical drive to the computer.

    • Slowly lift the optical drive away from the computer ensuring that you don't put stress on the connecting cable.

    • Do not fully lift off the optical drive as there is still a cable that connects it to the motherboard.

    • Remove Sub Speaker assembly first in order to remove Optical drive. Carefully disconnect speaker connector.

  5. HP Envy 17-3070NR Top Cover Replacement: 手順 6、 3の画像 1 HP Envy 17-3070NR Top Cover Replacement: 手順 6、 3の画像 2 HP Envy 17-3070NR Top Cover Replacement: 手順 6、 3の画像 3
    • Carefully disconnect the connecting cable by lifting the white clamp with a Flathead screwdriver and pulling on the blue tab away from connector.

  6. HP Envy 17-3070NR Top Cover Replacement, Battery: 手順 7、 2の画像 1 HP Envy 17-3070NR Top Cover Replacement, Battery: 手順 7、 2の画像 2
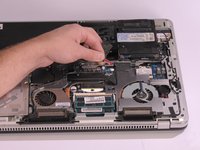
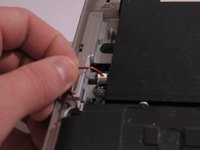
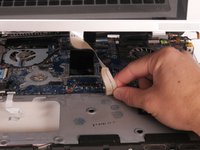
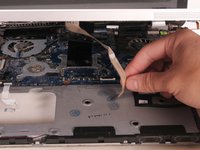
    • Disconnect the multi-colored battery cable from the main assembly by gently pulling upward on it.

  7. HP Envy 17-3070NR Top Cover Replacement: 手順 8、 3の画像 1 HP Envy 17-3070NR Top Cover Replacement: 手順 8、 3の画像 2 HP Envy 17-3070NR Top Cover Replacement: 手順 8、 3の画像 3
    • Remove the two 3.8 mm Torx screws using M8 Torx screwdriver.

    • Remove the battery by pulling it straight out away from the computer.

    • It is much easier to use the battery cable to carefully lift the battery off than to try to pry it off with tools.

  8. HP Envy 17-3070NR Top Cover Replacement, Subwoofer: 手順 9、 3の画像 1 HP Envy 17-3070NR Top Cover Replacement, Subwoofer: 手順 9、 3の画像 2 HP Envy 17-3070NR Top Cover Replacement, Subwoofer: 手順 9、 3の画像 3
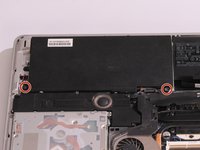
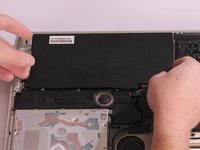
    • Unscrew the three 6.5mm Phillips shoulder screws that connect the subwoofer to the computer.

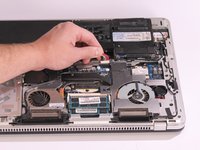
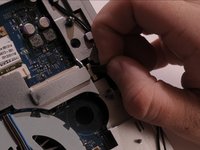
    • Disconnect the red and black subwoofer cable from the system board by pulling it upwards.

    • Remove the subwoofer by pulling straight up from the main assembly.

  9. HP Envy 17-3070NR Top Cover Replacement, Top Cover: 手順 10、 3の画像 1 HP Envy 17-3070NR Top Cover Replacement, Top Cover: 手順 10、 3の画像 2 HP Envy 17-3070NR Top Cover Replacement, Top Cover: 手順 10、 3の画像 3
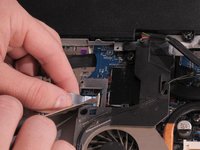
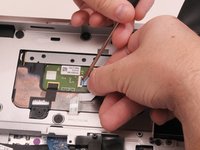
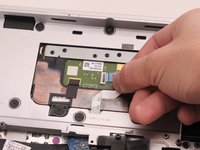
    • Remove the first connector by lifting the white clamp with a Flathead screwdriver and pulling the connector to your right.

  10. HP Envy 17-3070NR Top Cover Replacement: 手順 11、 3の画像 1 HP Envy 17-3070NR Top Cover Replacement: 手順 11、 3の画像 2 HP Envy 17-3070NR Top Cover Replacement: 手順 11、 3の画像 3
    • Remove the second connector by gently pulling upward.

  11. HP Envy 17-3070NR Top Cover Replacement: 手順 12、 1の画像 1
    • Remove the seventeen 6.6mm Phillips screws.

    • Remove the three 3.6 mm Phillips screws.

    • Remove the eleven 3.2mm Phillips screws

    • Three of the 3.2mm Phillips screws are located underneath the black hard drive flap.

    • Make sure that you keep the screws organized so that you keep track of all of the different sizes and locations.

  12. HP Envy 17-3070NR Top Cover Replacement: 手順 13、 3の画像 1 HP Envy 17-3070NR Top Cover Replacement: 手順 13、 3の画像 2 HP Envy 17-3070NR Top Cover Replacement: 手順 13、 3の画像 3
    • Flip the laptop over.

    • Use a Plastic Opening tool to carefully pry all around the top cover up off of the remaining assembly.

    • Starting location for prying does not matter as long as you pry all around the frame before lifting it off.

    • Do not fully lift the top cover because there are cables that will need to be disconnected before removal.

  13. HP Envy 17-3070NR Top Cover Replacement: 手順 14、 2の画像 1 HP Envy 17-3070NR Top Cover Replacement: 手順 14、 2の画像 2
    • Gently pull the white connector shown in the picture towards you to disconnect it from the system board.

  14. HP Envy 17-3070NR Top Cover Replacement: 手順 15、 1の画像 1
    • Gently pull the black connector towards you to disconnect the top cover from the main assembly.

    • Once both connectors are disconnected, lift the top cover off of the main assembly.

終わりに

To reassemble your device, follow these instructions in reverse order.

作成者

4人の作成者と共同で作成されました。

Jasper Lewin

メンバー登録日: 04/21/15

750 ポイント

6のガイドは作成済み

チーム

Cal Poly, Team 14-8, Amido Spring 2015 Cal Poly, Team 14-8, Amido Spring 2015人のメンバー

CPSU-AMIDO-S15S14G8

4 メンバー

12のガイドは作成済み

0 件のコメント

コメントを追加

統計データ:

過去 24時間: 0

過去 7 日: 2

過去 30 日: 4

今までの合計 1,675