メインコンテンツにスキップ

HP Elitebook 840 G1 Heatsink and Fan Replacement

必要な工具と部品

  1. HP Elitebook 840 G1 Heatsink and Fan Replacement, Battery: 手順 1、 1の画像 1
    • Working on your device while it is turned on may result in electric shock. Make sure to shut down and unplug your device before you begin.

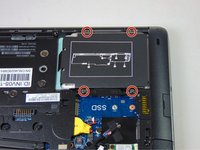
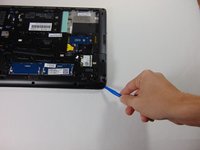
    • Slide the latch, to the right, away from the lock symbol.

    • Slide the cover away from the latch to remove it.

  2. HP Elitebook 840 G1 Heatsink and Fan Replacement: 手順 2、 1の画像 1
    • Once the cover is removed you will be able to see the battery and the two latches that hold it in place.

    • The two latches should be pulled back, one of which is spring loaded and must be held in place in order to remove the battery.

  3. HP Elitebook 840 G1 Heatsink and Fan Replacement: 手順 3、 1の画像 1
    • Battery should easily be lifted up and out.

  4. HP Elitebook 840 G1 Heatsink and Fan Replacement, RAM: 手順 4、 1の画像 1
    この手順で使用する道具:
    Anti-Static Wrist Strap
    $7.95
    購入する
    • Identify the RAM and the pull tabs that will be used in the next step.

    • Always use an anti-static wrist strap when working on a computer.

  5. HP Elitebook 840 G1 Heatsink and Fan Replacement: 手順 5、 1の画像 1
    • Pull back the two tabs on either side of the RAM this will allow the RAM to be removed.

    • When handling a memory module, use care to prevent touching the memory chips on the board. Touching the memory chips could damage or destroy the memory.

  6. HP Elitebook 840 G1 Heatsink and Fan Replacement: 手順 6、 1の画像 1
    • Pull the RAM stick gently out and up once the tabs have been pulled to the side.

  7. HP Elitebook 840 G1 Heatsink and Fan Replacement, Hard Drive: 手順 7、 2の画像 1 HP Elitebook 840 G1 Heatsink and Fan Replacement, Hard Drive: 手順 7、 2の画像 2
    • Loosen the four Phillips screws securing the hard drive.

    • These screws will stay captive to the plastic hard drive bracket.

  8. HP Elitebook 840 G1 Heatsink and Fan Replacement: 手順 8、 1の画像 1
    • Grab the pull tab on the hard drives plastic casing and pull it out and to the side.

    • Make sure all screws have been properly loosened and are no longer connected at the bottom before doing this step.

    • Remove the 2.5" hard drive from the plastic bracket.

  9. HP Elitebook 840 G1 Heatsink and Fan Replacement, Heatsink and Fan: 手順 9、 1の画像 1
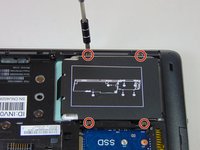
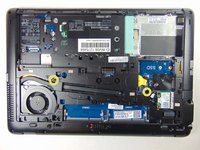
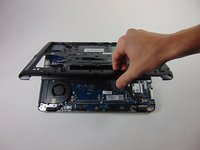
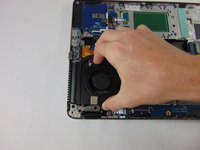
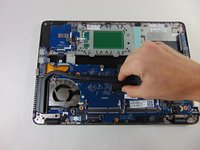
    • In order to take out the fan and heatsink the plastic cover must first be taken off.

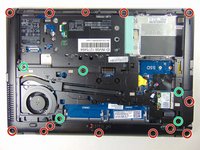
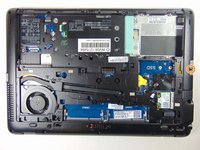
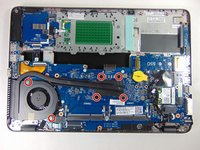
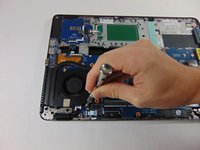
    • Remove the eight 2 mm Phillips #1 screws.

  10. HP Elitebook 840 G1 Heatsink and Fan Replacement: 手順 10、 1の画像 1
    • Remove SD card by sliding it out.

  11. HP Elitebook 840 G1 Heatsink and Fan Replacement: 手順 11、 3の画像 1 HP Elitebook 840 G1 Heatsink and Fan Replacement: 手順 11、 3の画像 2 HP Elitebook 840 G1 Heatsink and Fan Replacement: 手順 11、 3の画像 3
    • Remove the thirteen 6 mm Torx T8 screws.

    • Some screws have plastic covers over them that need to be pried out before the screws can be removed.

    • Remove the five Torx M2.5x5 screws.

    • Remove the single 7 mm Phillips #1 screw.

    • Loosen the two Phillips #1 screws. These screws will remain captive to the device.

  12. HP Elitebook 840 G1 Heatsink and Fan Replacement: 手順 12、 2の画像 1 HP Elitebook 840 G1 Heatsink and Fan Replacement: 手順 12、 2の画像 2
    • Using the plastic opening tools, remove the plastic cover by beginning at one of the corners and prying it up.

  13. HP Elitebook 840 G1 Heatsink and Fan Replacement: 手順 13、 2の画像 1 HP Elitebook 840 G1 Heatsink and Fan Replacement: 手順 13、 2の画像 2
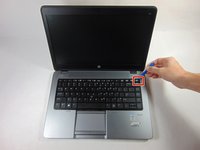
    • Use the plastic opening tools to remove the keyboard, starting at one of the top corners. You need to lift the top side and then takeing it out moving the keyboard towards the screen.

    • Once the keyboard is removed, detach the ribbons connecting the keyboard to the laptop by prying the small tab and sliding the ribbon out.

  14. HP Elitebook 840 G1 Heatsink and Fan Replacement: 手順 14、 2の画像 1 HP Elitebook 840 G1 Heatsink and Fan Replacement: 手順 14、 2の画像 2
    • Loosen the six Phillips #1 screws. These will remain captive to the heatsink.

  15. HP Elitebook 840 G1 Heatsink and Fan Replacement: 手順 15、 1の画像 1
    • Use the plastic opening tools to remove the tape covering the wires connected from the fan to the motherboard.

    • Disconnect the fan by sliding the wire out.

  16. HP Elitebook 840 G1 Heatsink and Fan Replacement: 手順 16、 2の画像 1 HP Elitebook 840 G1 Heatsink and Fan Replacement: 手順 16、 2の画像 2
    • Remove the fan by lifting it up and sliding it out.

    • Remove the heat sink by lifting it up and sliding it out.

終わりに

To reassemble your device, follow these instructions in reverse order.

16 の人々がこのガイドを完成させました。

作成者

7人の作成者と共同で作成されました。

Ashley Williams

メンバー登録日: 08/27/15

2,398 ポイント

5のガイドは作成済み

チーム

USF Tampa, Team 5-3, Blackwell Fall 2015 USF Tampa, Team 5-3, Blackwell Fall 2015人のメンバー

USFT-BLACKWELL-F15S5G3

4 メンバー

19のガイドは作成済み

4 件のコメント

Quality guide. Very logical. Thank you.

mediatrigg - 返信

perfectly done, thank you!

wayne evans - 返信

Do you need to remove the keyboard for replacing the tehmal paste?

Adam Grufík - 返信

You don’t need to remove the keyoard to replace the thermal paste :)

Brendan -

コメントを追加

統計データ:

過去 24時間: 3

過去 7 日: 28

過去 30 日: 122

今までの合計 24,592