メインコンテンツにスキップ

HP Elitebook 840 G1 Hard Drive Replacement

必要な工具と部品

  1. HP Elitebook 840 G1 Hard Drive Replacement, Battery: 手順 1、 1の画像 1
    • Working on your device while it is turned on may result in electric shock. Make sure to shut down and unplug your device before you begin.

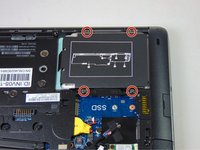
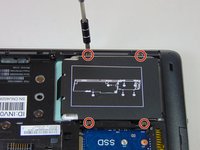
    • Slide the latch, to the right, away from the lock symbol.

    • Slide the cover away from the latch to remove it.

  2. HP Elitebook 840 G1 Hard Drive Replacement: 手順 2、 1の画像 1
    • Once the cover is removed you will be able to see the battery and the two latches that hold it in place.

    • The two latches should be pulled back, one of which is spring loaded and must be held in place in order to remove the battery.

  3. HP Elitebook 840 G1 Hard Drive Replacement: 手順 3、 1の画像 1
    • Battery should easily be lifted up and out.

  4. HP Elitebook 840 G1 Hard Drive Replacement, Hard Drive: 手順 4、 2の画像 1 HP Elitebook 840 G1 Hard Drive Replacement, Hard Drive: 手順 4、 2の画像 2
    • Loosen the four Phillips screws securing the hard drive.

    • These screws will stay captive to the plastic hard drive bracket.

  5. HP Elitebook 840 G1 Hard Drive Replacement: 手順 5、 1の画像 1
    • Grab the pull tab on the hard drives plastic casing and pull it out and to the side.

    • Make sure all screws have been properly loosened and are no longer connected at the bottom before doing this step.

    • Remove the 2.5" hard drive from the plastic bracket.

終わりに

To reassemble your device, follow these instructions in reverse order.

11 の人々がこのガイドを完成させました。

作成者

2人の作成者と共同で作成されました。

Ashley Williams

メンバー登録日: 08/27/15

2,398 ポイント

5のガイドは作成済み

チーム

USF Tampa, Team 5-3, Blackwell Fall 2015 USF Tampa, Team 5-3, Blackwell Fall 2015人のメンバー

USFT-BLACKWELL-F15S5G3

4 メンバー

19のガイドは作成済み

3 件のコメント

I'm surprised not to see a caution about removing the hard drive, but I guess generally I fixit users are pretty computer savvy!

cadegans - 返信

The NEW hard drive does NOT have any OP system.  How does that work now ?????

Frank Mraz - 返信

In case you're still looking for an answer:

-Create a bootable usb flash drive with your os of choice: Download rufus, get iso file of os, flash the iso to the usb drive via rufus. (Unfortunately need a pc for this part).

-Put usb drive to your notebook and turn it on.

-Most notebooks should automatically start from that usb drive. However if not: your notebook brand should have specific button for that (Eg.: ESC, F2). You can google that and find out… OR choose usb drive as first boot option in your BIOS.

PS: If windows asks for key on installation, skip that part and use Microsoft Toolkit to activate it later ;)

Eren Üstün -

コメントを追加

統計データ:

過去 24時間: 6

過去 7 日: 21

過去 30 日: 106

今までの合計 27,248