メインコンテンツにスキップ

HP EliteOne 800 G1 Power Supply Replacement

必要な工具と部品

  1. HP EliteOne 800 G1 Power Supply Replacement, Removing the Back Cover: 手順 1、 3の画像 1 HP EliteOne 800 G1 Power Supply Replacement, Removing the Back Cover: 手順 1、 3の画像 2 HP EliteOne 800 G1 Power Supply Replacement, Removing the Back Cover: 手順 1、 3の画像 3
    • Place computer with the screen down on a flat surface.

    • Push the two locking latches to the unlocked position.

    • Push the cover toward the top of the computer and lift up.

  2. HP EliteOne 800 G1 Power Supply Replacement, Removing Stand: 手順 2、 2の画像 1 HP EliteOne 800 G1 Power Supply Replacement, Removing Stand: 手順 2、 2の画像 2
    • Press locking latch on the bottom of the base of the stand.

    • Pull the plastic cover off of the stand.

  3. HP EliteOne 800 G1 Power Supply Replacement: 手順 3、 2の画像 1 HP EliteOne 800 G1 Power Supply Replacement: 手順 3、 2の画像 2
    • Use a Torx T15 driver and stick it through the holes on the stand in order to remove the two 12mm screws on the back of the main unit.

    • Tilt stand and lift up to remove it.

  4. HP EliteOne 800 G1 Power Supply Replacement: 手順 4、 2の画像 1 HP EliteOne 800 G1 Power Supply Replacement: 手順 4、 2の画像 2
    • Use a Torx T15 driver to remove the single 10mm screw on the back panel.

    • Pull the back panel toward the bottom of the device to remove it.

  5. HP EliteOne 800 G1 Power Supply Replacement, Power Supply: 手順 5、 2の画像 1 HP EliteOne 800 G1 Power Supply Replacement, Power Supply: 手順 5、 2の画像 2
    • Use a Torx T15 driver to remove the four 10mm screws on the VESA mount cover.

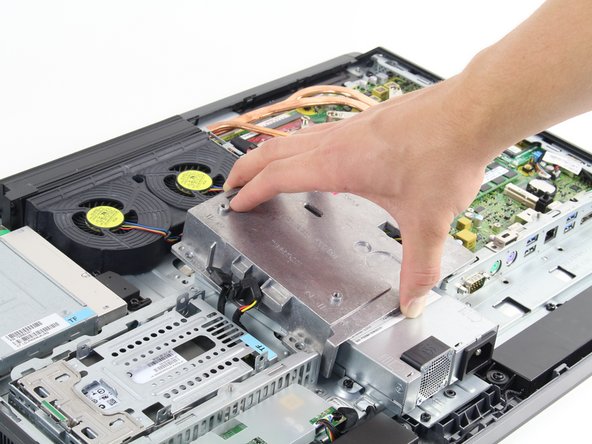
    • Lift up on the VESA mount cover to remove it.

  6. HP EliteOne 800 G1 Power Supply Replacement: 手順 6、 1の画像 1
    • Disconnect the power supply's black and yellow cable from the motherboard.

  7. HP EliteOne 800 G1 Power Supply Replacement: 手順 7、 2の画像 1 HP EliteOne 800 G1 Power Supply Replacement: 手順 7、 2の画像 2
    • Use a Torx T15 driver to remove the two 8mm screws on either side of the power supply.

    • Lift the power supply from the case to remove it.

終わりに

To reassemble your device, follow these instructions in reverse order.

6 の人々がこのガイドを完成させました。

作成者

3人の作成者と共同で作成されました。

Michael Ewing

メンバー登録日: 10/01/15

1,071 ポイント

4のガイドは作成済み

チーム

Cal Poly, Team 1-24, Maness Fall 2015 Cal Poly, Team 1-24, Maness Fall 2015人のメンバー

CPSU-MANESS-F15S1G24

4 メンバー

14のガイドは作成済み

0 件のコメント

コメントを追加

統計データ:

過去 24時間: 0

過去 7 日: 10

過去 30 日: 52

今までの合計 5,302